
Note: This documentation covers both the Free and Pro versions of FundCollector. FundCollector Pro requires the Free version to be installed and kept active at all times. Sections that apply only to Pro are marked with PRO.
Payment Methods
Navigate to FundCollector → Settings → Payment Methods. The Setup Wizard can configure the basic PayPal and Mollie settings; this page explains every payment method and its advanced options.
FundCollector Free supports PayPal, including PayPal wallet, credit card, and debit card payments through PayPal, plus Bank Transfer. FundCollector Pro adds Mollie PRO. Each available method can be enabled independently or together. There are no FundCollector platform fees; payment providers apply their own processing fees.
Recurring donations are available in FundCollector Pro through PayPal and Mollie PRO. Donors can choose monthly or annual donations. Mollie is available to eligible organizations based in Europe; PayPal recurring donations are available wherever PayPal Checkout supports them.
PayPal Settings
FundCollector Free uses the PayPal settings shown below.
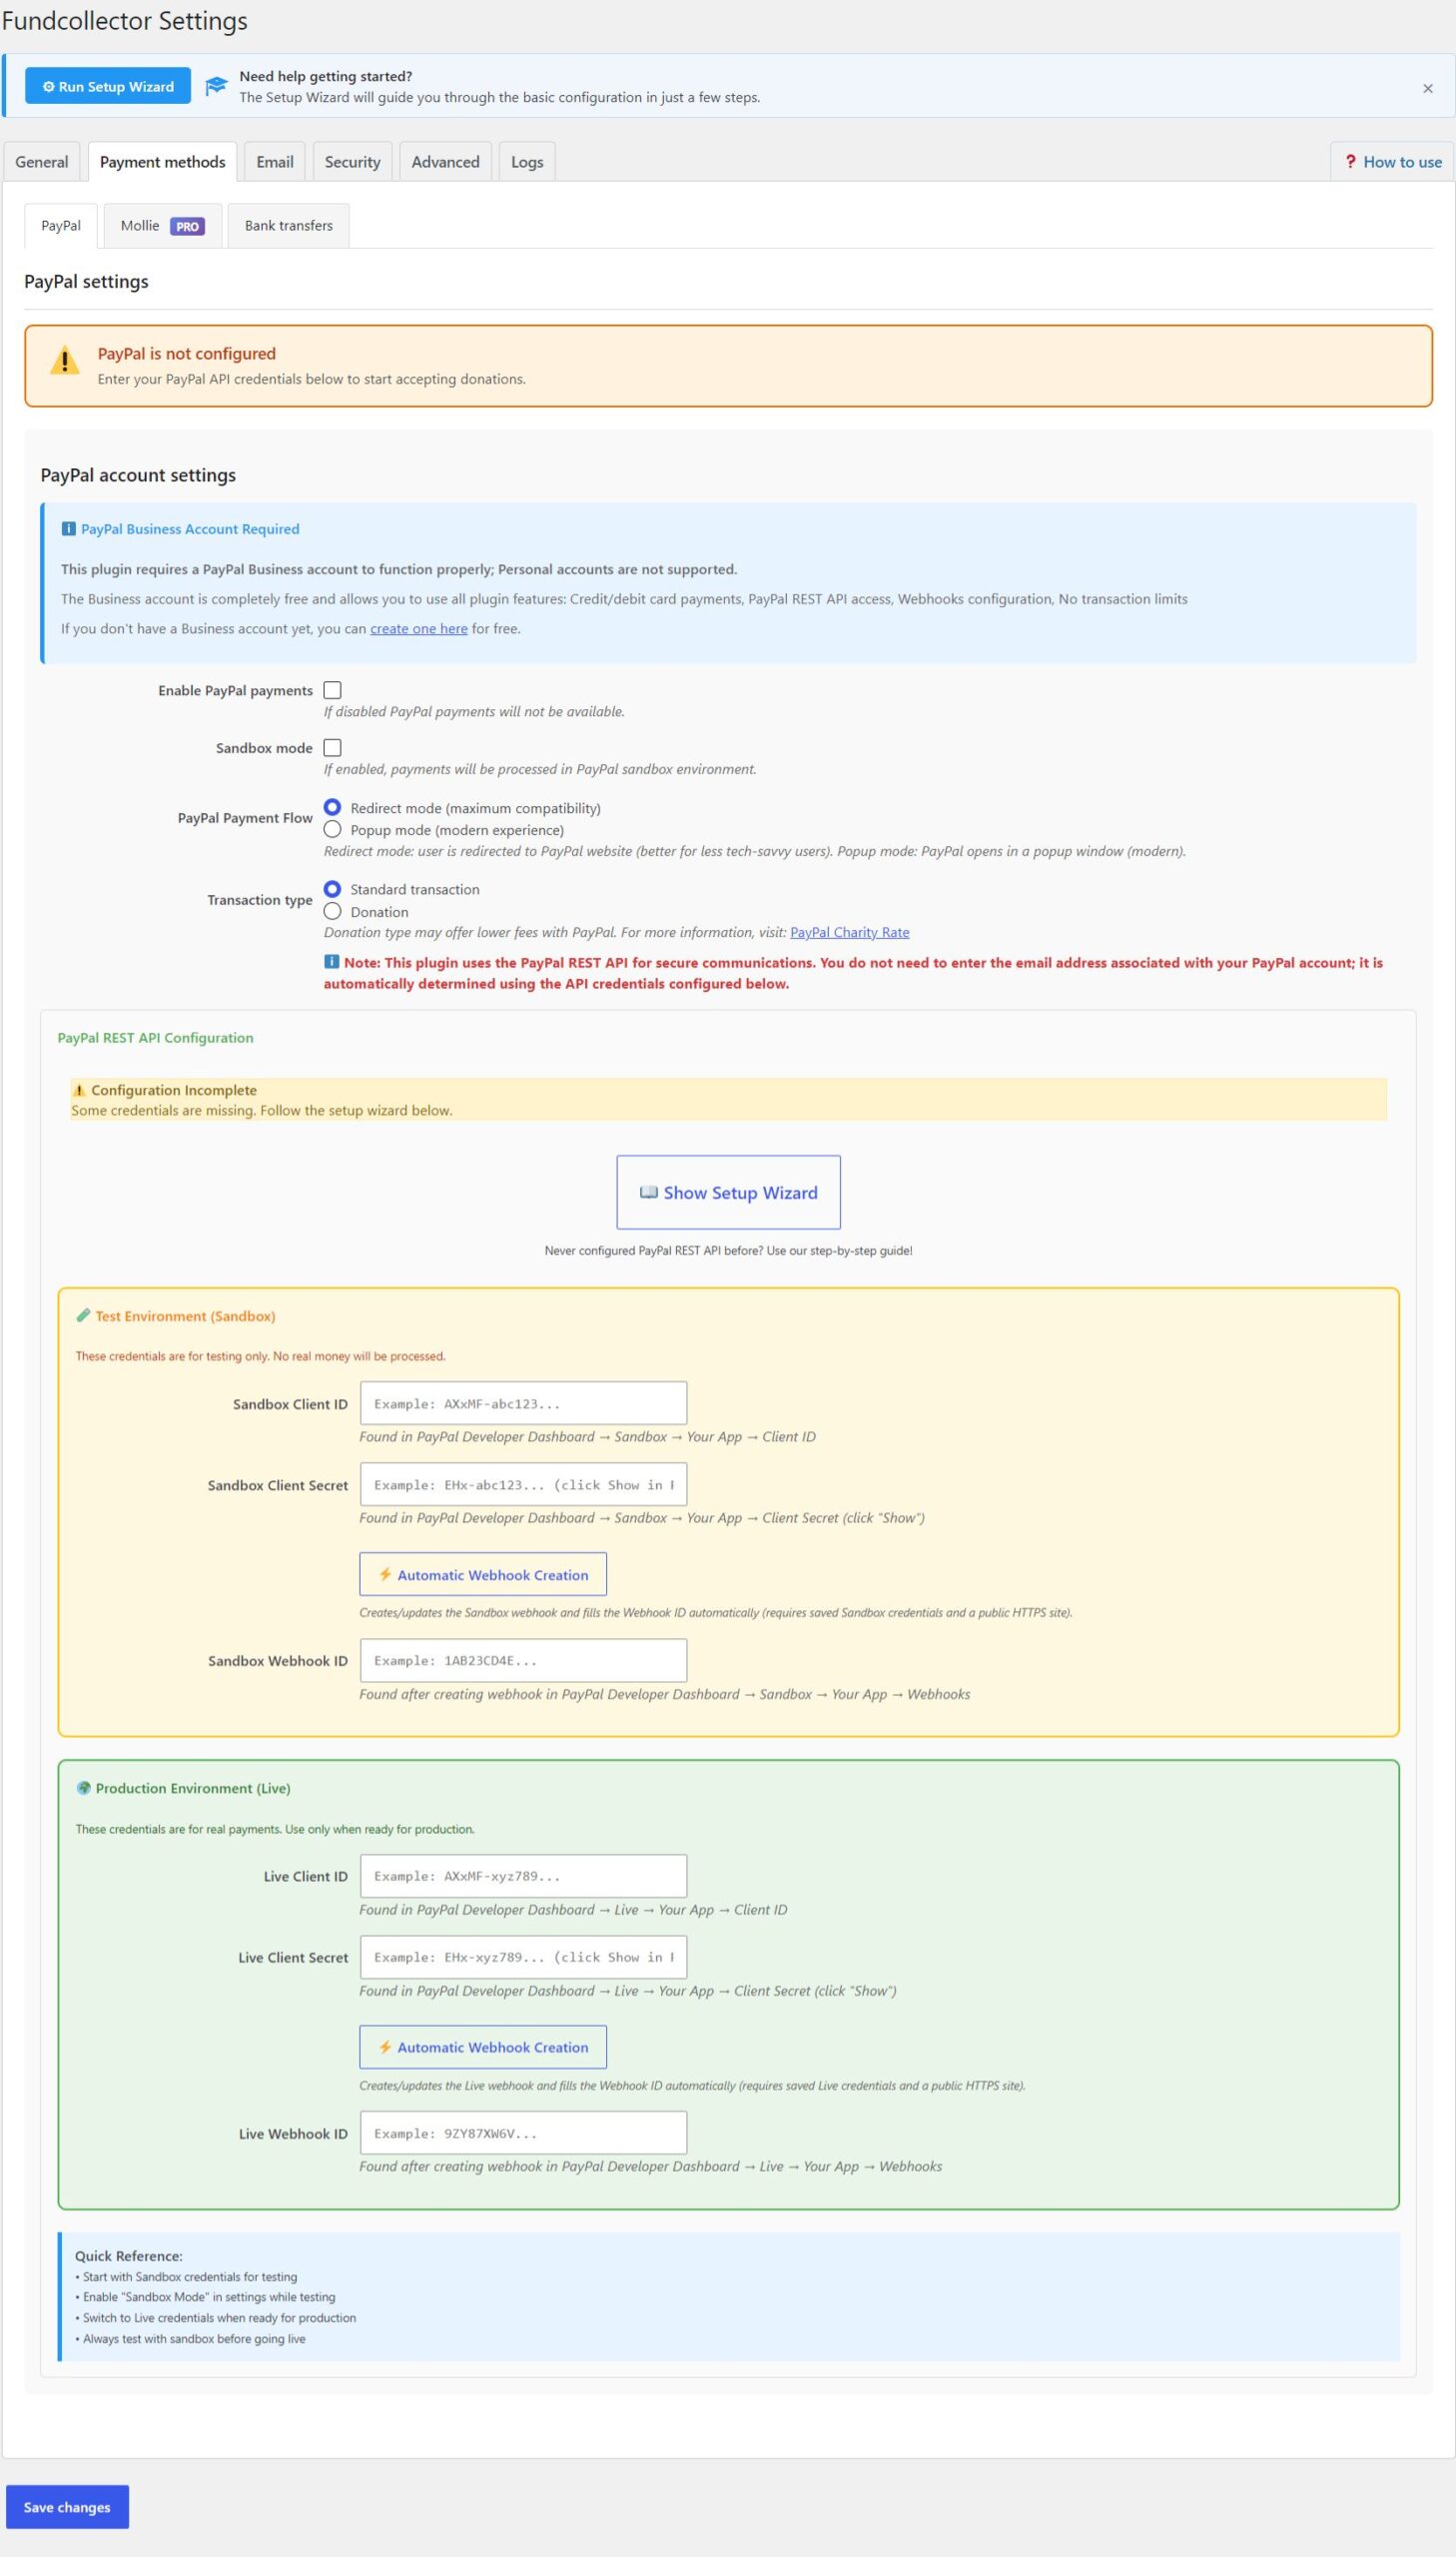
The complete PayPal screen in FundCollector Pro includes recurring donation controls. PRO
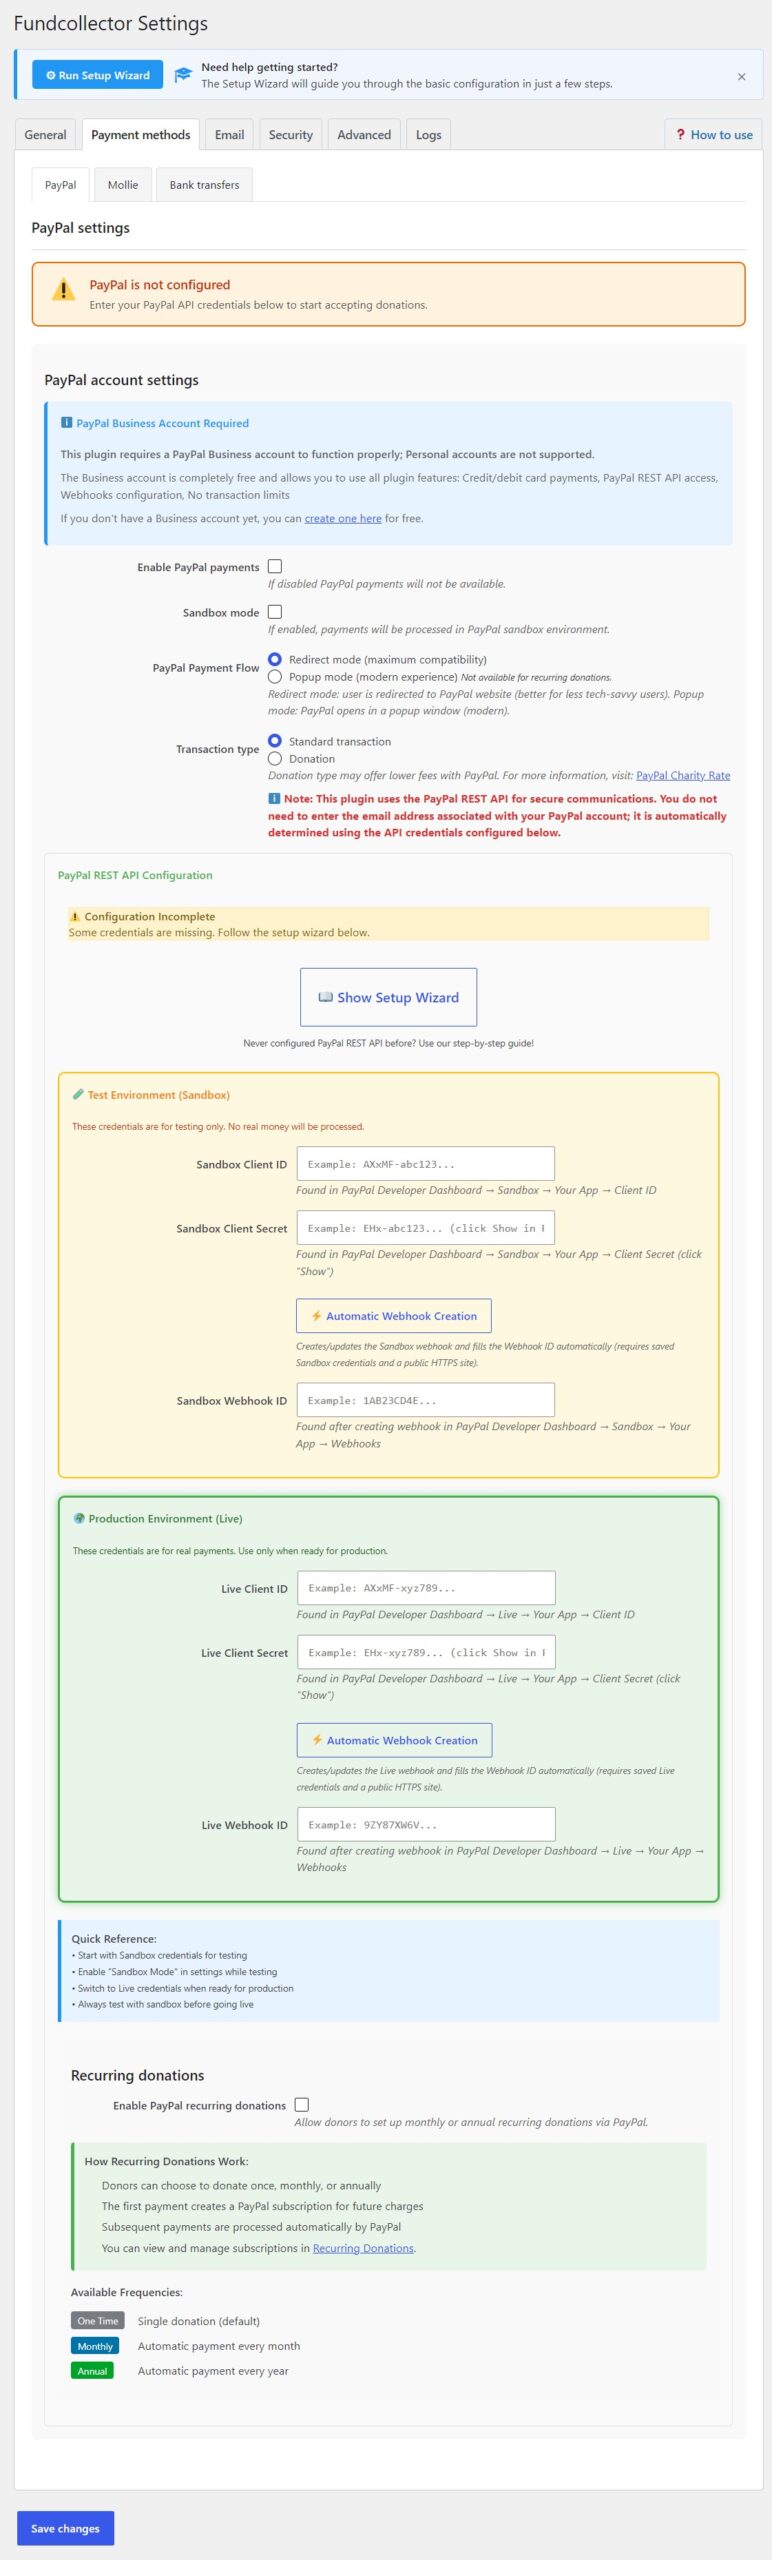
Info before you start
- PayPal Business account – FundCollector does not support PayPal Personal accounts. A Business account is completely free and allows you to use all the plugin’s features: credit and debit card payments, access to the PayPal REST API, webhook configuration, and no transaction limits. You can create a Business account on PayPal.
- You do not need to type your PayPal email in FundCollector. The REST API identifies your account from the Client ID and Secret you configure.
- HTTPS on production – Use a valid SSL certificate on your live site before accepting real payments.
- Currency – Set your base currency under FundCollector → Settings → General so it matches what your PayPal account and payment methods support.
PayPal account settings
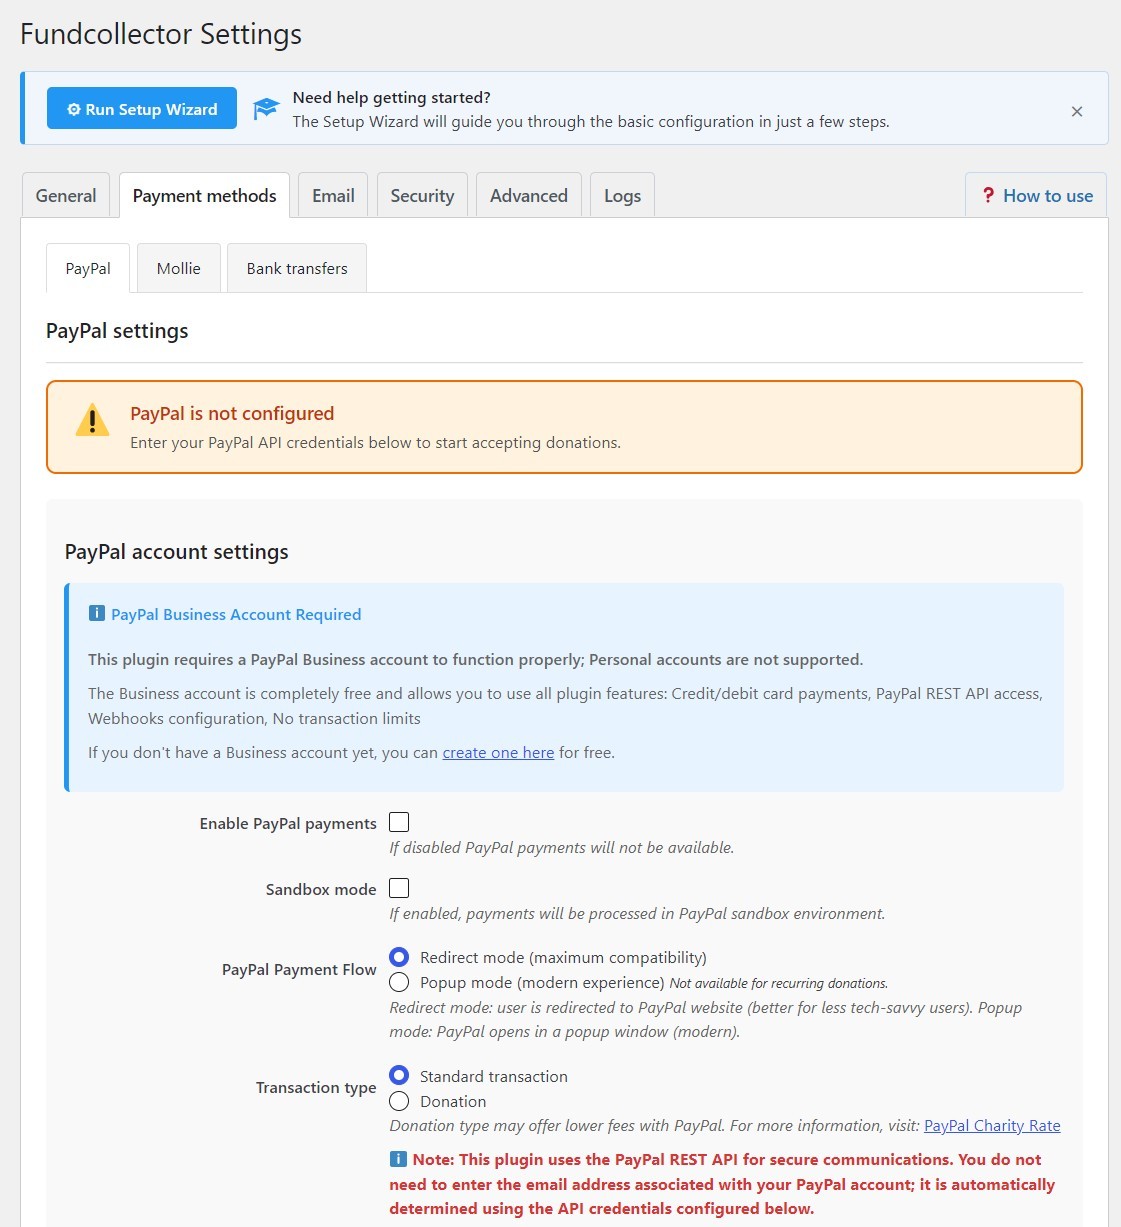
Enable PayPal payments
Turn this on to show PayPal as a payment option on your donation forms. If it is off, donors will not see PayPal even if API credentials are saved.
Sandbox mode
When enabled, FundCollector talks to PayPal’s test (sandbox) environment. No real money moves. Use Sandbox to verify that everything works before accepting real payments.
To use Sandbox mode, enter Sandbox Client ID, Sandbox Client Secret, and Sandbox Webhook ID in the Test Environment section. Before going live, disable Sandbox mode and ensure that the Live credentials are filled in.
PayPal payment flow
- Redirect mode (maximum compatibility) – The donor leaves your site briefly to pay on PayPal, then returns. This is best for older browsers and users who block pop-ups.
- Popup mode (modern experience) – PayPal opens in a popup over your page. This is smoother for many users and requires pop-ups to be allowed for your domain.
Transaction type
- Standard transaction – Regular commerce-style capture.
- Donation – Eligible organizations may qualify for lower PayPal fees or rates. See PayPal’s Charity rate documentation for eligibility and application details.
PayPal REST API configuration
FundCollector needs three values for each environment, Sandbox for testing and Live for production: Client ID, Client Secret, and Webhook ID.
On the PayPal settings screen you will also see:
- Show Setup Wizard – an in-page checklist that walks through the Developer Dashboard steps described below.
- A configuration status banner, either Configuration Complete or Configuration Incomplete, which reflects whether the required credentials for the active mode are filled in.
- Automatic Webhook Creation – the recommended way to create the webhook and fill the Webhook ID.
Recommended path: Automatic Webhook Creation
The Free payment settings include the Automatic Webhook Creation button shown here.
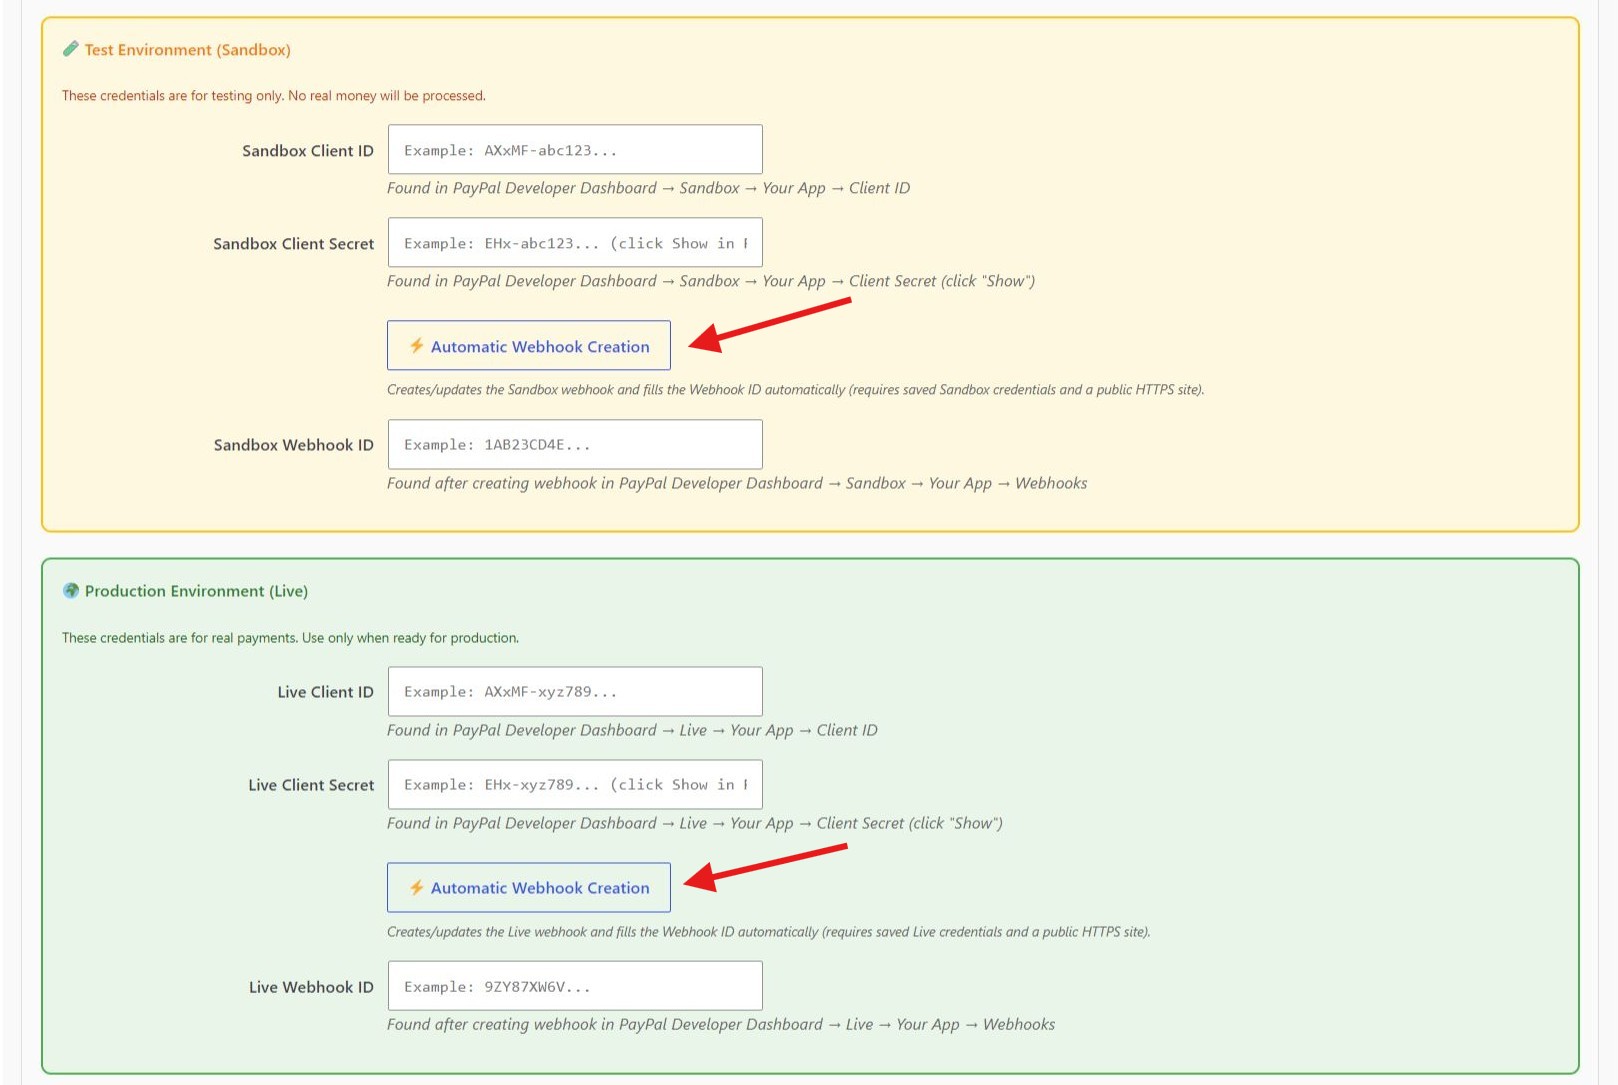
FundCollector Pro shows separate Automatic Webhook Creation controls for Sandbox and Live. PRO
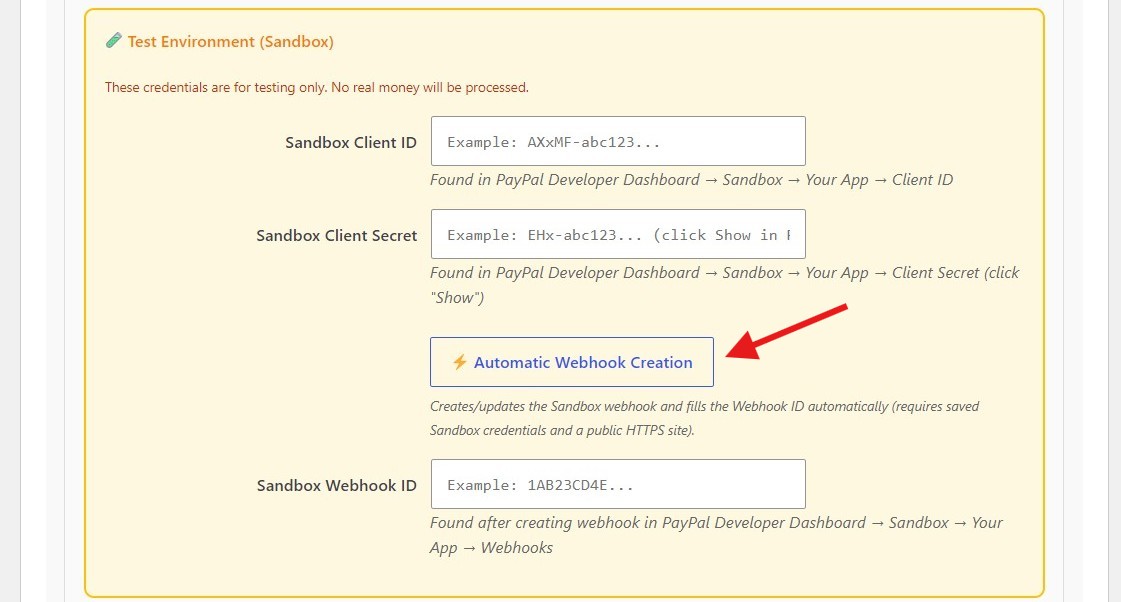
After you have a PayPal REST app and have copied the Client ID and Client Secret, you usually do not need to create the webhook by hand in the PayPal dashboard.
- Paste the Client ID and Client Secret into the matching environment box, either Test Environment (Sandbox) or Production Environment (Live).
- Click Automatic Webhook Creation in that same box and confirm when prompted.
- FundCollector calls the PayPal API, creates the webhook or links an existing one that already points to your site, subscribes to the required events, and fills the Webhook ID field.
- Click Save changes at the bottom of Settings.
Requirements for Automatic Webhook Creation:
- Valid Client ID and Client Secret for that environment. You can enter them in the form before saving because the button reads the current field values.
- A public HTTPS site that PayPal can reach. Localhost, private IPs, and sites blocked from the internet will fail.
- Use the Sandbox button with Sandbox credentials and the Live button with Live credentials.
If PayPal already has a webhook for your FundCollector URL, the plugin links that webhook ID instead of creating a duplicate. In that case, open the PayPal Developer Dashboard and confirm that the required event types are enabled. If automatic creation fails because credentials are incorrect, the site is unreachable, or PayPal returns an API error, use the manual steps below or check FundCollector → Settings → Logs.
Manual path: Show Setup Wizard checklist
Click Show Setup Wizard on the PayPal REST API panel for a step-by-step checklist inside WordPress. This detailed PayPal checklist complements the main Setup Wizard and can be used as a printable guide.
Step 1 – Open the PayPal Developer Dashboard
- Go to developer.paypal.com/developer/applications/.
- Sign in with your PayPal Business account.
- Open My Apps & Credentials.
Step 2 – Create a Sandbox app (testing)
- In the Sandbox section, click Create App.
- Name the app, for example
Fundcollector Sandbox. - Select your sandbox business (merchant) account.
- Under features, enable Accept payments.
- Critical: enable JavaScript SDK v6. FundCollector relies on it for a secure, compatible checkout flow.
- For recurring card donations in Pro, enable Save payment methods (Vault API). PRO
- Save the app.
Step 3 – Copy Sandbox credentials
- Open your new Sandbox app.
- Copy the Client ID.
- Click Show next to Client Secret and copy it.
- Paste both values into Sandbox Client ID and Sandbox Client Secret in FundCollector.
- Click Automatic Webhook Creation for Sandbox, then Save changes. Skip the next step unless automatic creation is unavailable for your site.
Step 4 – Create the Sandbox webhook manually (optional fallback)
Webhooks let PayPal notify your site when an order is approved or completed and when a payment capture completes, fails, or is pending. Without a webhook and its ID in settings, status updates may be delayed or incomplete.
- On the same app page, scroll to Webhooks.
- Click Add Webhook.
- Webhook URL – use this URL on your public WordPress site, replacing
YOUR-DOMAINwith your site hostname and without a trailing slash:https://YOUR-DOMAIN/wp-admin/admin-post.php?action=fundcollector_paypal_webhook_rest - Event types – subscribe to all of the following:
CHECKOUT.ORDER.APPROVEDCHECKOUT.ORDER.COMPLETEDPAYMENT.CAPTURE.COMPLETEDPAYMENT.CAPTURE.DENIEDPAYMENT.CAPTURE.PENDING
- Save the webhook, copy the Webhook ID from PayPal, and paste it into Sandbox Webhook ID in FundCollector.
- Click Save changes in FundCollector.
In Pro, the Live REST API panel has its own Automatic Webhook Creation control. PRO
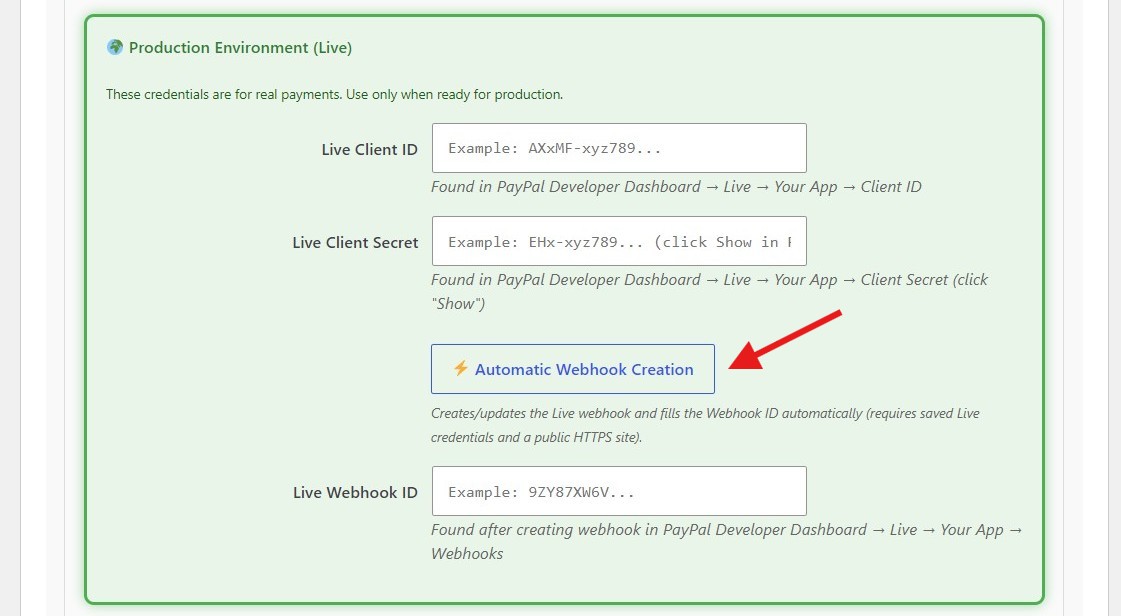
Step 5 – Repeat for Live (production)
- In the Developer Dashboard, switch to the Live section, not Sandbox.
- Create a Live app, for example
Fundcollector Live, with Accept payments and JavaScript SDK v6 enabled. - For recurring card donations in Pro, also enable Save payment methods (Vault API). PRO
- Copy the Live Client ID and Live Client Secret into the Production Environment section in FundCollector.
- Click Automatic Webhook Creation for Live, then Save changes. Alternatively, add a Live webhook manually with the same URL pattern and event types above, then enter the Live Webhook ID.
- When you are ready for real donations, turn off Sandbox mode.
Quick reference checklist
- Start with Sandbox credentials and Sandbox mode enabled.
- Confirm that Enable PayPal payments is on.
- Prefer Automatic Webhook Creation when your site is publicly reachable over HTTPS.
- The webhook URL must be reachable from the public internet. Localhost will not work for PayPal webhooks.
- After changing credentials or webhooks, run a test donation and verify it appears in FundCollector → Donations list with the expected status.
- Before launch, disable Sandbox mode, verify JavaScript SDK v6 is enabled on the Live app, and keep Live secrets confidential.
PayPal recurring donations PRO
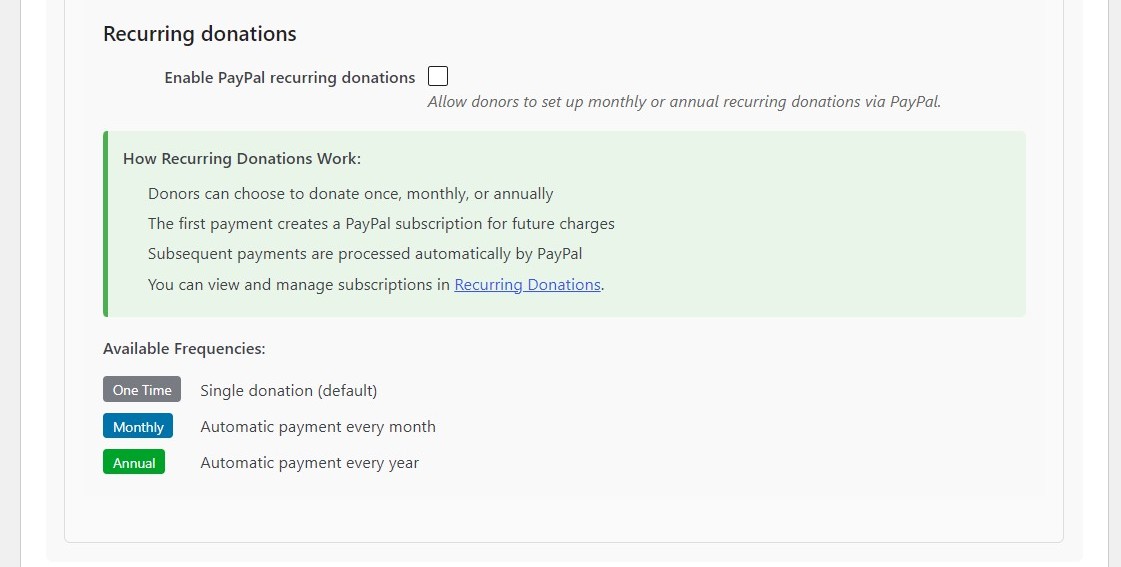
FundCollector Pro can process recurring monthly or annual donations through PayPal, so organizations outside Europe can offer recurring donations without a Mollie account.
- Open FundCollector → Settings → Payment Methods → PayPal and enable PayPal recurring donations in the Recurring donations section.
- Enable Save payment methods (Vault API) on both your Sandbox and Live PayPal apps. Without it, recurring card donations fail with an authorization error.
- Click Save changes and test the recurring flow in Sandbox before accepting live donations.
How it works: the donor chooses Monthly or Annual on the donation form. FundCollector creates a dedicated PayPal billing plan using the donation amount, and PayPal charges the donor automatically on the scheduled date. Depending on the donor’s PayPal account, the first payment may activate immediately with a vaulted card or require a one-time PayPal approval redirect. This is normal PayPal behaviour.
Manage active PayPal and Mollie subscriptions together from FundCollector → Recurring Donations. See Donations Management. If a PayPal subscription fails to be created, ask the donor to start a new recurring donation. PayPal subscriptions cannot be retried from the admin.
Mollie Settings PRO
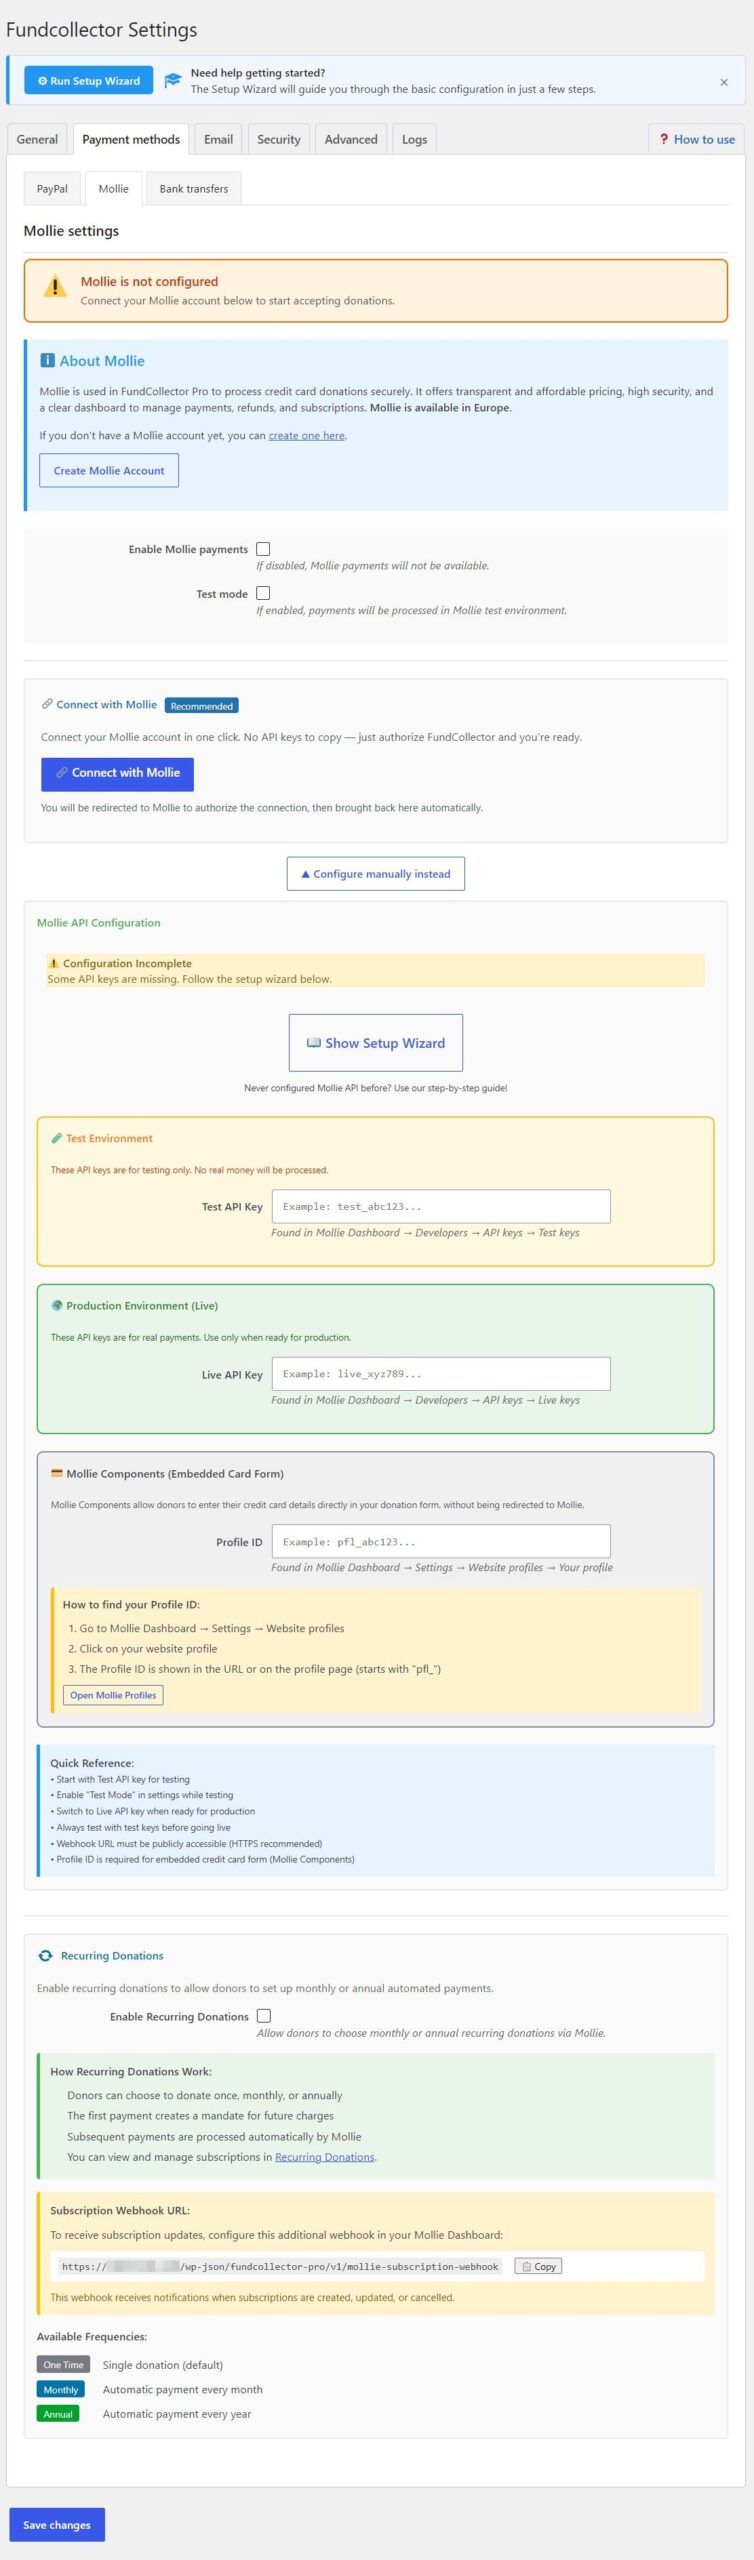
Mollie is a payment gateway for eligible organizations based in Europe. FundCollector Pro supports Mollie for one-time and recurring donations.
About Mollie
Mollie offers transparent pricing, high security standards, and a dashboard to manage payments, refunds, and subscriptions. Mollie requires a merchant account and accepts eligible businesses and organizations based in Europe. If your organization is outside Europe, use a PayPal Business account for one-time credit and debit card donations in FundCollector Free or Pro, and for recurring donations in Pro where PayPal Checkout supports them. If you do not have a Mollie account yet, create one here.
Recommended: Connect with Mollie PRO
Mollie Connect is the fastest way to link your Mollie account. You do not need to find and copy API keys manually.
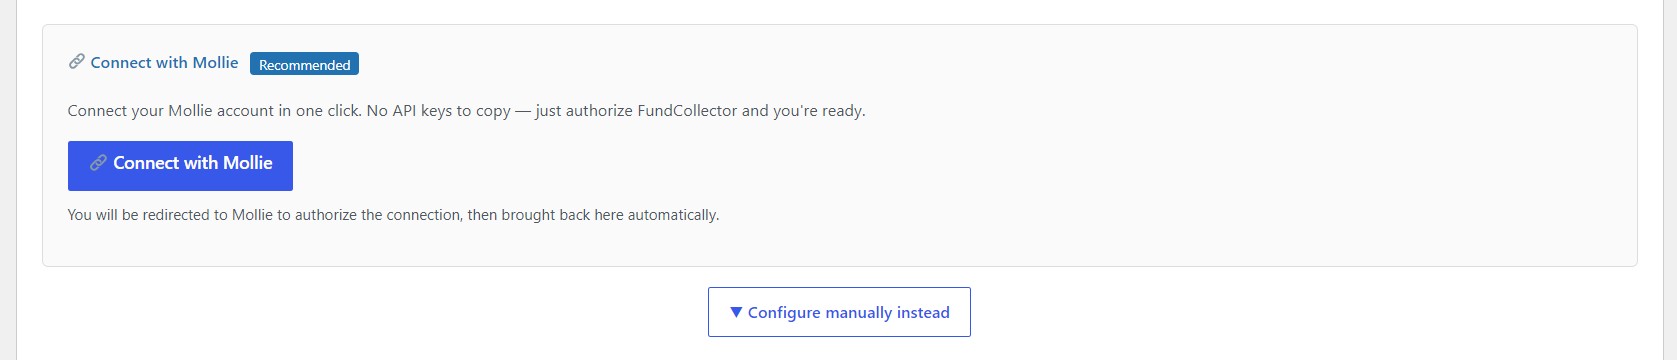
- Click Connect with Mollie on the Mollie settings tab.
- You are redirected to Mollie to log in and authorize FundCollector for your organization.
- After authorizing, you are redirected back to your site. A green banner confirms that Mollie is connected and ready and shows your organization name.
Once connected, FundCollector refreshes the access token in the background every 15 minutes, well before it expires. If a refresh fails and remains broken for more than one hour, FundCollector shows a dashboard notice and emails the site administrator with a link back to Mollie settings. A confirmation email follows when the connection recovers. You can disconnect at any time, reconnect, or switch to manual API keys.
If Mollie Connect is unavailable on your site, or you prefer to manage your own credentials, use the manual path below.
Separate Mollie checklist: the Mollie tab also includes a Show Setup Wizard button. It opens a five-step in-page checklist covering the Mollie Dashboard, test API key and webhook, then Live API key and webhook. It is separate from the main Setup Wizard.
Manual alternative: API keys PRO
Step 1: Enable Mollie
- Navigate to FundCollector → Settings → Payment Methods → Mollie.
- Enable Mollie payments.
Step 2: Configure Test Mode
- Enable Test mode to process payments in the Mollie test environment.
- Use Test mode during setup and development to avoid real charges.
- Disable Test mode when you are ready to go live.
Mollie API keys
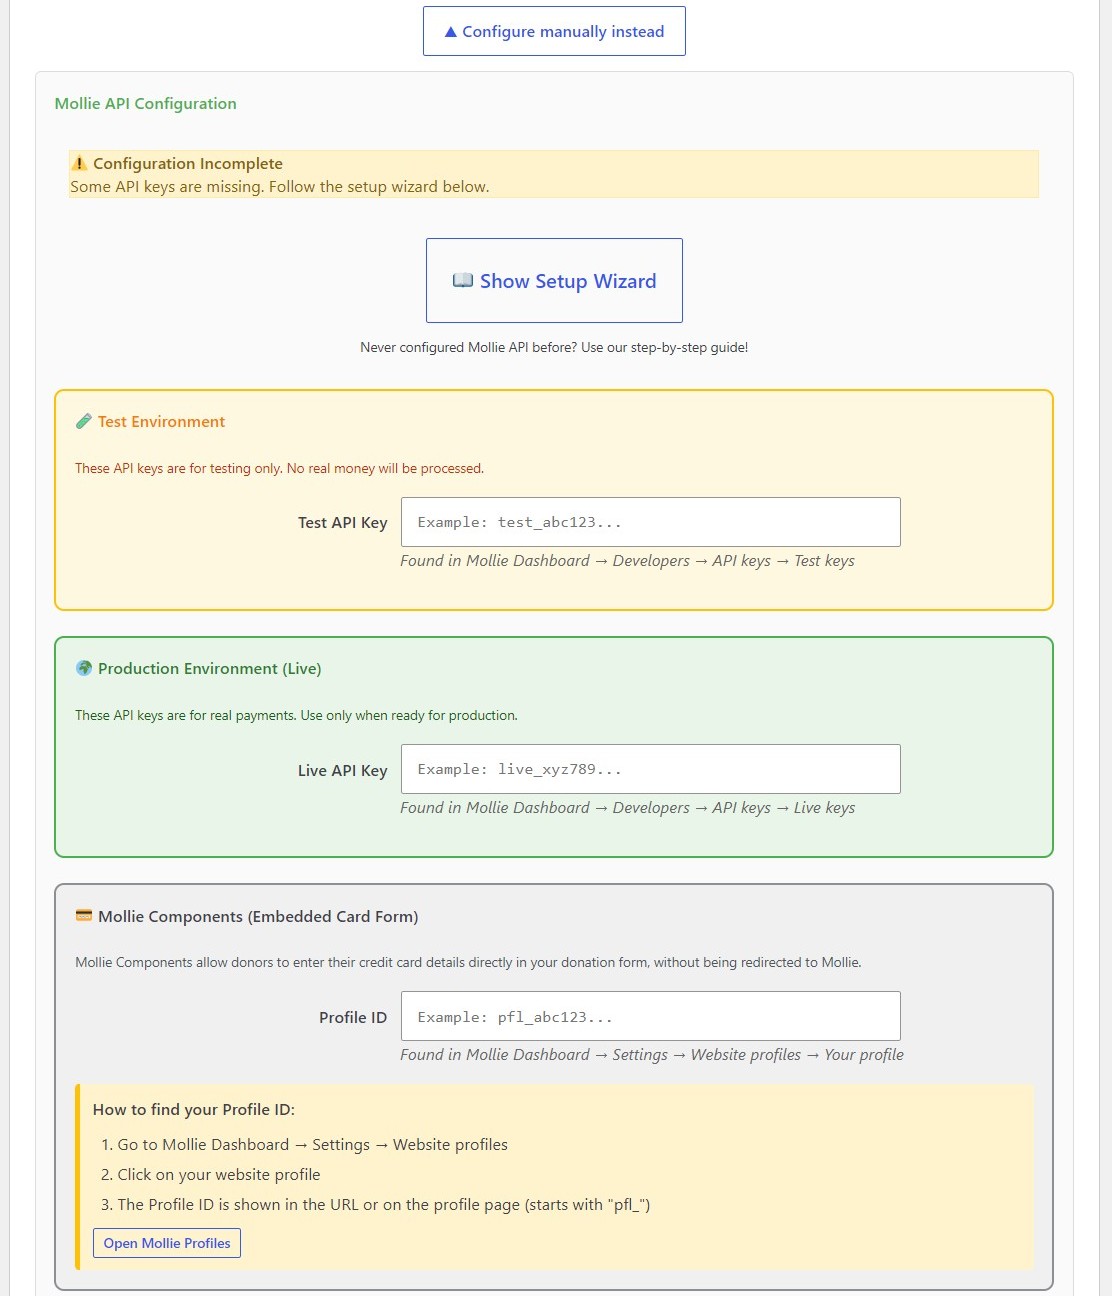
When Test mode is enabled, FundCollector uses Mollie’s test environment. No real money is charged and no live payouts are made. Enter the Test API key, which starts with test_, and the Profile ID. Copy the Test API key from Mollie Dashboard → Developers → API keys.
The Profile ID identifies your website profile in Mollie and is required for the embedded credit card form, Mollie Components. Find it in Mollie Dashboard → Settings → Website profiles by opening your profile and using the ID shown in the URL or on the profile page. It starts with pfl_. The Profile ID is the same for Test and Live; only the API key changes.
Use only Mollie’s test payment methods and test cards while Test mode is enabled. Before going live, turn Test mode off and enter the Live API key, which starts with live_, from Developers → API keys. Keep the Profile ID filled in and confirm that webhooks and return URLs match your production site URL.
Getting your API keys
- Log in to your Mollie Dashboard.
- Navigate to Developers → API keys.
- Copy your Test API key, starting with
test_, for sandbox testing. - Copy your Live API key, starting with
live_, for production.
Getting your Profile ID
- In your Mollie Dashboard, navigate to Settings → Website profiles.
- Select or create a profile for your website.
- Copy the Profile ID, with the format
pfl_xxxxxxxxxx. - The Profile ID is required for the embedded card form, Mollie Components.
Entering your credentials
- Test API key: enter your Mollie test API key when Test mode is enabled.
- Live API key: enter your Mollie live API key for production.
- Profile ID: enter your Mollie website profile ID for card payments.
Security note: FundCollector encrypts all API keys before storing them in the database.
Recurring donations with Mollie PRO
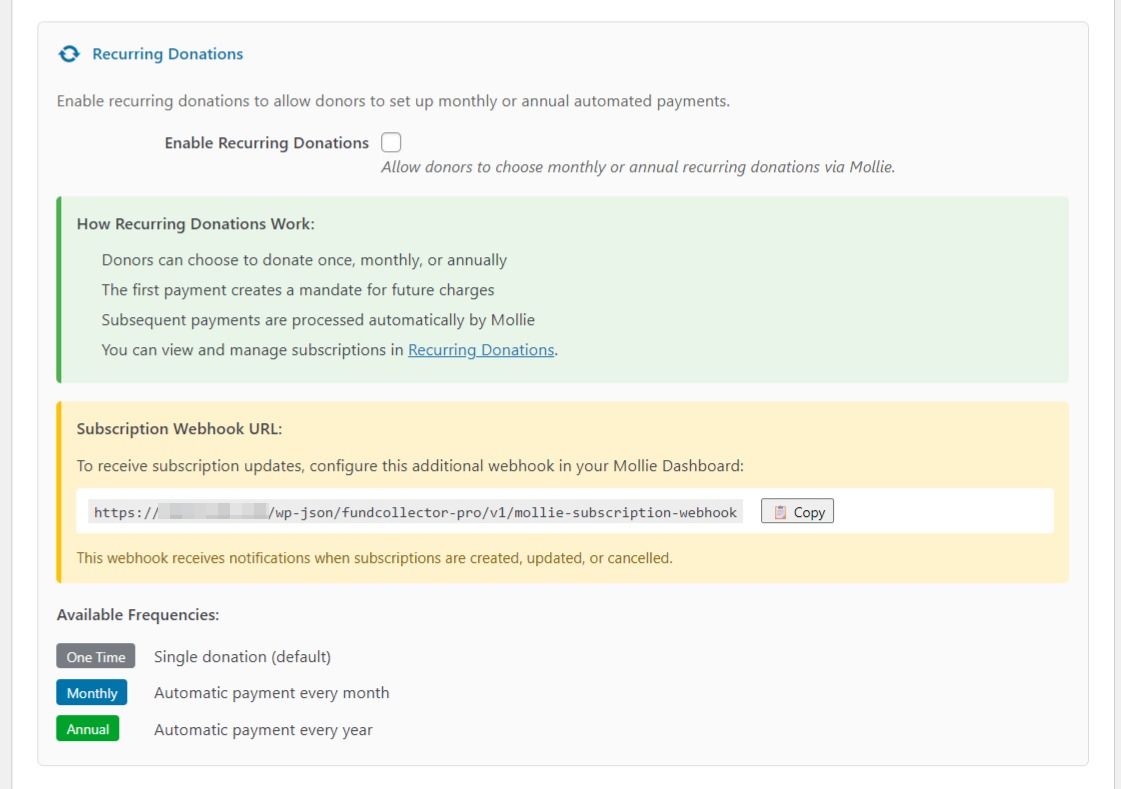
Recurring donations let donors set up automatic monthly or annual payments. FundCollector Pro supports recurring donations through both Mollie and PayPal.
Enabling recurring donations
- Ensure Mollie is enabled and configured with valid API keys or Mollie Connect.
- Enable recurring donations in the Mollie settings.
- Save your settings.
- Recurring donation options will appear on your donation forms.
How recurring donations work
- The donor selects monthly or annual frequency on the donation form.
- The first payment is processed immediately through Mollie.
- Mollie automatically charges subsequent payments on the scheduled date.
- Donors can cancel their subscription at any time, or you can cancel it from the admin.
- All recurring payments appear in the Donations List with their subscription reference.
Mollie account requirements for recurring donations
- Your Mollie account must have recurring payments enabled.
- Contact Mollie support if recurring payments are not available in your account.
- Recurring payments require a verified Mollie account.
Mollie Subscription Webhook URL
Recurring donations rely on Mollie subscriptions, which can change when a subscription is updated or cancelled. The Subscription Webhook URL is the endpoint where Mollie sends subscription-level events. It lets FundCollector keep the Recurring Donations list in sync with Mollie, including status, next payment date, cancellations, and related updates.
This webhook is separate from ordinary payment webhooks. Add it as an additional webhook in your Mollie account. In WordPress, open FundCollector → Settings → Payment Methods → Mollie, find Subscription Webhook URL, and copy the full URL. In the Mollie Dashboard, go to Developers → Webhooks, create a new webhook, paste the URL, and save it. Add it for both Test and Live environments if you use both. Your site must use HTTPS and allow POST requests to /wp-json/ so Mollie can reach the endpoint.
Bank Transfer Settings
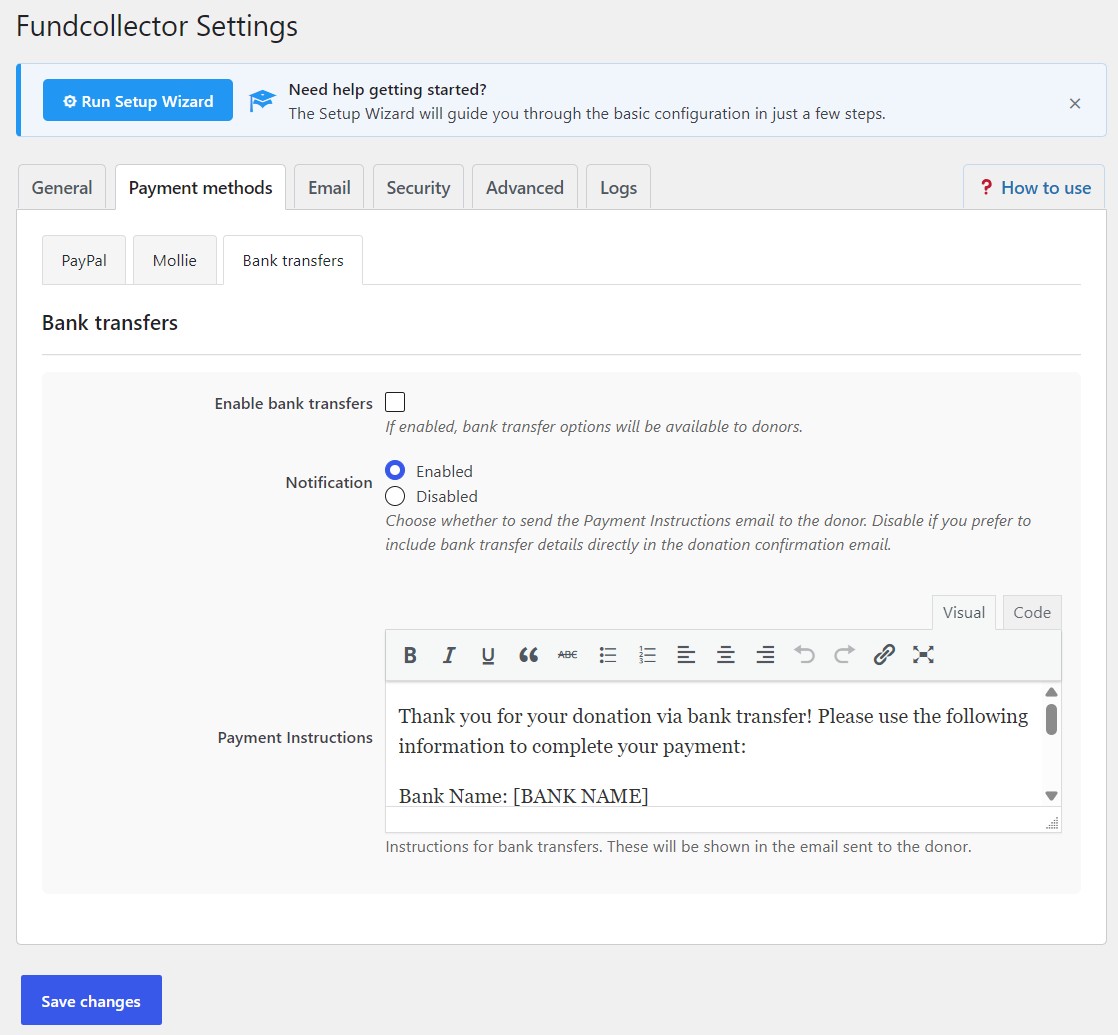
Bank Transfer provides an alternative payment method for donors who prefer traditional banking.
Enable Bank Transfer
Enable this option to show Bank Transfer on your donation forms.
Notification
Choose whether to send an email to donors who select Bank Transfer. This email contains the bank account details needed to complete the transfer. You can disable this email and include the bank details in the donation confirmation email described in the Email Notifications guide.
Bank Transfer Instructions
Customize the message donors receive with your banking details. It appears:
- On the website after the donor selects Bank Transfer.
- In the confirmation email sent to the donor.
Template placeholders: use these dynamic tags in your instructions:
{donor_name}– donor’s full name.{donor_email}– donor’s email address.{donation_amount}– amount to transfer.{donation_id}– unique reference number.{form_name}– name of the donation form used.
Example Bank Transfer Instructions:
Thank you for your donation via bank transfer!

Please transfer {donation_amount} to the following account:

Bank Name: First National Bank
Account Holder: Your Organization Name
IBAN: GB29 NWBK 6016 1331 9268 19
SWIFT/BIC: NWBKGB2L
Reference: {donation_id}

Please use the donation ID as your payment reference so we can match your payment.

Your donation reference: {donation_id}

Thank you for your generous support!
Important notes:
- Bank Transfer donations are marked with the Manual check status.
- You must manually verify payments in your bank account. FundCollector cannot access bank account information to verify whether a payment was completed.
- Consider sending a final confirmation email after verifying the payment.