
Note: This documentation covers both the Free and Pro versions of FundCollector. FundCollector Pro requires the Free version to be installed and kept active at all times. Sections that apply only to Pro are marked with PRO.
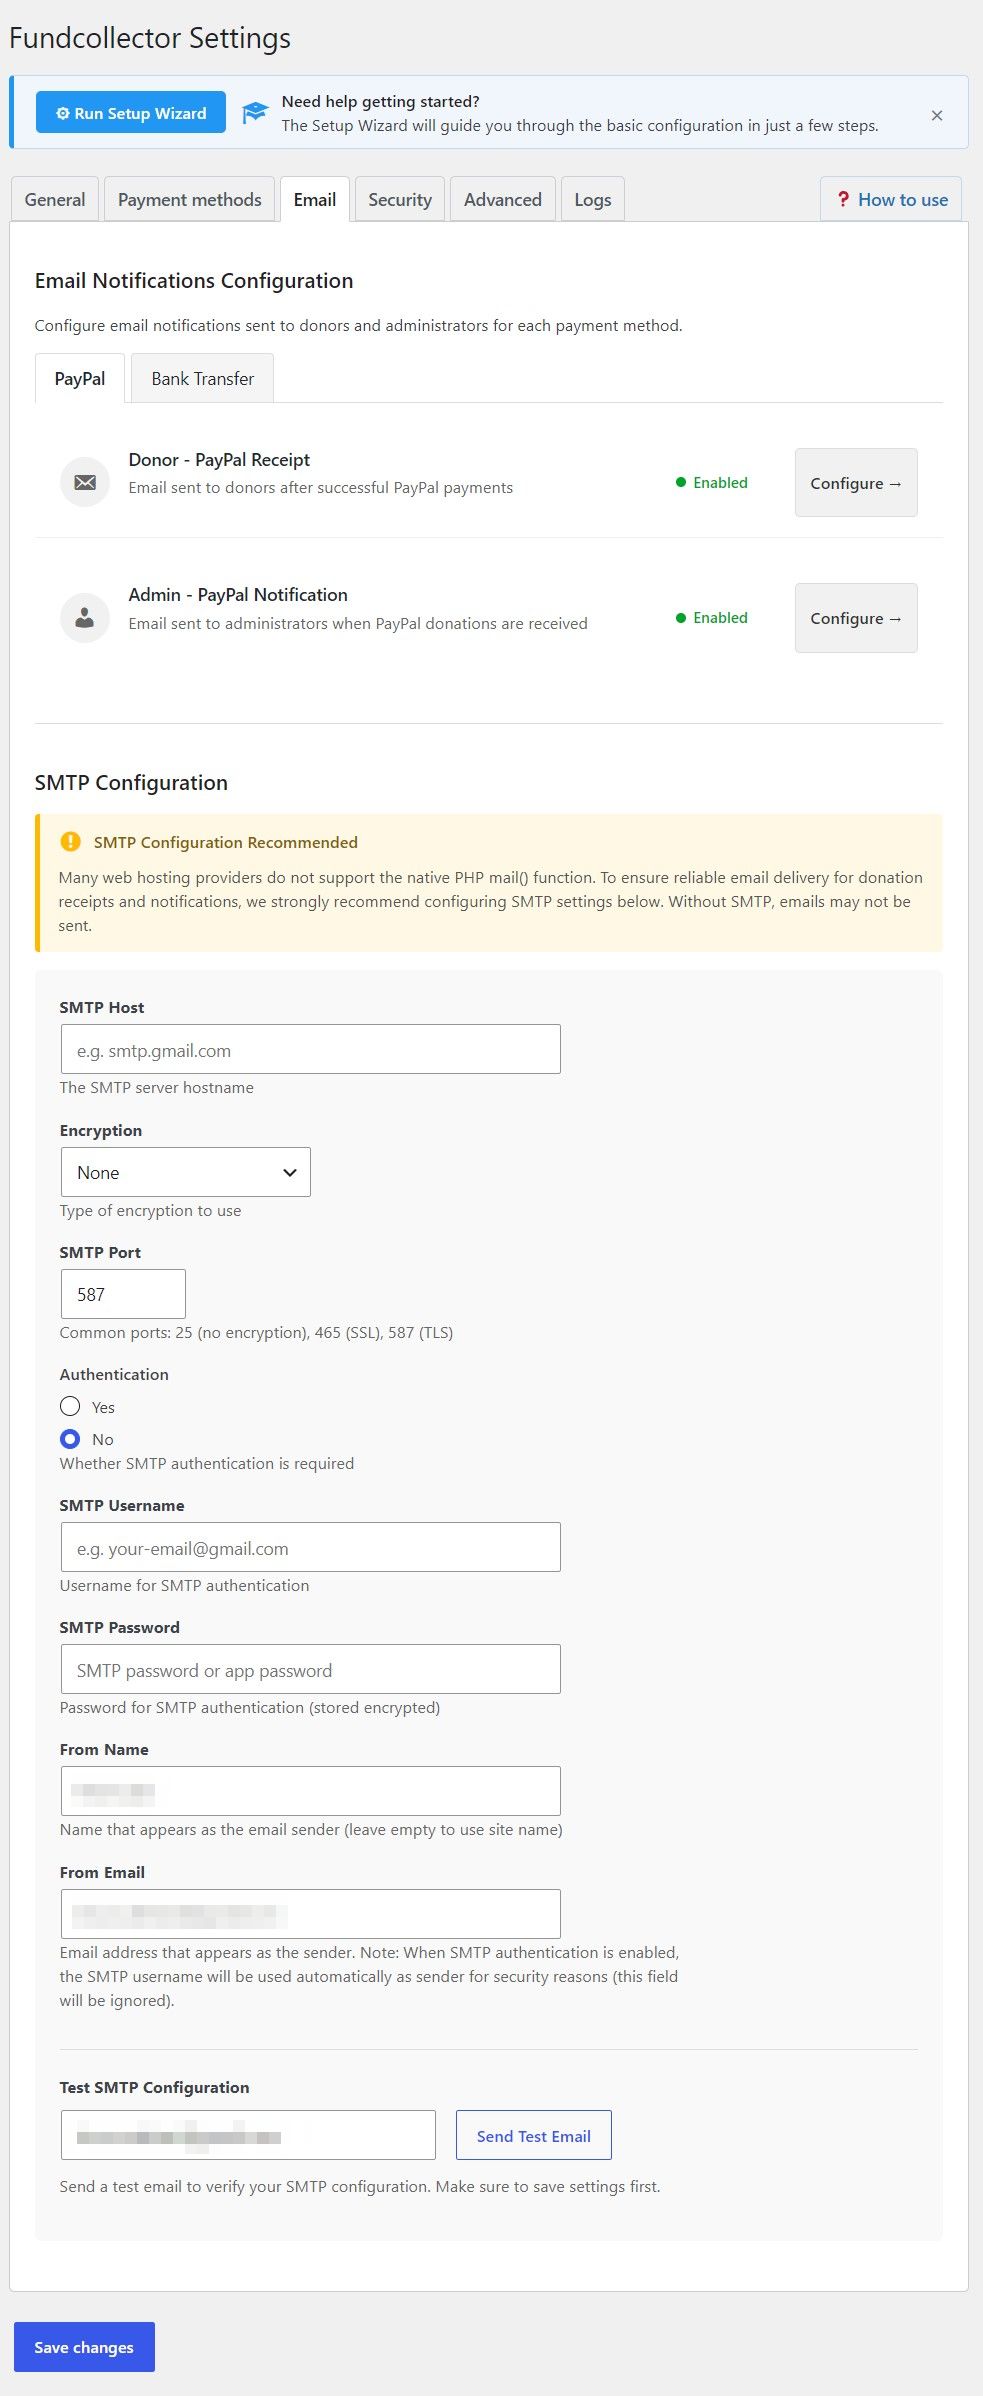
Email Notifications Configuration
Navigate to FundCollector → Settings → Email. FundCollector includes four email templates: donor receipts and administrator notifications for PayPal and bank transfer. FundCollector Pro adds two Mollie templates.
Email notifications overview, Free version
Email notifications overview, FundCollector Pro PRO
This screen is titled Email Notifications Configuration. It is where you control which emails are sent after donations and what they say, grouped by payment method. A short introduction explains that you configure notifications for donors and administrators for each method.
At the top of the email area you switch between:
- PayPal – two entries: Donor – PayPal Receipt (confirmation after a successful PayPal payment) and Admin – PayPal Notification (alert to site staff when a PayPal donation is received). Each row shows an Enabled / Disabled status and a Configure → button.
- Mollie PRO – visible with FundCollector Pro, with Donor – Mollie Receipt and Admin – Mollie Notification.
- Bank Transfer – Donor – Bank Transfer Receipt (message with transfer instructions) and Admin – Bank Transfer Notification.
Choosing Configure → opens the detailed editor for that template: you can turn the notification on or off, set the subject, and edit the message in the WordPress editor (including media and formatting where supported). Message bodies can include placeholders such as donor name, amount, donation ID, form name, date, and site name, so each email is filled in automatically.
SMTP Configuration
In this subsection, you can configure the SMTP email protocol. We recommend that you enable SMTP because many web hosting providers do not support the native PHP mail() function. Without SMTP, emails may not be sent. Contact your hosting provider to find out the SMTP settings you need to use.
Here you set:
- SMTP Host, Encryption (None / SSL / TLS), and SMTP Port (with hints for common ports).
- Authentication (Yes/No), then SMTP Username and SMTP Password when required.
- From Name and From Email for the sender shown to recipients. When SMTP authentication is on, the authenticated username may be used as the sender for deliverability.
Use Test SMTP Configuration: enter a recipient address and click Send Test Email to verify delivery after saving. Finish with Save changes at the bottom of the settings page.
Donor: PayPal Donation Receipt
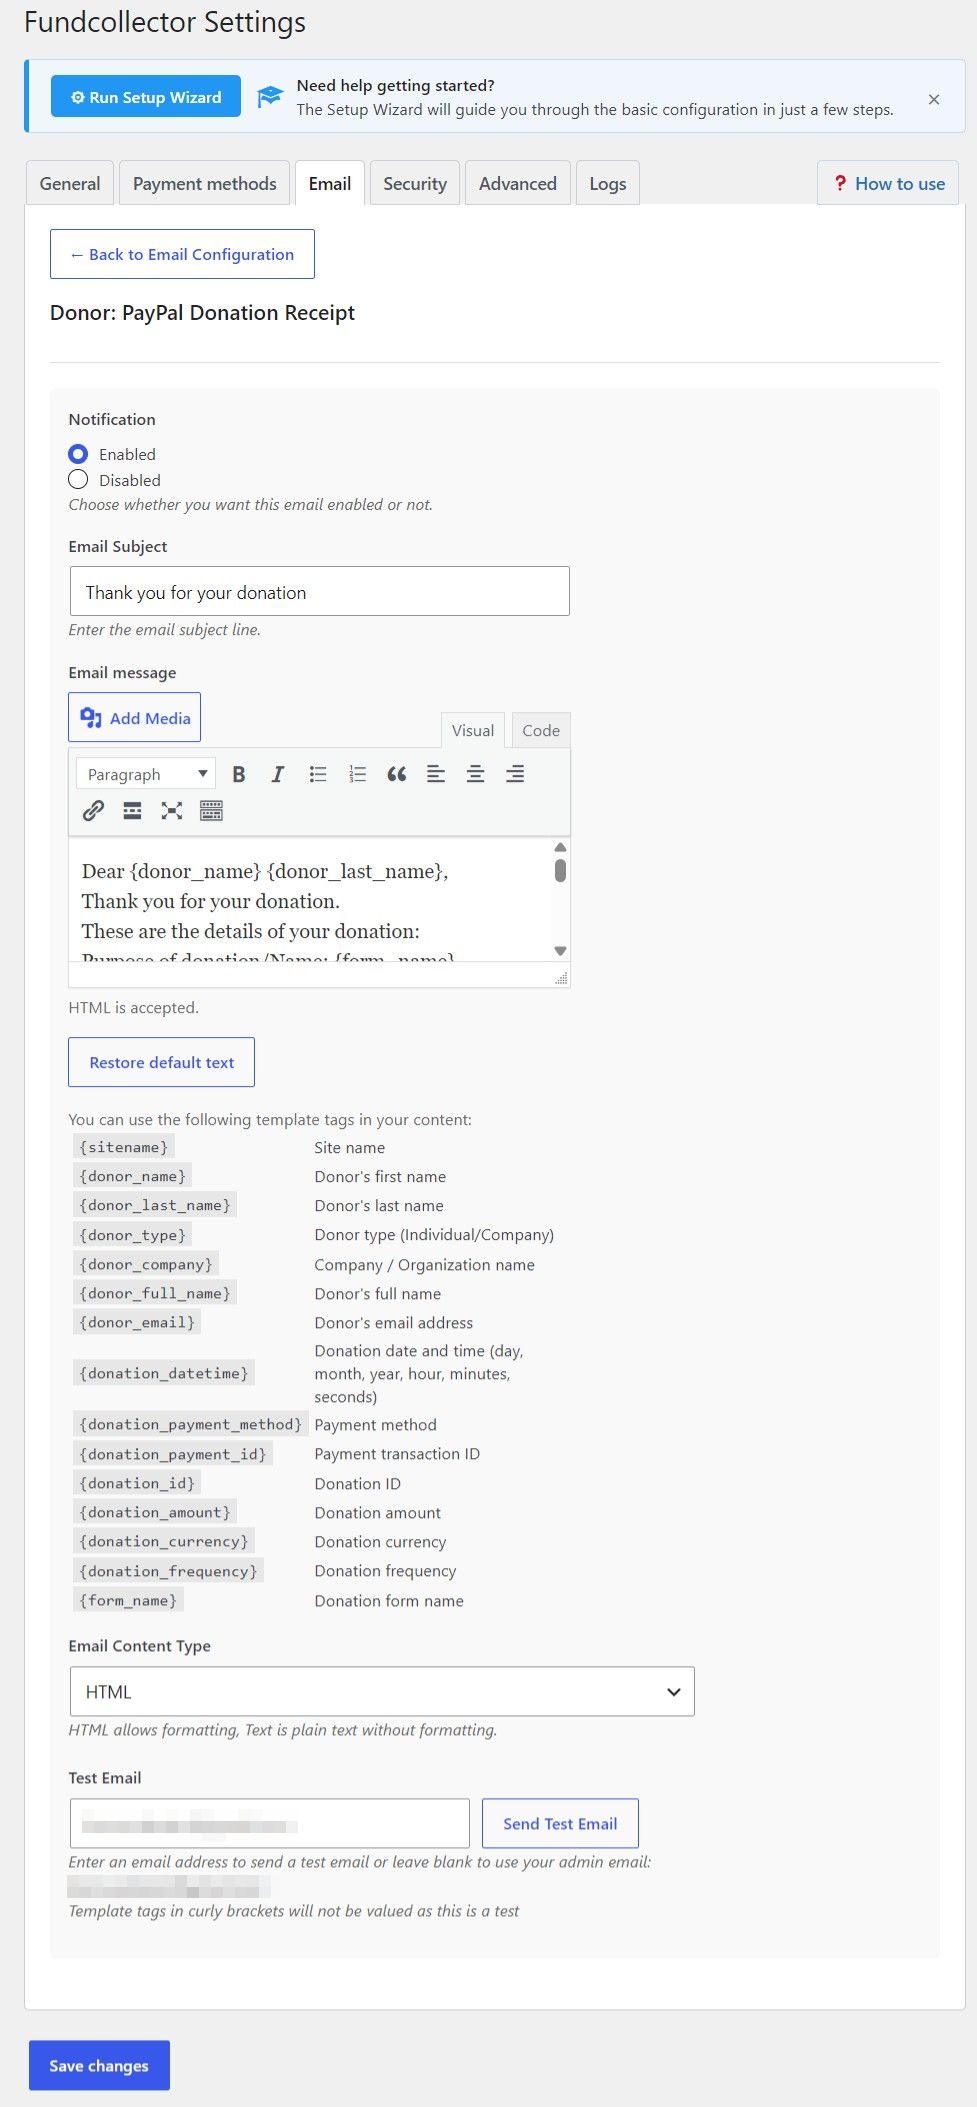
This screen configures the thank-you / receipt email that FundCollector sends to the donor after a successful PayPal donation.
Navigation
Open FundCollector → Settings → Email, choose the PayPal sub-tab, then click Configure → on Donor – PayPal Receipt. Use ← Back to Email Configuration to return to the email overview without losing unsaved work until you save.
Notification
Under Notification, choose Enabled or Disabled. When disabled, donors will not receive this receipt email after PayPal payments (the donation can still be recorded normally).
Email Subject
Set the subject line donors see in their inbox. A short hint explains that this is the visible subject of the message.
Email message
The body is edited with the WordPress visual/HTML editor (toolbar, media where allowed, Quicktags). HTML is supported. You can replace the default wording with your own branding and tone.
Restore default text
If you change the message and want to go back to the plugin’s built-in template, use Restore default text. You will be asked to confirm; after restoring, click Save changes on the main settings page to persist.
Template tags
Below the editor, an Available template tags reference lists placeholders you can paste into the subject or body, for example site name, donor name, email, amount, payment method, donation ID, form name, date/time, and frequency. They are replaced automatically when the email is sent.
Saving
Scroll to the bottom of Settings and click Save changes so subject, body, and enabled/disabled state are stored. Reliable delivery still depends on your SMTP (or server mail) configuration on the same Email tab.
Admin: PayPal Donation Notifications
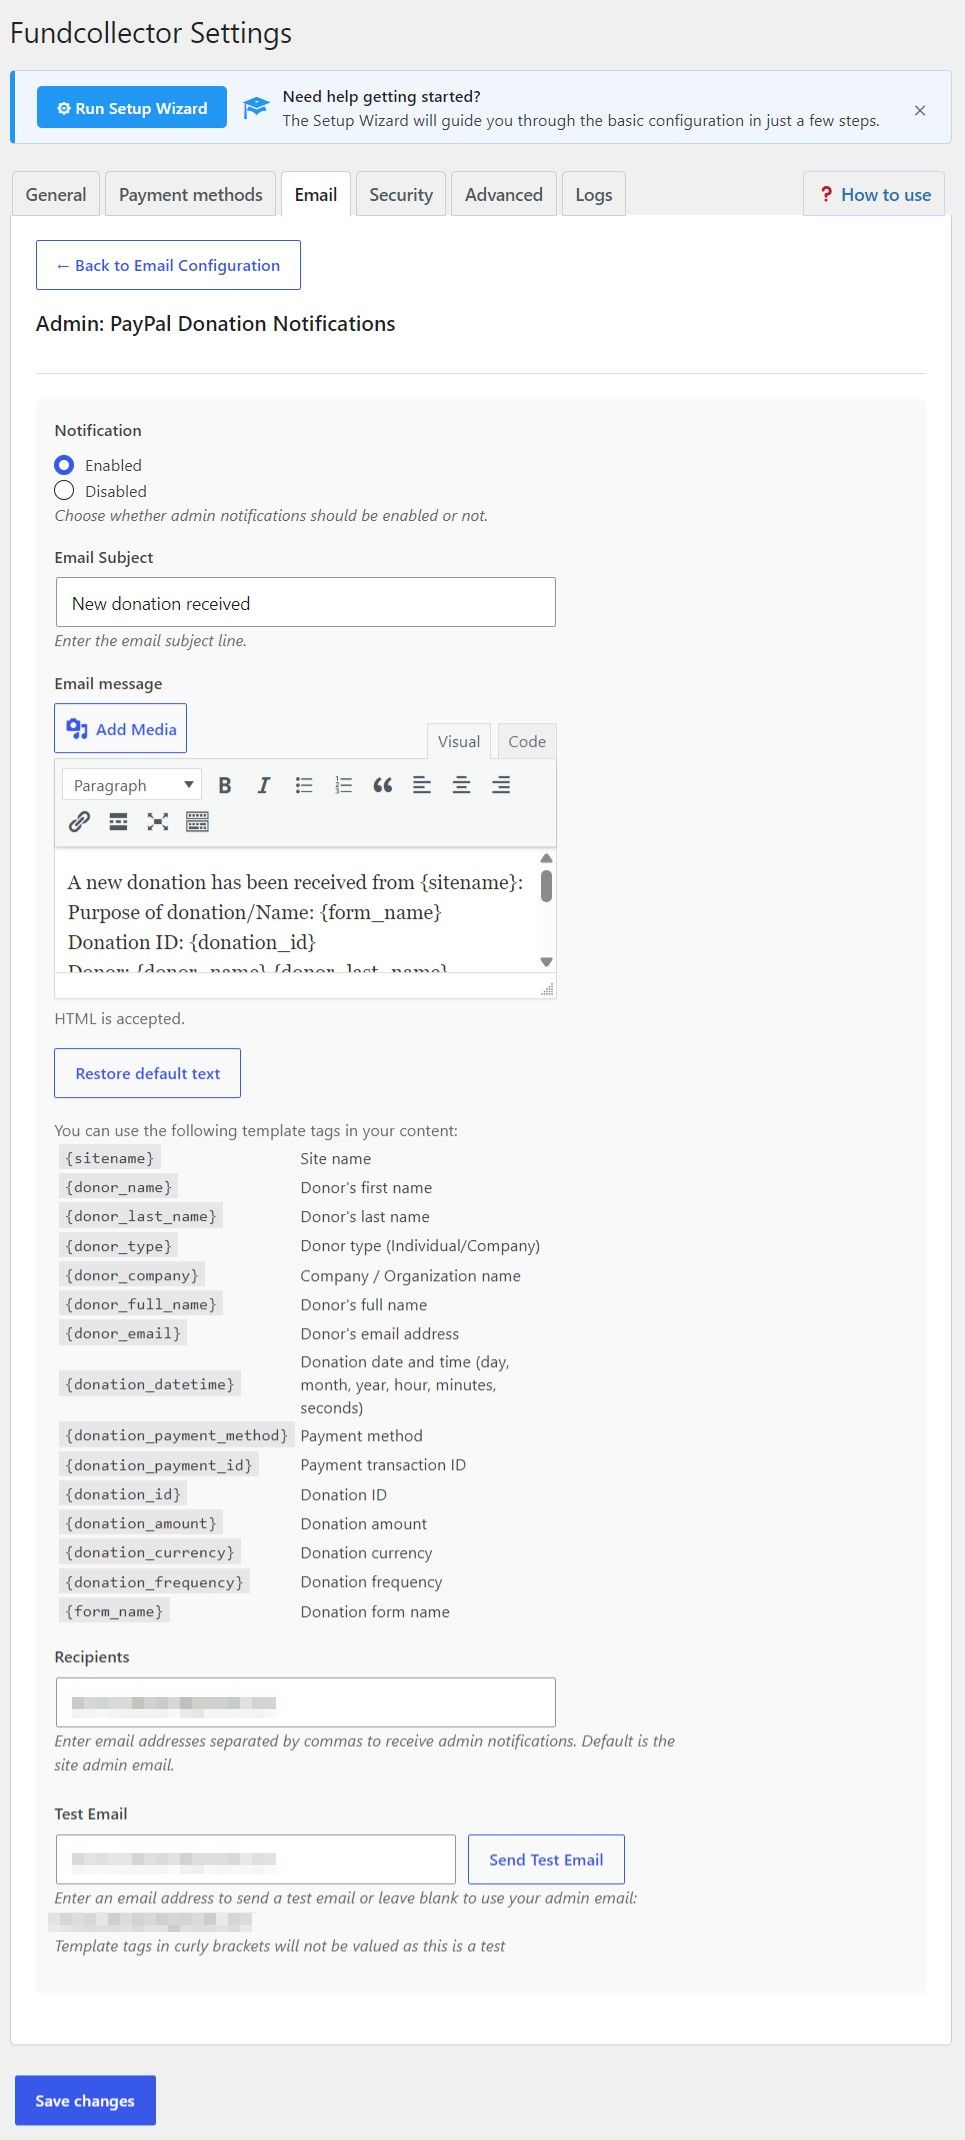
This screen configures the administrator notification email sent when a PayPal donation is successfully received.
How to open it: Go to FundCollector → Settings → Email, open the PayPal sub-tab, then click Configure → on Admin – PayPal Notification. Use ← Back to Email Configuration to return to the email overview.
Notification – Choose Enabled or Disabled. If disabled, no admin email is sent for PayPal donations.
Email Subject – The subject line shown in the administrator’s inbox.
Email message – The body is edited with the WordPress editor. HTML is allowed. Use Restore default text to reset the template (confirm, then click Save changes on the settings page). The Available template tags section lists placeholders (donor details, amount, donation ID, form name, payment transaction ID, site name, and more) that are filled when the real email is sent.
Recipients – One or more email addresses separated by commas. The default is the WordPress site admin email.
Test Email – Enter an address in the field (or leave it empty to use the site admin email, shown in the help text) and click Send Test Email. This sends a real message through your mail setup so you can confirm delivery (SMTP, spam filters, and more). Template tags in curly brackets are not filled in for this test. They appear as literal placeholders because no live donation record is used.
Click Save changes at the bottom of FundCollector Settings to store your changes. For reliable delivery, configure SMTP on the same Email tab if needed.
Donor: Mollie Donation Receipt PRO
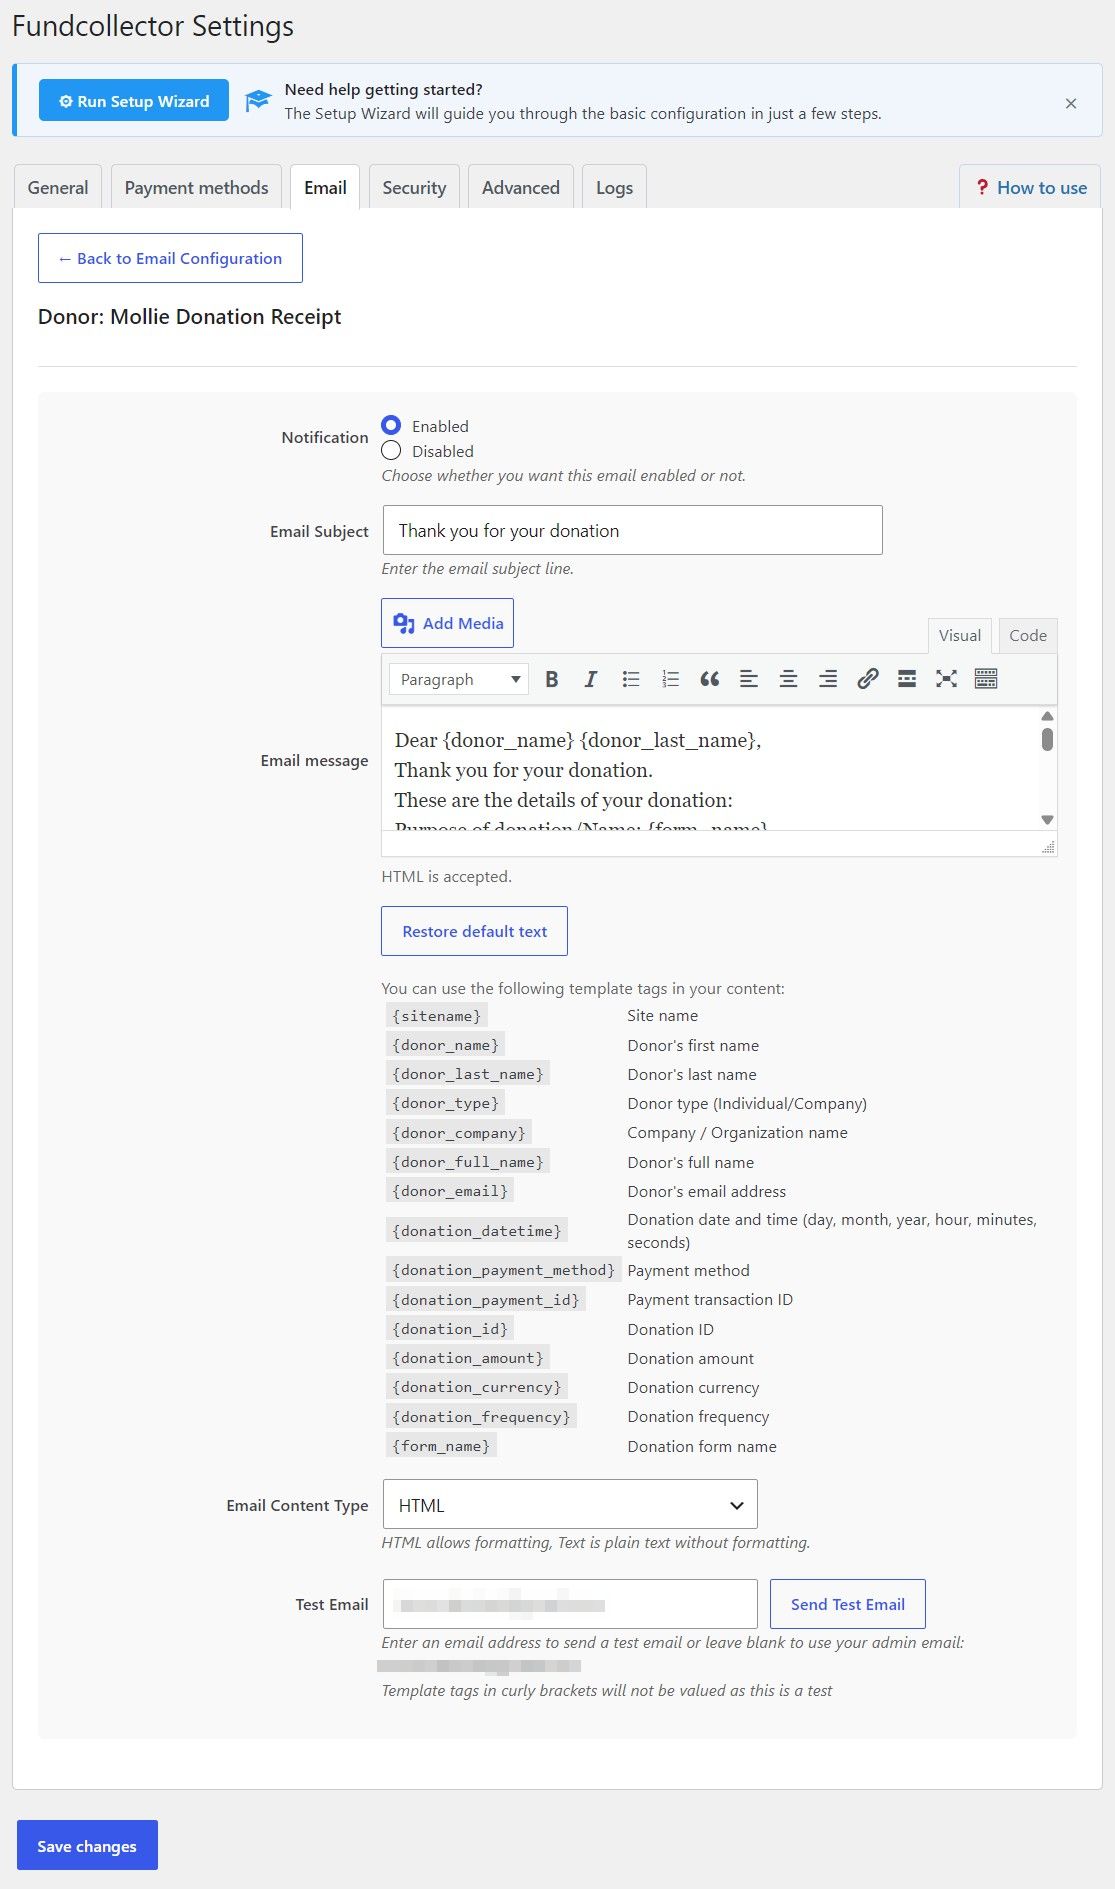
This screen is available only with FundCollector Pro. It configures the receipt email sent to the donor after a successful Mollie payment (card or other Mollie methods you offer).
How to open it: Go to FundCollector → Settings → Email, open the Mollie sub-tab, then click Configure → on Donor – Mollie Receipt. Use ← Back to Email Configuration to return to the email overview.
Notification – Choose Enabled or Disabled. If disabled, donors do not receive this Mollie receipt email after payment.
Email Subject – The subject line donors see in their inbox.
Email message – The body is edited with the WordPress editor. HTML is accepted. Restore default text resets the plugin’s default copy (confirm, then use Save changes on the settings page). Below the editor, Available template tags documents placeholders such as donor name, email, amount, donation ID, form name, payment method, frequency, date/time, site name, payment transaction ID, and site URL.
Email Content Type – Choose HTML (formatted) or Text (plain, with no HTML formatting). The on-screen note explains that HTML allows formatting while Text does not.
Test Email – Enter an address in the field (or leave it empty to use the site admin email, shown in the help text) and click Send Test Email. This sends a real message through your mail setup so you can confirm delivery (SMTP, spam filters, and more). Template tags in curly brackets are not filled in for this test. They appear as literal placeholders because no live donation record is used.
Click Save changes at the bottom of FundCollector Settings to store everything. For reliable delivery, configure SMTP on the same Email tab if needed.
Admin: Mollie Donation Notifications PRO
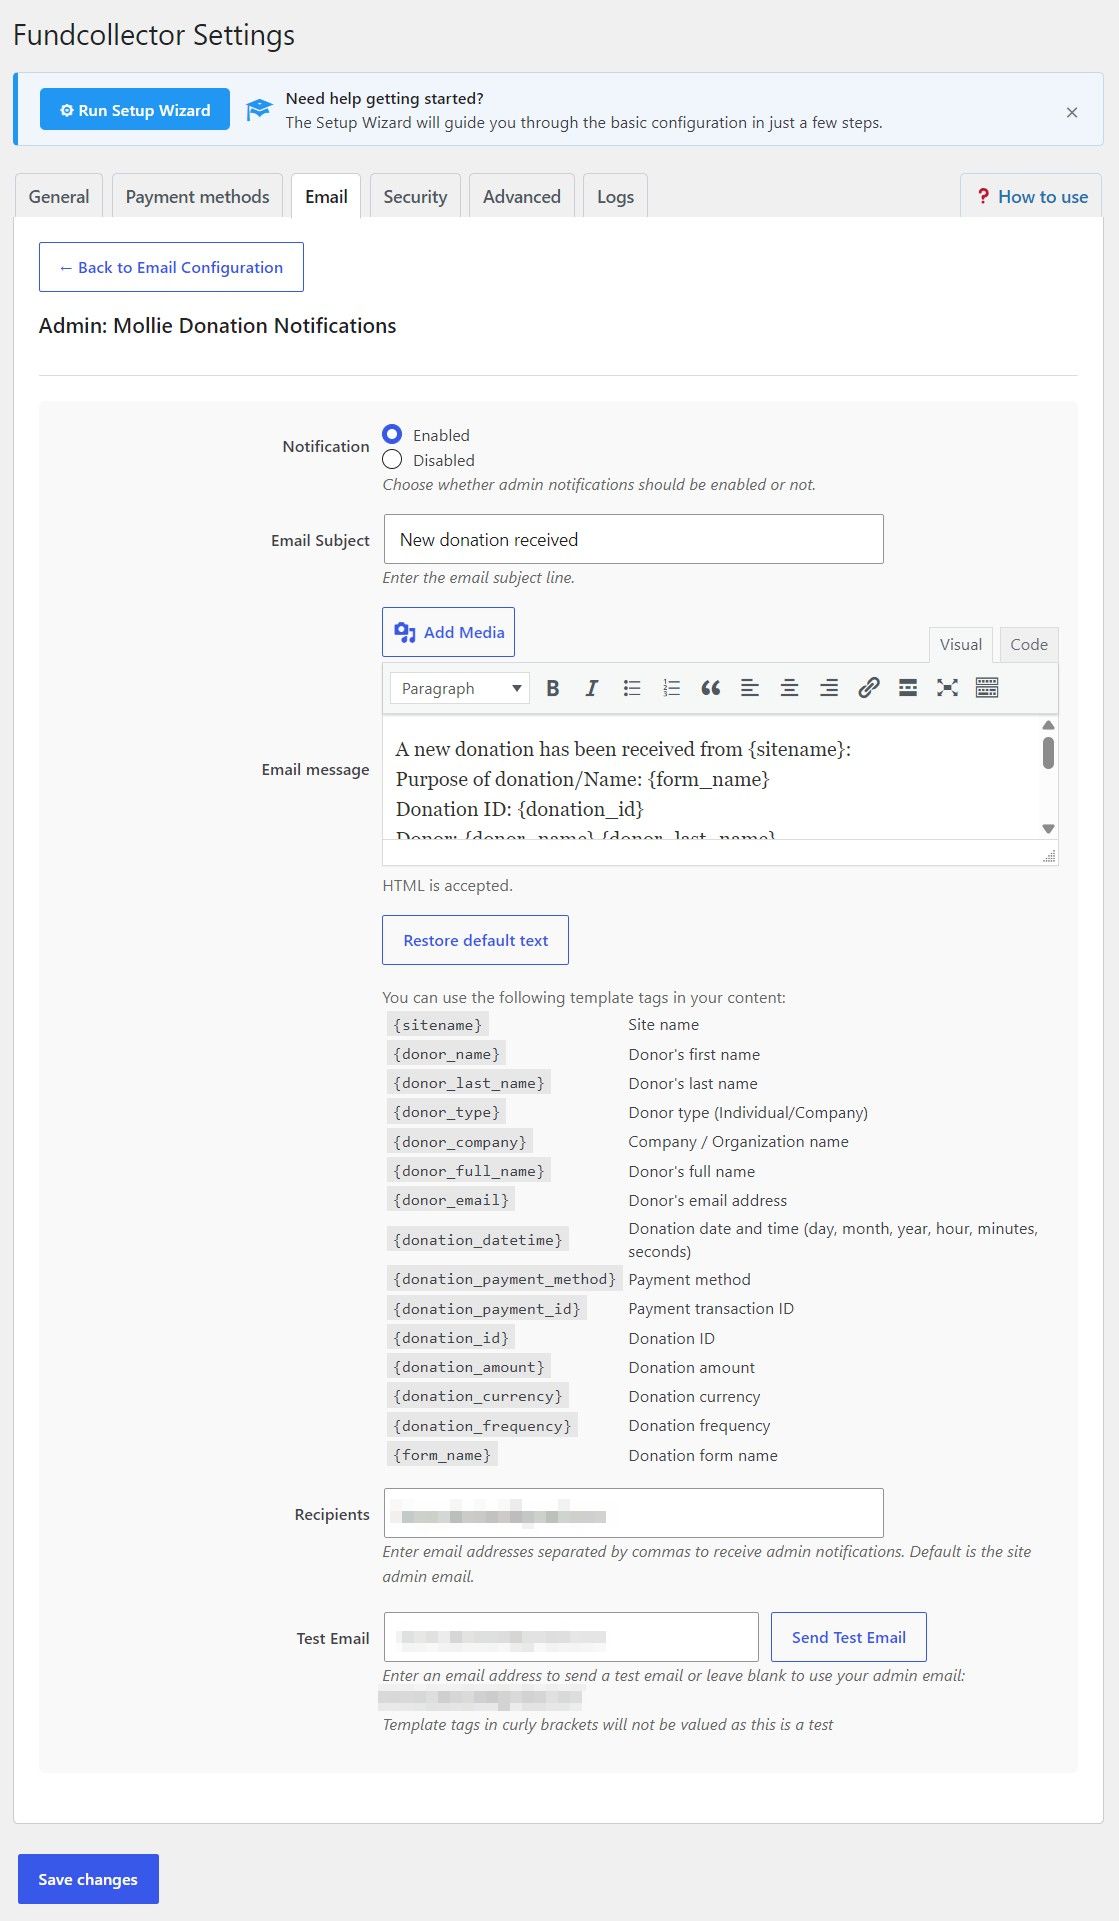
This screen is available only with FundCollector Pro. It configures the administrator notification email sent when a Mollie donation is successfully received (one-time or recurring, depending on your setup).
How to open it: Go to FundCollector → Settings → Email, open the Mollie sub-tab, then click Configure → on Admin – Mollie Notification. Use ← Back to Email Configuration to return to the email overview.
Notification – Choose Enabled or Disabled. If disabled, no admin email is sent for Mollie donations.
Email Subject – The subject line shown in the administrator’s inbox.
Email message – The body is edited with the WordPress editor. HTML is accepted. Use Restore default text to reset the plugin default (confirm, then click Save changes on the settings page). The Available template tags section lists placeholders (donor details, amount, donation ID, form name, payment method, frequency, date/time, payment transaction ID, site name, site URL, and more) that are replaced when the real notification is sent.
Recipients – One or more email addresses separated by commas. The default is the WordPress site admin email.
Test Email – Enter an address in the field (or leave it empty to use the site admin email, shown in the help text) and click Send Test Email. This sends a real message through your mail setup so you can confirm delivery (SMTP, spam filters, and more). Template tags in curly brackets are not filled in for this test. They appear as literal placeholders because no live donation record is used.
Click Save changes at the bottom of FundCollector Settings to store your changes. For reliable delivery, configure SMTP on the same Email tab if needed.
Donor: Bank Transfer Donation Receipt
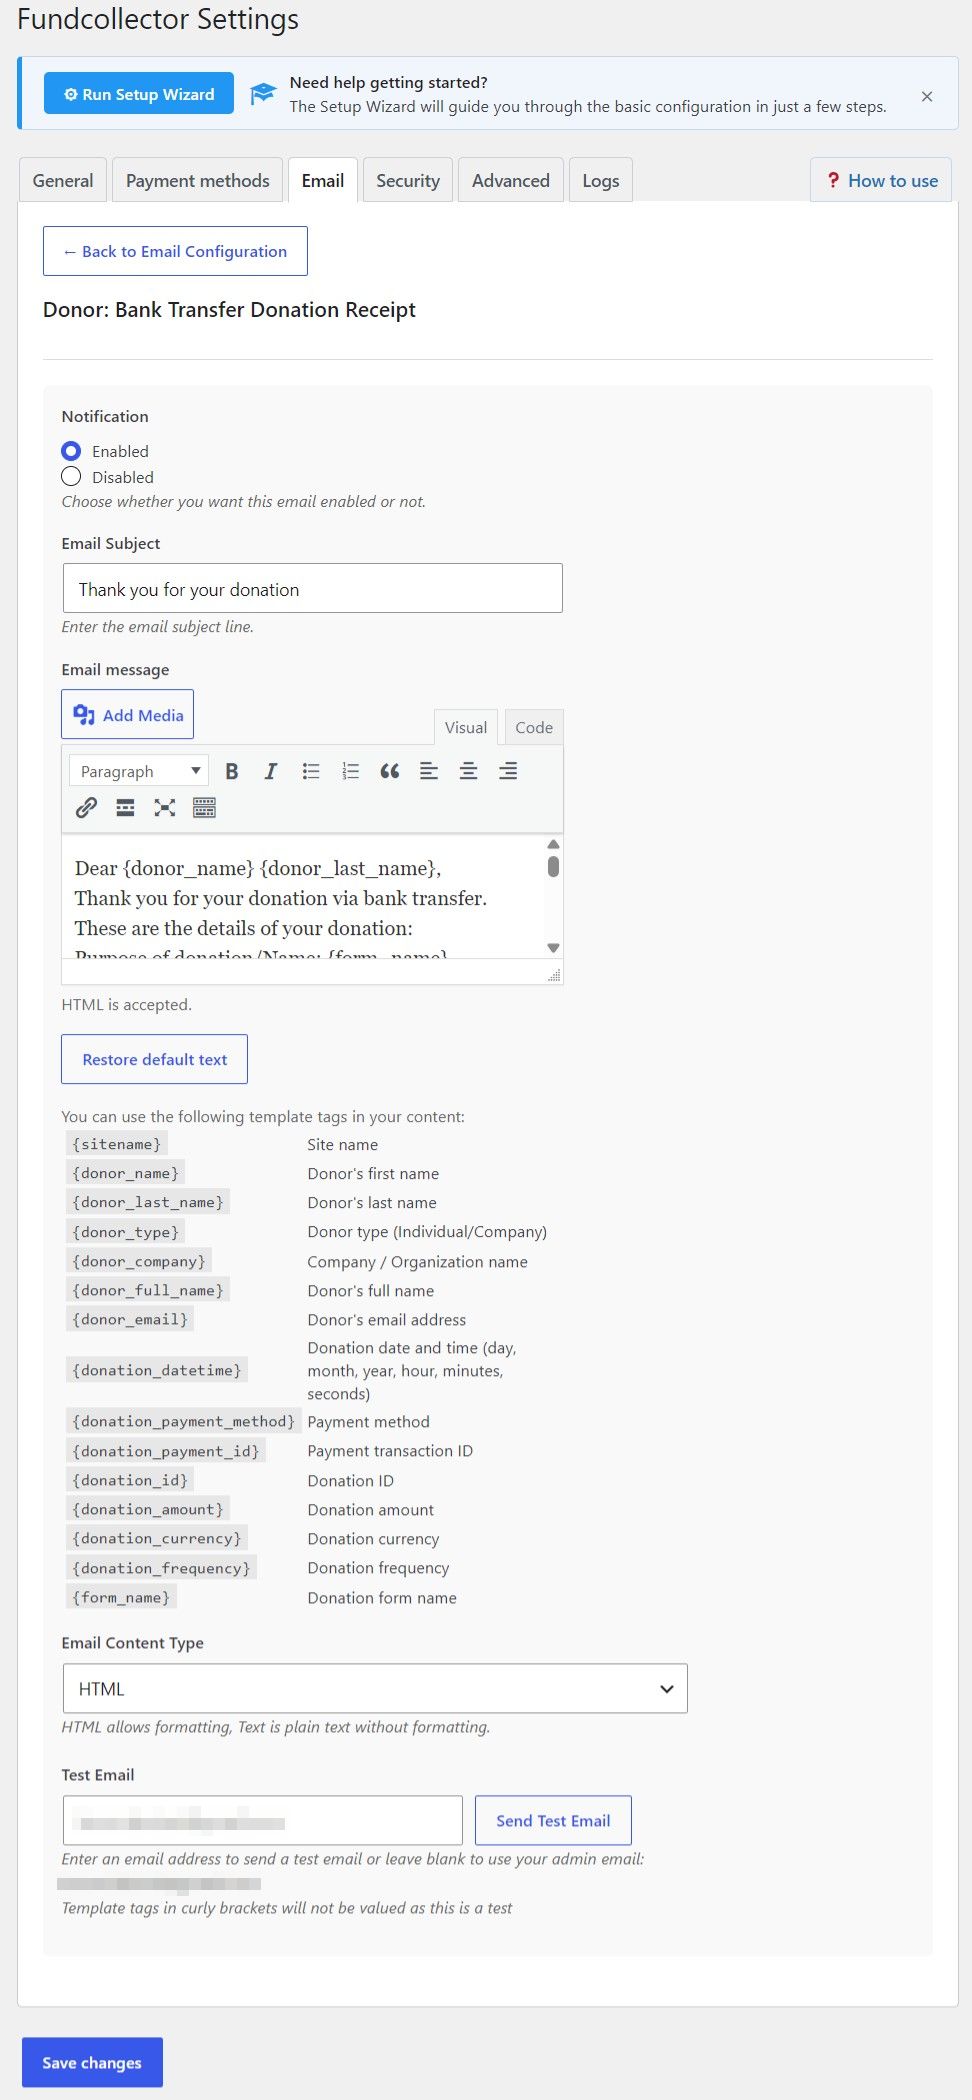
This screen configures the email sent to donors after they choose bank transfer as the payment method. Open it from FundCollector → Settings → Email, choose the Bank Transfer sub-tab, then open Donor: Bank Transfer Donation Receipt. Use Back to Email Configuration to return to the email overview.
Notification
Choose Enabled or Disabled to turn this receipt on or off. When it is disabled, donors do not receive this message (real donations still follow your other settings).
Email Subject
Single line for the subject. The default is a “thank you for your donation” style subject (localized when the site language is not English).
Email message
The body is edited with the WordPress editor (visual/HTML, Quicktags, optional media). HTML is accepted. The built-in default text thanks the donor for choosing bank transfer, summarizes donation details (form name, donation ID, donor, email, payment method, amount with a note that the amount is to be verified on the bank account, date/time), and reminds them to complete the donation using the bank transfer instructions sent in a separate email.
Restore default text
Replaces the current message with the plugin default after confirmation. You must still click Save changes on the main settings page to persist it.
Available template tags
A reference table lists placeholders such as {sitename}, {donor_name}, {donor_last_name}, {donor_full_name}, {donor_type}, {donor_company}, {donor_email}, {donation_datetime}, {donation_amount}, {donation_payment_method}, {donation_frequency}, {donation_payment_id}, {donation_id}, {form_name}, and {site_url}. They are replaced with real values when the email is sent for an actual donation.
Email Content Type
HTML (default) sends formatted content; Text sends plain text without HTML formatting.
Test Email
Enter an address in the field (or leave it empty to use the site admin email, shown in the help text) and click Send Test Email. This sends a real message through your mail setup so you can confirm delivery (SMTP, spam filters, and more). Template tags in curly brackets are not filled in for this test. They appear as literal placeholders because no live donation record is used.
Remember to save plugin settings after editing subject, body, content type, or notification state.
Admin: Bank Transfer Donation Notifications
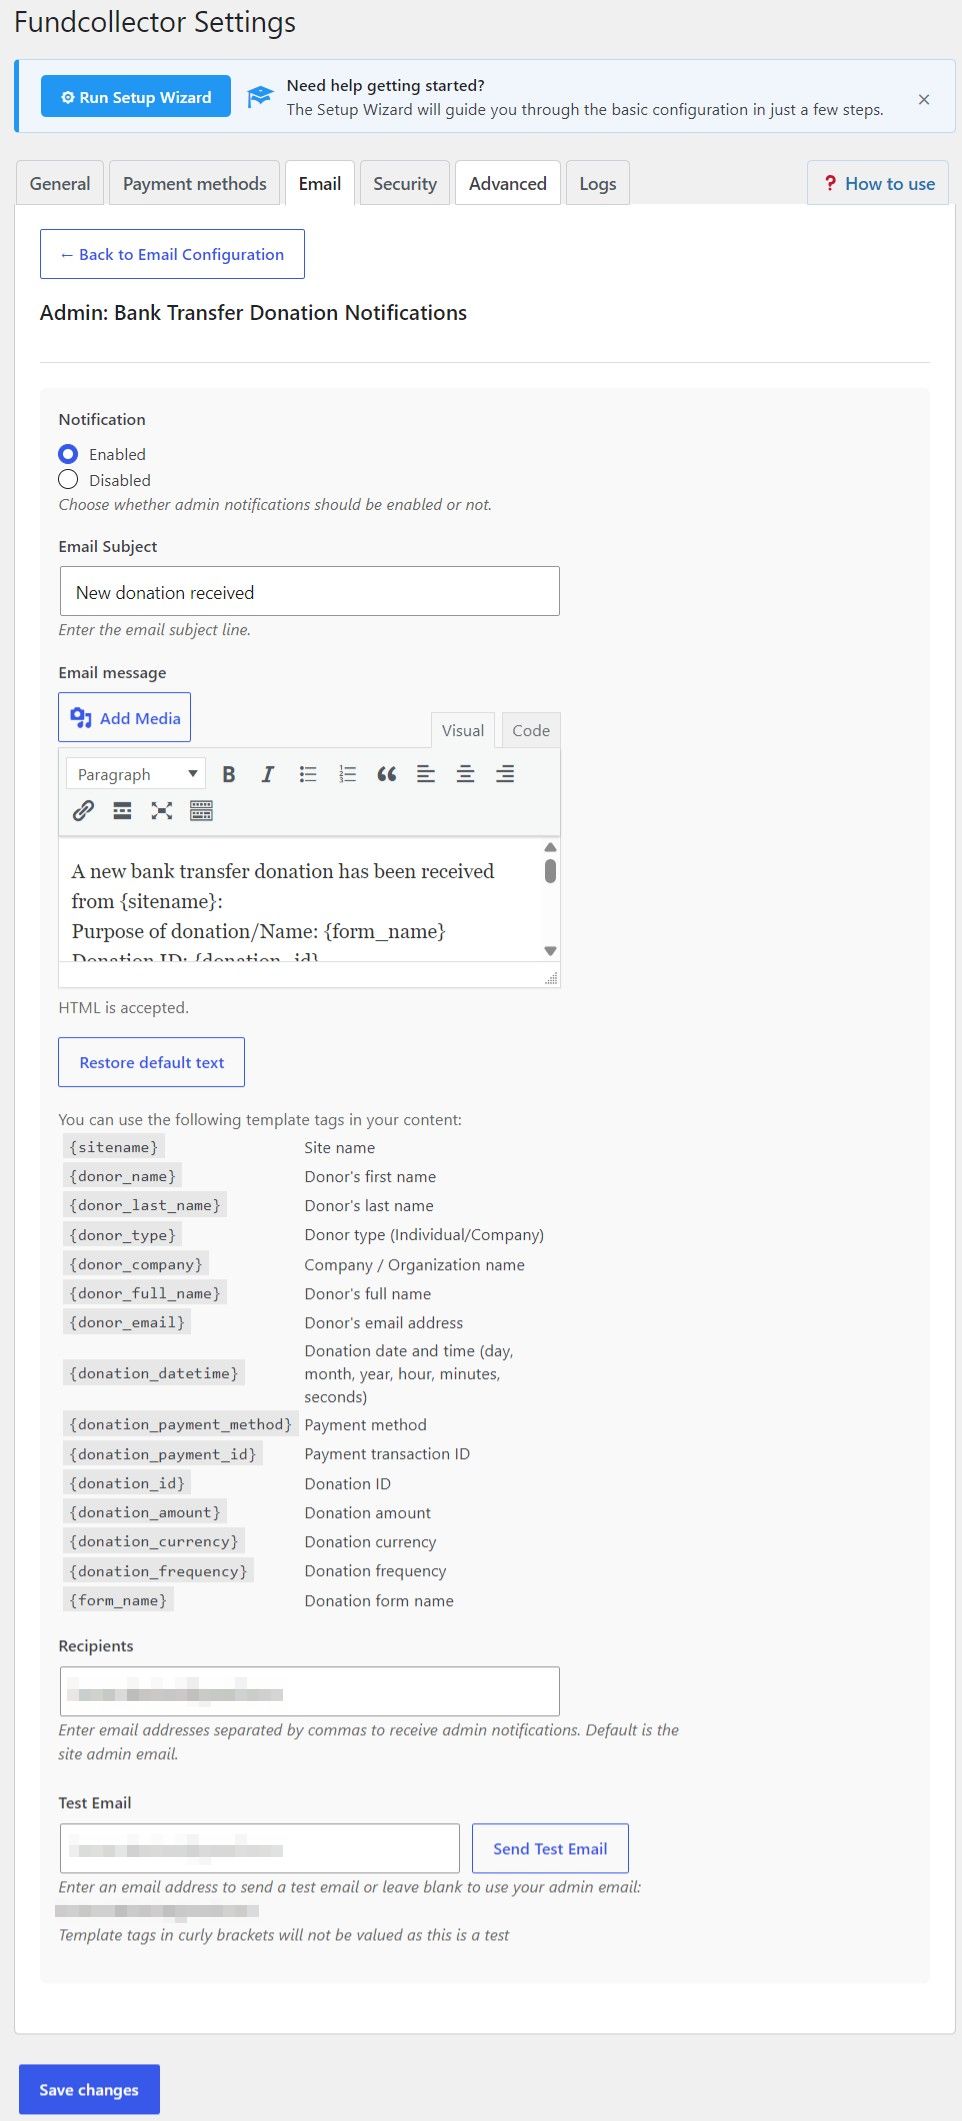
This screen configures the email sent to site staff when someone submits a donation using bank transfer. Open it from FundCollector → Settings → Email, select the Bank Transfer sub-tab, then open Admin: Bank Transfer Donation Notifications. Use Back to Email Configuration to return to the email overview.
Notification
Use Enabled or Disabled to turn these admin alerts on or off. When disabled, no admin notification is sent for new bank-transfer donations (other payment methods use their own admin templates).
Email Subject
Sets the subject line. The default is a “new donation received” style subject (localized when the site language is not English).
Email message
The body is edited with the WordPress editor (visual/HTML, Quicktags, optional media). HTML is accepted. The default text announces that a new bank transfer donation was received, includes key details (form name, donation ID, donor name, email, payment method, amount with a note that the amount is to be verified on the bank account, date/time), and states that the donor has been given bank transfer instructions to complete payment.
Restore default text
After confirmation, replaces the current message with the plugin default. Click Save changes on the settings page to keep the change.
Available template tags
The reference lists placeholders such as {sitename}, {donor_name}, {donor_last_name}, {donor_full_name}, {donor_type}, {donor_company}, {donor_email}, {donation_datetime}, {donation_amount}, {donation_payment_method}, {donation_frequency}, {donation_payment_id}, {donation_id}, {form_name}, and {site_url}. They are replaced with real data when the email is sent for an actual donation.
Recipients
One or more addresses separated by commas. By default this is the WordPress site admin email. Use this to notify finance staff, a shared inbox, or multiple people.
Test Email
Enter an address (or leave the field empty to use the admin email shown in the help text) and click Send Test Email. This sends a real message so you can verify SMTP and delivery. Curly-bracket template tags are not replaced in test mode. They stay as literal text because no live donation is attached.
Save the FundCollector settings after changing notification state, subject, body, or recipients.