Welcome to FundCollector! This comprehensive guide will walk you through setting up and configuring your donation management system. Whether you are a small nonprofit or an established charity, you will be accepting donations in minutes.
Prerequisites & Requirements
Before you begin, ensure your WordPress site meets these minimum requirements:
System Requirements
WordPress: 5.8 or higher
PHP: 7.4 or higher (PHP 8.0+ recommended for optimal performance)
Database: MySQL 5.6 or higher / MariaDB 10.0 or higher
cURL: Required for PayPal integration
SSL Certificate: Required for payment processing
What You Will Need
WordPress admin access
PayPal Business account (optional – for PayPal payments) – create one here
Google reCAPTCHA v3 keys (optional – for spam protection)
SMTP credentials (optional – for reliable email delivery)
Quick Start Overview
Here is the high-level workflow to get your donation system up and running:
Install & Activate — Install FundCollector from the WordPress Plugin Directory
Configure General Settings – Set your currency, country, and essential pages
Set Up Payment Methods – Configure PayPal and/or bank transfer
Customize Email Notifications – Personalize donor and admin email templates
Enable Security Features – Activate spam protection (honeypot/reCAPTCHA)
Create Your First Form or use the pre-filled default form
Add the form to a page on your website – use Gutenberg block or shortcode. If you want, you can use the pre-designed default pages.
Test & Launch – Make a test donation and go live!
Now let us dive into each configuration section in detail.
1. Installation
Automatic Installation
This is the simplest method of installing a plugin. To add a plugin using the built-in plugin installer:
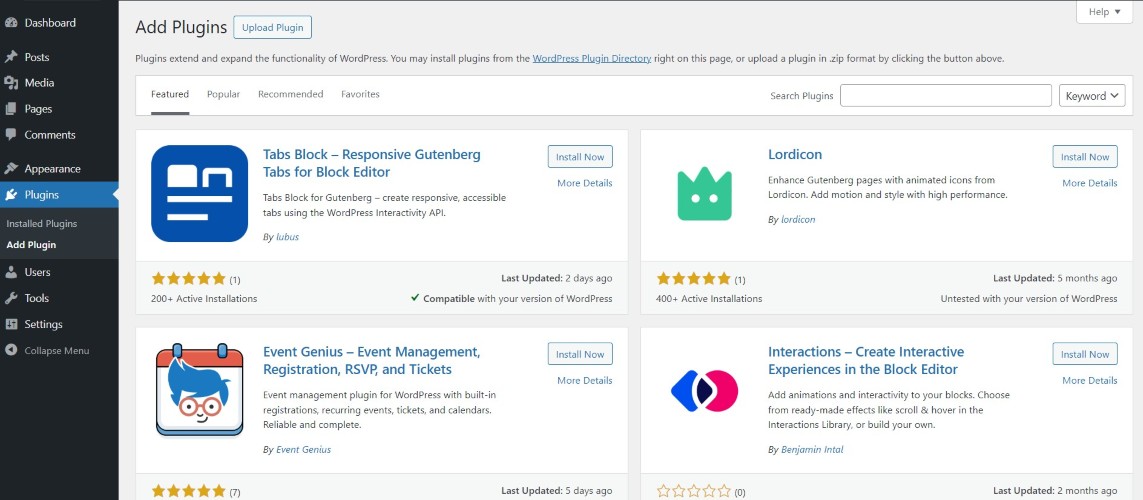
Log in to your WordPress dashboard, navigate to the Plugins menu and click “Add Plugin”.
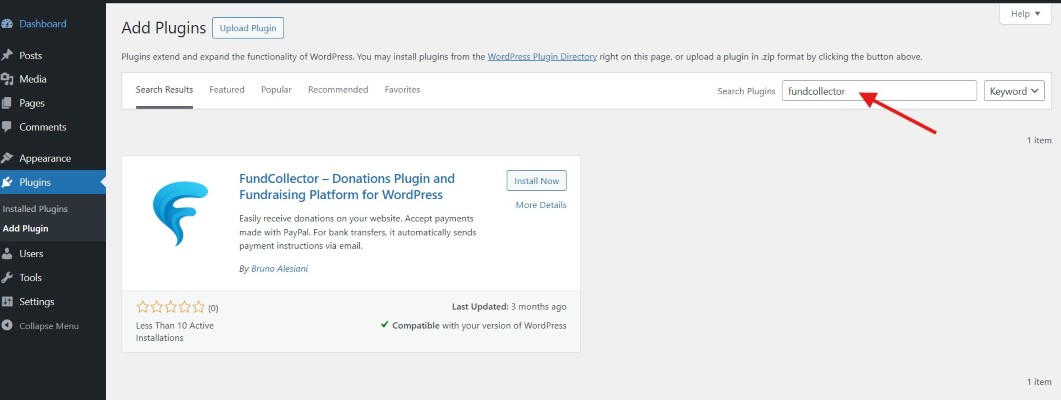
Type “fundcollector” in the search field. The FundCollector plugin box will appear.
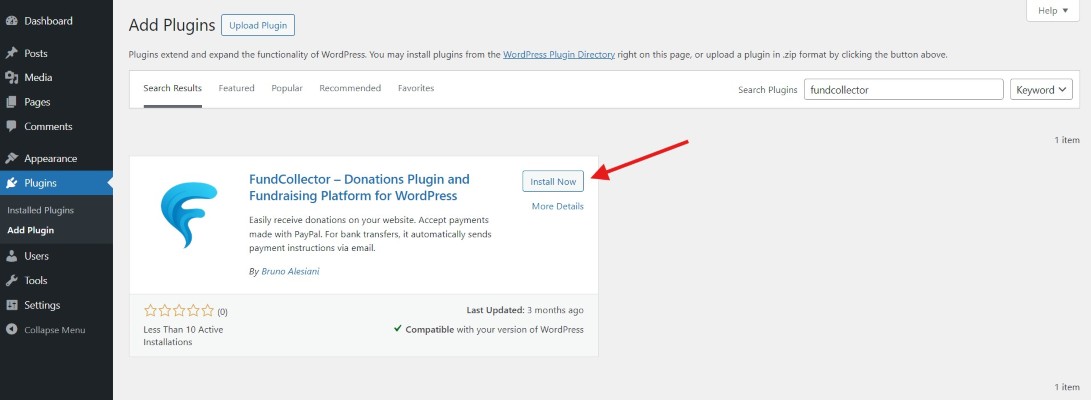
Click on the “Install now” button inside the box.
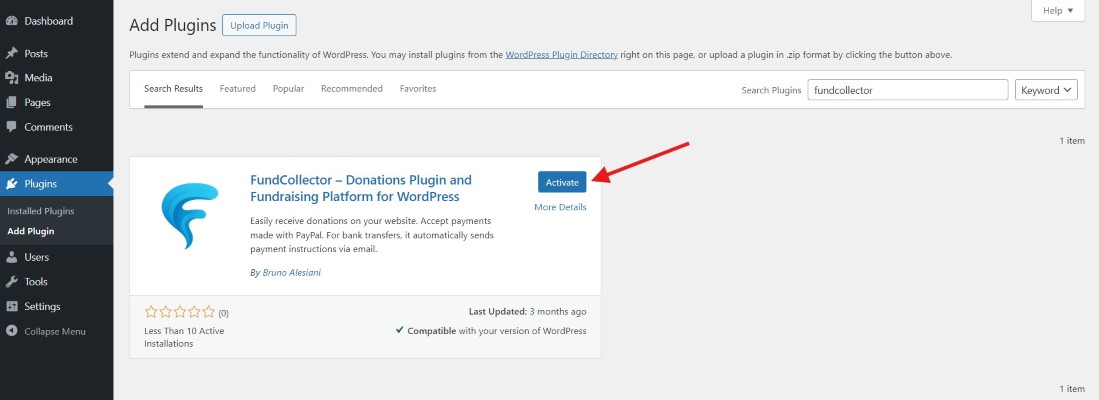
Once the automatic installation is complete, click the “Activate” button.
Manual Installation
This type of installation may be required if the server hosting WordPress does not allow automatic installations. It is a recommended procedure for experts and developers because it relies on file transfer via the SFTP protocol.
Transfer the extracted folder to the /wp-content/plugins directory of your WordPress site via SFTP or remote file manager.
From the Plugins menu in the Administration Screen, click “Activate” for the transferred plugin.
2. FundCollector Menu Items
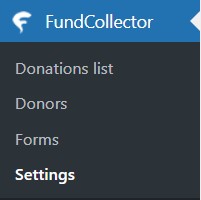
Once activated, FundCollector adds a new menu to your WordPress admin dashboard:
Below is a brief explanation of each menu item; each item will be explained in detail later on:
Donations List
Your central hub for viewing and managing all received donations. Here you can:
View all donations with status indicators (completed, pending, cancelled, failed, expired, refunded, manual check)
View detailed information for each donation
Soft-delete (trash) donations you no longer need
Donors
A dedicated section to view all your donors:
See all donors with their total donation amount and number of donations
View individual donor profiles with full donation history
Sort donors by name, email, total donated, or date
Forms
The form builder interface where you create and customize donation forms. Features include:
Create multiple forms for different campaigns
Customize form fields and design
Generate shortcode and Gutenberg blocks
Preview forms before publishing
Settings
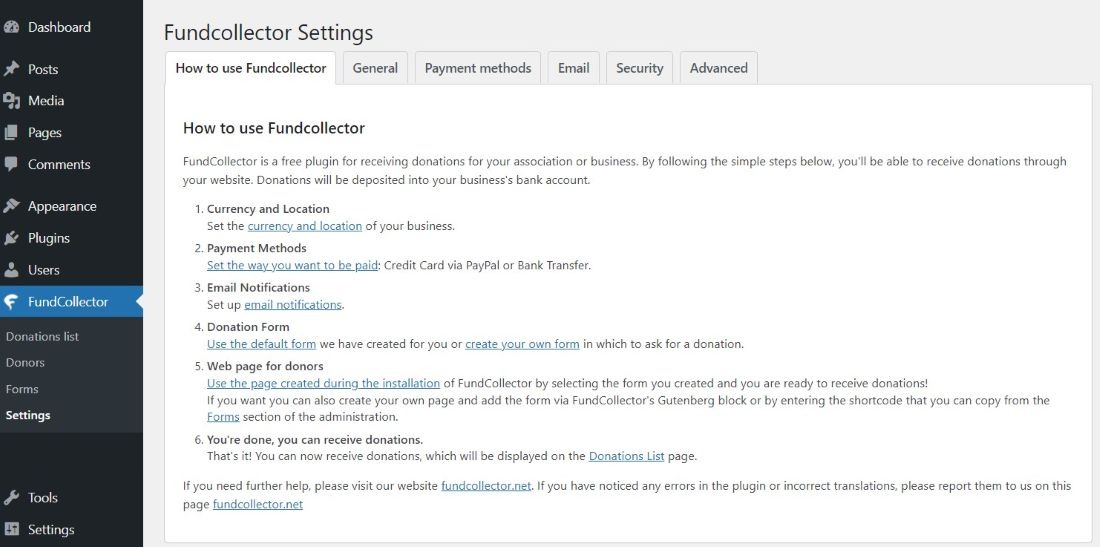
Comprehensive configuration panel with the following tabs:
General: Currency, location, and pages
Payment Methods: PayPal and bank transfer configuration
Email: Customize all email templates
Security: Honeypot and reCAPTCHA settings
Advanced: Logging and data retention preferences
Let us configure each section step by step.
3. Settings
Navigate to FundCollector → Settings to configure your plugin settings.
Settings Free version
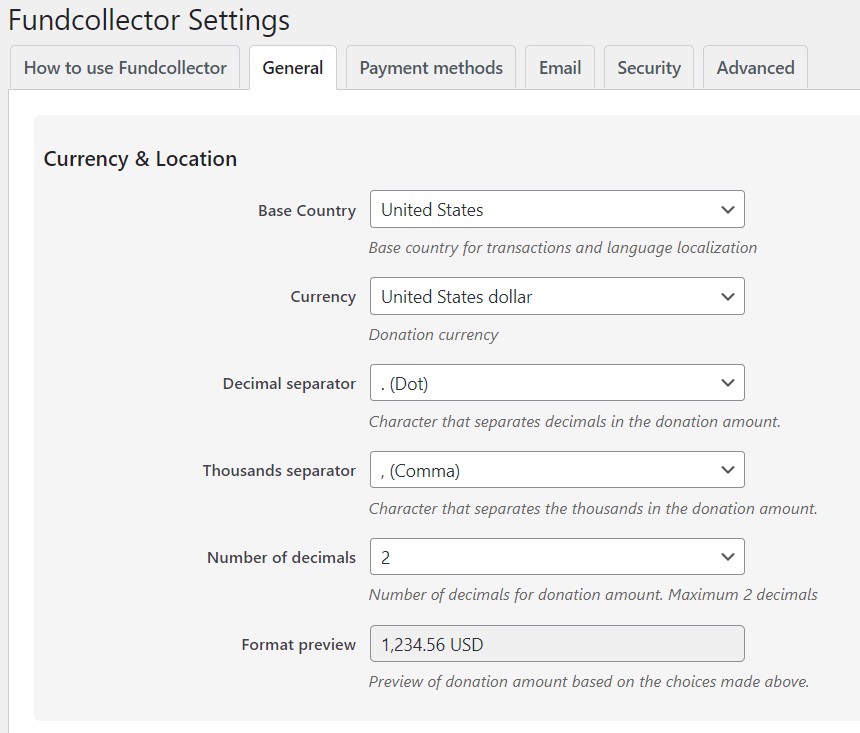
Currency & Location Settings
Currency & Location
These settings define how donation amounts are displayed and processed:
Base Country
Select your organization’s primary country
This helps ensure proper payment processing
Affects currency compatibility and regional settings
Currency
Choose your preferred currency (USD, EUR, GBP, etc.)
Important: Ensure your currency is compatible with your PayPal account
PayPal has specific currency requirements for different countries
Number Formatting
Decimal Separator: Character between whole numbers and decimals (e.g., . or ,)
Thousands Separator: Character grouping thousands (e.g., , or .)
Number of Decimals: How many decimal places to show (0-2 supported)
Example Formatting:
US format: 1,000.50 (comma thousands, period decimal, 2 decimals)
EU format: 1.000,50 (period thousands, comma decimal, 2 decimals)
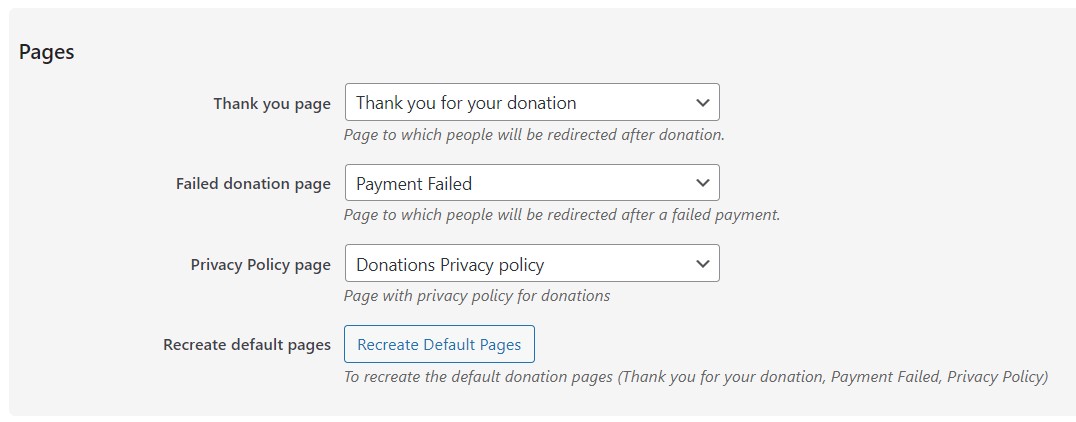
Pages Settings
Pages settings
During installation, FundCollector creates three web pages to simplify the administrator work. The pages created by the plugin will be set to draft status. These pages can be recreated using the dedicated button if needed:
Thank You Page
Where donors land after successful payment
Should include a gratitude message and next steps
Displays donation confirmation with the donation ID
Failed Donation Page
Shown when payment fails or is cancelled
Should include support contact information
Offer alternative payment methods
Privacy Page
This page is designed to accommodate your specific privacy policy; the text must be updated in accordance with the privacy regulations in effect in your country.
4. Payment Methods Settings
Navigate to FundCollector → Settings → Payment Methods. FundCollector supports two payment methods that can be enabled independently or together.
PayPal Settings
Info before you start
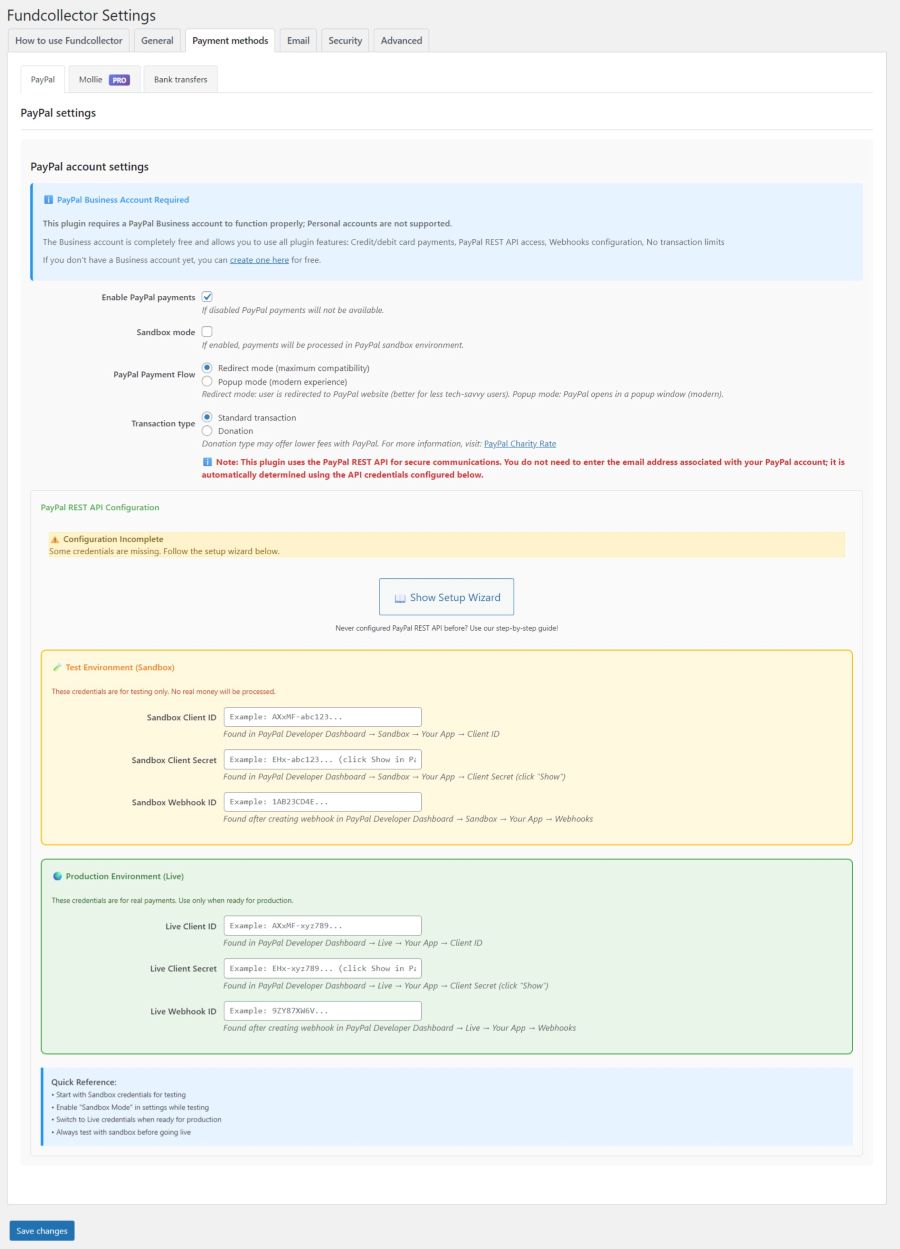
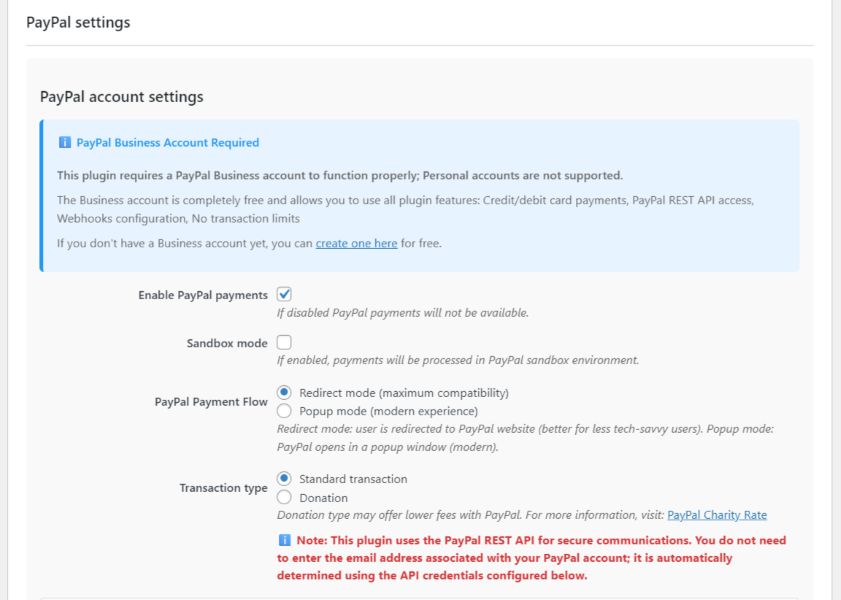
PayPal Business account — FundCollector does not support PayPal Personal accounts. A Business account is completely free and allows you to use all the plugin’s features: credit/debit card payments, access to the PayPal REST API, webhook configuration, and no transaction limits. You can create a Business account on PayPal.
You do not need to type your PayPal email in FundCollector. The REST API identifies your account from the Client ID and Secret you configure.
HTTPS on production — Use a valid SSL certificate on your live site before accepting real payments.
Currency — Set your base currency under FundCollector → Settings → General so it matches what your PayPal account and payment methods support.
PayPal account settings
PayPal general settings
Enable PayPal payments
Turn this on to show PayPal as a payment option on your donation forms. If it is off, donors will not see PayPal even if API credentials are saved.
Sandbox mode
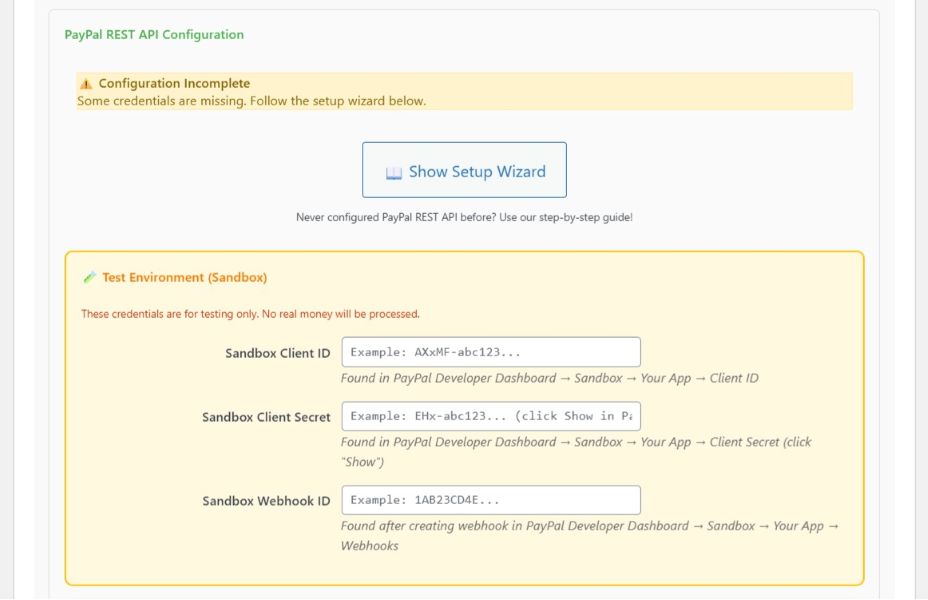
When enabled, FundCollector talks to PayPal’s test (sandbox) environment. No real money moves. The Sandbox version is used for testing and to verify that everything is working properly before using the live version with real payments. To use Sandbox mode, you must fill in the following fields in the “Test Environment (Sandbox)” section: Sandbox Client ID, Sandbox Client Secret, and Sandbox Webhook ID. You can obtain these from the PayPal Developer website, as explained in the following sections of this guide. Before going live, disable Sandbox mode and ensure Live credentials are filled in.
PayPal payment flow
Redirect mode (maximum compatibility) — The donor leaves your site briefly to pay on PayPal, then returns. Best for older browsers and users who block pop-ups.
Popup mode (modern experience) — PayPal opens in a popup over your page. Smoother for many users; requires pop-ups to be allowed for your domain.
Transaction type
Standard transaction — Regular commerce-style capture.
Donation — Eligible organizations may qualify for lower PayPal fees or rates. See PayPal’s Charity rate documentation for eligibility and application details.
PayPal REST API configuration
PayPal Rest API Sandbox
FundCollector needs three values per environment (Sandbox for testing, Live for production): Client ID, Client Secret, and Webhook ID. The same admin screen shows a built-in Setup Wizard; the steps below match that wizard so you can also use this page as a printable checklist.
App name: for example Fundcollector Sandbox (any clear name is fine).
Select your sandbox business (merchant) account.
Under features, enable Accept payments.
Critical: Enable JavaScript SDK v6 for this app. FundCollector relies on it for a secure, compatible checkout flow.
Save the app.
Step 3 — Copy Sandbox credentials
Open your new sandbox app.
Copy the Client ID (visible on the page).
Click Show next to Client Secret and copy it.
Paste them into FundCollector under Test Environment (Sandbox): Sandbox Client ID and Sandbox Client Secret.
Step 4 — Create the Sandbox webhook
Webhooks let PayPal notify your site when a payment capture completes, fails, or is pending. Without a webhook (and its ID in settings), status updates may be delayed or incomplete.
On the same app page, scroll to Webhooks.
Click Add Webhook.
Webhook URL — Use this URL on your public WordPress site (replace YOUR-DOMAIN with your site hostname, no trailing slash):https://YOUR-DOMAIN/wp-admin/admin-post.php?action=fundcollector_paypal_webhook_rest
Event types — Subscribe at minimum to:
PAYMENT.CAPTURE.COMPLETED
PAYMENT.CAPTURE.DENIED
PAYMENT.CAPTURE.PENDING
Save the webhook, then copy the Webhook ID PayPal shows and paste it into Sandbox Webhook ID in FundCollector.
PayPal Rest API Live
Step 5 — Repeat for Live (production)
In the Developer Dashboard, switch to the Live section (not Sandbox).
Create a Live app (for example Fundcollector Live) with the same feature flags: Accept payments and JavaScript SDK v6.
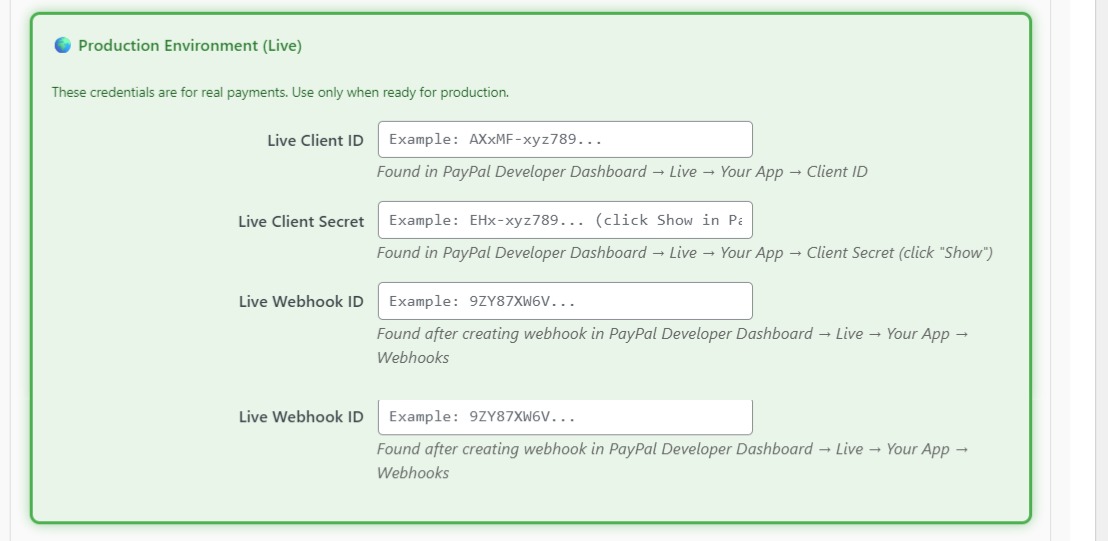
Copy Live Client ID and Live Client Secret into FundCollector under Production Environment (Live).
Add a Live webhook using the same webhook URL pattern on your live domain. Subscribe to the same three event types.
Copy the Live Webhook ID into Live Webhook ID.
When you are ready for real donations, turn off Sandbox mode in FundCollector so Live credentials are used.
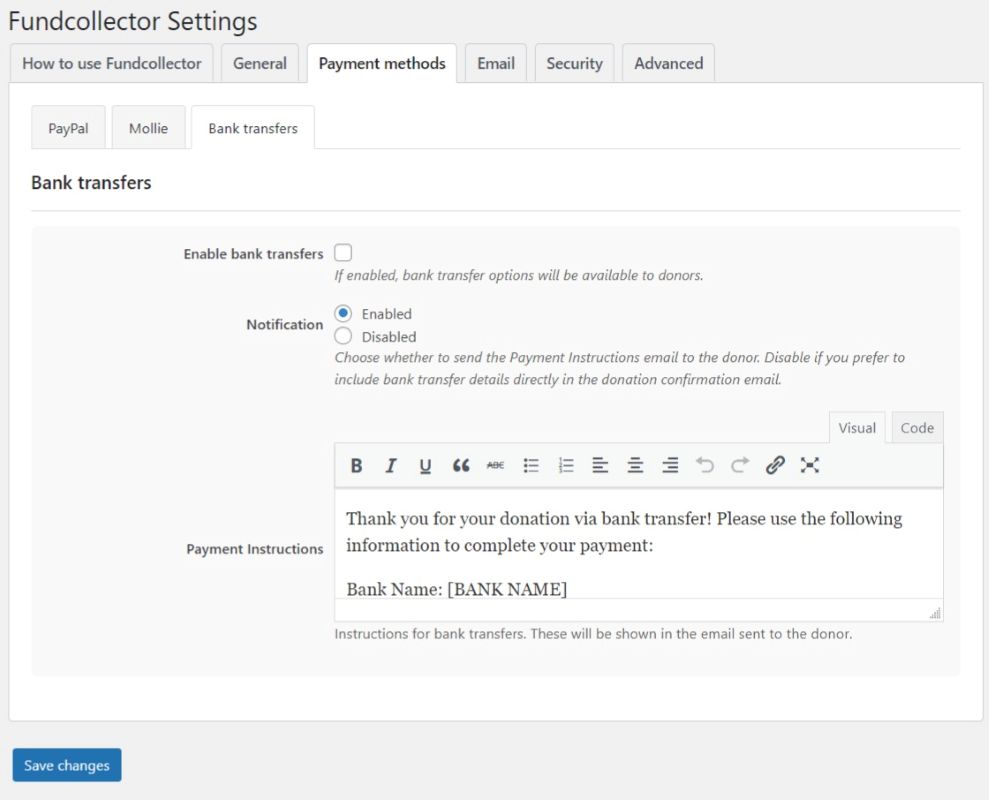
Bank Transfer Settings
Bank Transfer Settings
Bank transfer provides an alternative payment method for donors who prefer traditional banking.
Enable Bank Transfer
Toggle the checkbox to activate this payment option.
Notification
Select whether or not you want to send an email to donors who make payments via bank transfer. This email contains the bank account details needed for the donor to complete the transfer. If you prefer, you can disable this email and include the bank details in the donation confirmation email described later in this guide.
Bank Transfer Instructions
Customize the message donors receive with your banking details. This appears:
On the website after selecting bank transfer
In the confirmation email sent to donors
Template Placeholders: Use these dynamic tags in your instructions:
{donor_name} – Donor’s full name
{donor_email} – Donor’s email address
{donation_amount} – Amount to transfer
{donation_id} – Unique reference number
{form_name} – Name of the donation form used
Example Bank Transfer Instructions:
Thank you for your donation via bank transfer!

         Please transfer {donation_amount} to the following account:

         Bank Name: First National Bank
         Account Holder: Your Organization Name
         IBAN: GB29 NWBK 6016 1331 9268 19
         SWIFT/BIC: NWBKGB2L
         Reference: {donation_id}

         Please use the donation ID as your payment reference so we can match your payment.

         Your donation reference: {donation_id}

         Thank you for your generous support!
Important Notes:
Bank transfer donations are marked as “Manual check” status
You must manually verify payments in your bank account, FundCollector cannot access bank account information to verify whether the payment went through successfully.
Consider sending a final confirmation email after verifying payment
5. Email Notifications Configuration
Email Settings Free version
Navigate to FundCollector → Settings → Email.
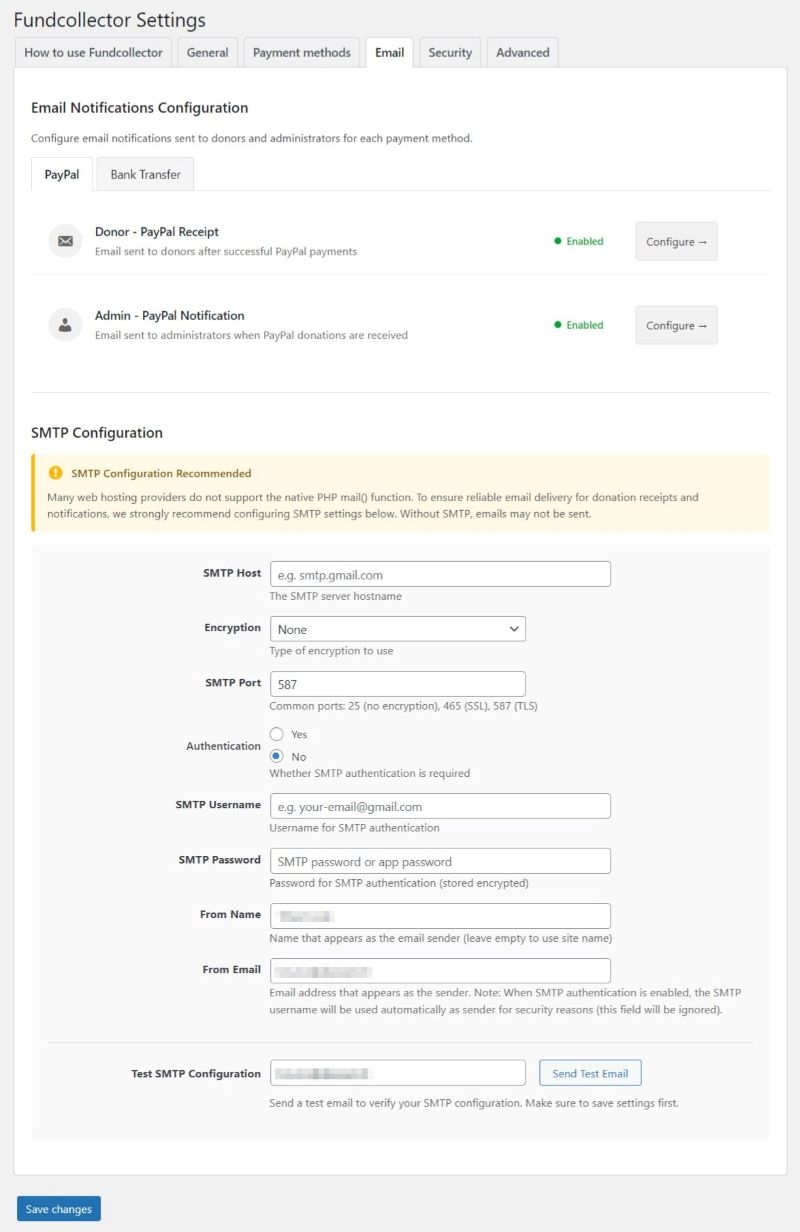
This screen is titled Email Notifications Configuration. It is where you control which emails are sent after donations and what they say, grouped by payment method. A short introduction explains that you configure notifications for donors and administrators for each method.
At the top of the email area you switch between:
PayPal — two entries: Donor – PayPal Receipt (confirmation after a successful PayPal payment) and Admin – PayPal Notification (alert to site staff when a PayPal donation is received). Each row shows an Enabled / Disabled status and a Configure → button.
Bank Transfer — Donor – Bank Transfer Receipt (message with transfer instructions) and Admin – Bank Transfer Notification.
Choosing Configure → opens the detailed editor for that template: you can turn the notification on or off, set the subject, and edit the message in the WordPress editor (including media and formatting where supported). Message bodies can include placeholders (such as donor name, amount, donation ID, form name, date, and site name) so each email is filled in automatically.
SMTP Configuration In this subsection, you can configure the SMTP email protocol. We recommend that you enable SMTP because many web hosting providers do not support the native PHP mail() function. Without SMTP, emails may not be sent. Contact your hosting provider to find out the SMTP settings you need to use. Here you set:
SMTP Host, Encryption (None / SSL / TLS), SMTP Port (with hints for common ports),
Authentication (Yes/No), then SMTP Username and SMTP Password when required,
From Name and From Email for the sender shown to recipients (with the note that when SMTP authentication is on, the authenticated username may be used as the sender for deliverability).
Use Test SMTP Configuration: enter a recipient address and click Send Test Email to verify delivery after saving. Finish with Save changes at the bottom of the settings page.
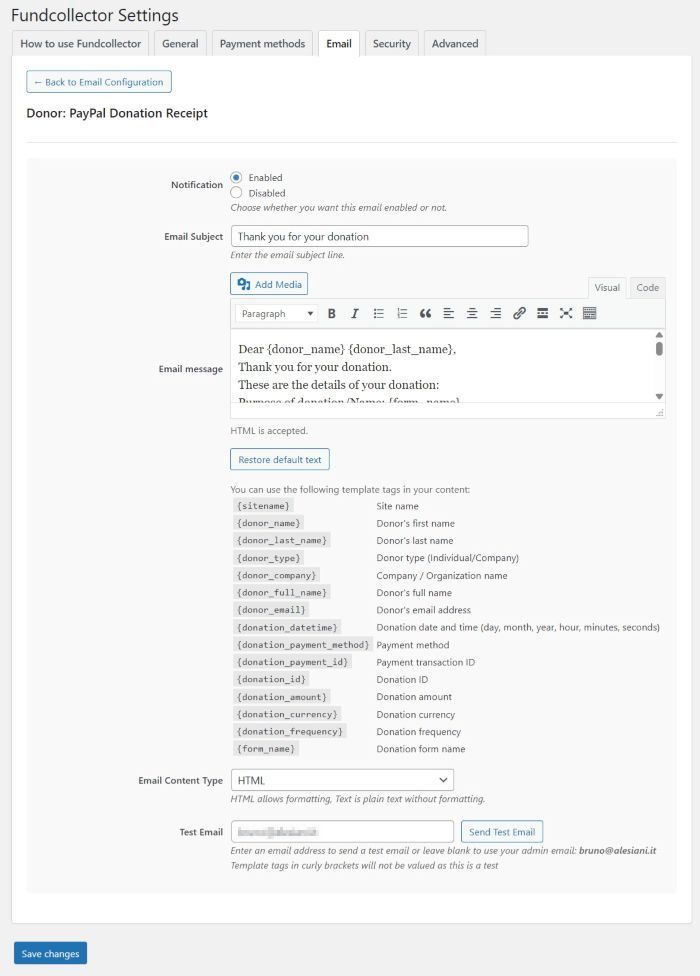
Donor: PayPal Donation Receipt
This screen configures the thank-you / receipt email that FundCollector sends to the donor after a successful PayPal donation.
Navigation Open FundCollector → Settings → Email, choose the PayPal sub-tab, then click Configure → on Donor – PayPal Receipt. Use ← Back to Email Configuration to return to the email overview without losing unsaved work until you save.
Notification Under Notification, choose Enabled or Disabled. When disabled, donors will not receive this receipt email after PayPal payments (the donation can still be recorded normally).
Email Subject Set the subject line donors see in their inbox.
Email message The body is edited with the WordPress visual/HTML editor (toolbar, media where allowed, Quicktags). HTML is supported. You can replace the default wording with your own branding and tone.
Restore default text If you change the message and want to go back to the plugin’s built-in template, use Restore default text. You will be asked to confirm; after restoring, click Save changes on the main settings page to persist.
Template tags Below the editor, an Available template tags reference lists placeholders you can paste into the subject or body (for example site name, donor name, email, amount, payment method, donation ID, form name, date/time). They are replaced automatically when the email is sent.
Saving Scroll to the bottom of Settings and click Save changes so subject, body, and enabled/disabled state are stored. Reliable delivery still depends on your SMTP (or server mail) configuration on the same Email tab.
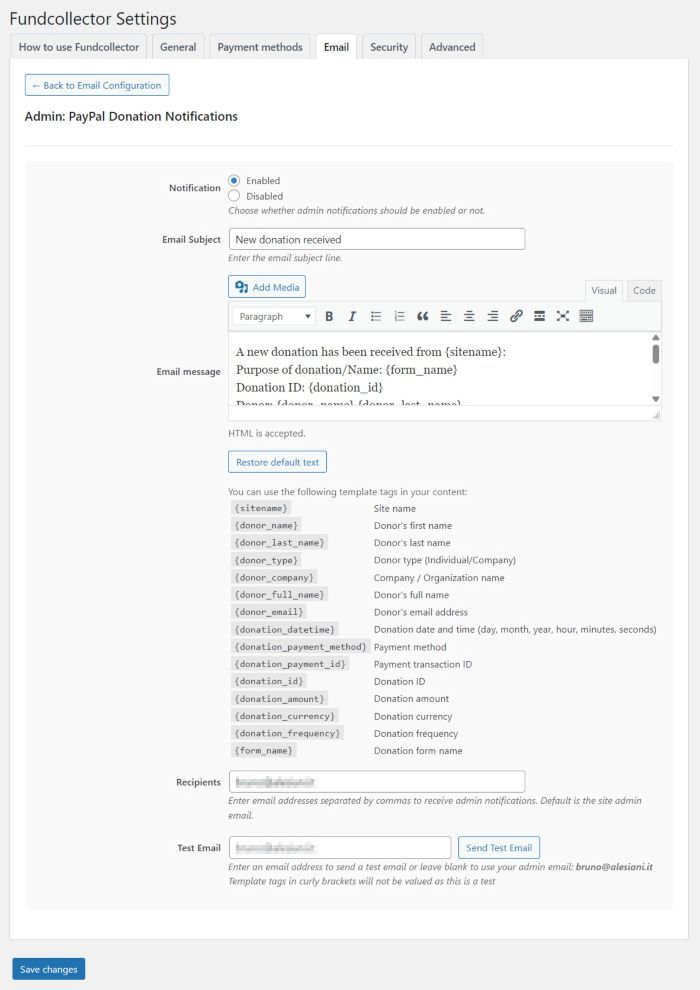
Admin: PayPal Donation Notifications
This screen configures the administrator notification email sent when a PayPal donation is successfully received.
How to open it: Go to FundCollector → Settings → Email, open the PayPal sub-tab, then click Configure → on Admin – PayPal Notification. Use ← Back to Email Configuration to return to the email overview.
Notification — Choose Enabled or Disabled. If disabled, no admin email is sent for PayPal donations.
Email Subject — The subject line shown in the administrator’s inbox.
Email message — The body is edited with the WordPress editor. HTML is allowed. Use Restore default text to reset the template (confirm, then click Save changes on the settings page). The Available template tags section lists placeholders (donor details, amount, donation ID, form name, payment transaction ID, site name, etc.) that are filled when the real email is sent.
Recipients — One or more email addresses separated by commas. The default is the WordPress site admin email.
Test Email — Enter an address in the field (or leave it empty to use the site admin email, shown in the help text) and click Send Test Email. This sends a real message through your mail setup so you can confirm delivery (SMTP, spam filters, etc.). Template tags in curly brackets are not filled in for this test—they appear as literal placeholders, because no live donation record is used.
Click Save changes at the bottom of FundCollector Settings to store your changes. For reliable delivery, configure SMTP on the same Email tab if needed.
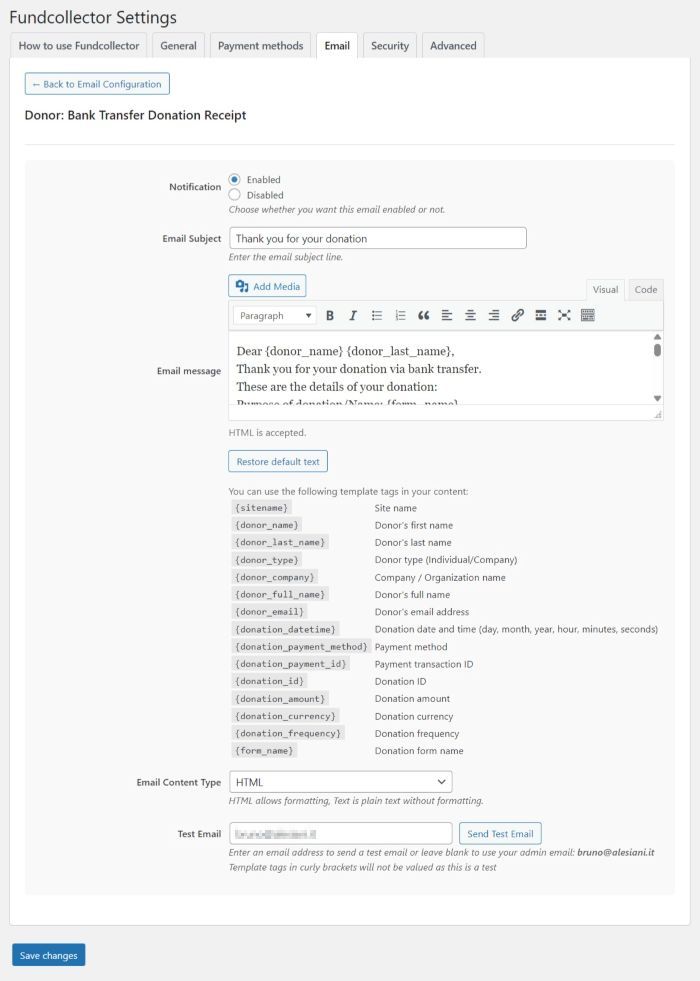
Donor: Bank Transfer Donation Receipt
Email Settings for Bank Transfer Donation Receipt
This screen configures the email sent to donors after they choose bank transfer as the payment method. Open it from FundCollector → Settings → Email, choose the Bank Transfer sub-tab, then open Donor: Bank Transfer Donation Receipt. Use Back to Email Configuration to return to the email overview.
Notification Choose Enabled or Disabled to turn this receipt on or off. When it is disabled, donors do not receive this message (real donations still follow your other settings).
Email Subject Single line for the subject. The default is a “thank you for your donation” style subject (localized when the site language is not English).
Email message The body is edited with the WordPress editor (visual/HTML, quick tags, optional media). HTML is accepted. The built-in default text thanks the donor for choosing bank transfer, summarizes donation details (form name, donation ID, donor, email, payment method, amount with a note that the amount is to be verified on the bank account, date/time), and reminds them to complete the donation using the bank transfer instructions sent in a separate email.
Restore default text Replaces the current message with the plugin default after confirmation. You must still click Save changes on the main settings page to persist it.
Available template tags A reference table lists placeholders such as {sitename}, {donor_name}, {donor_last_name}, {donor_full_name}, {donor_type}, {donor_company}, {donor_email}, {donation_datetime}, {donation_amount}, {donation_payment_method}, {donation_payment_id}, {donation_id}, {form_name}, and {site_url}. They are replaced with real values when the email is sent for an actual donation.
Email Content Type HTML (default) sends formatted content; Text sends plain text without HTML formatting.
Test Email Enter an address in the field (or leave it empty to use the site admin email, shown in the help text) and click Send Test Email. This sends a real message through your mail setup so you can confirm delivery (SMTP, spam filters, etc.). Template tags in curly brackets are not filled in for this test—they appear as literal placeholders, because no live donation record is used.
Remember to save plugin settings after editing subject, body, content type, or notification state.
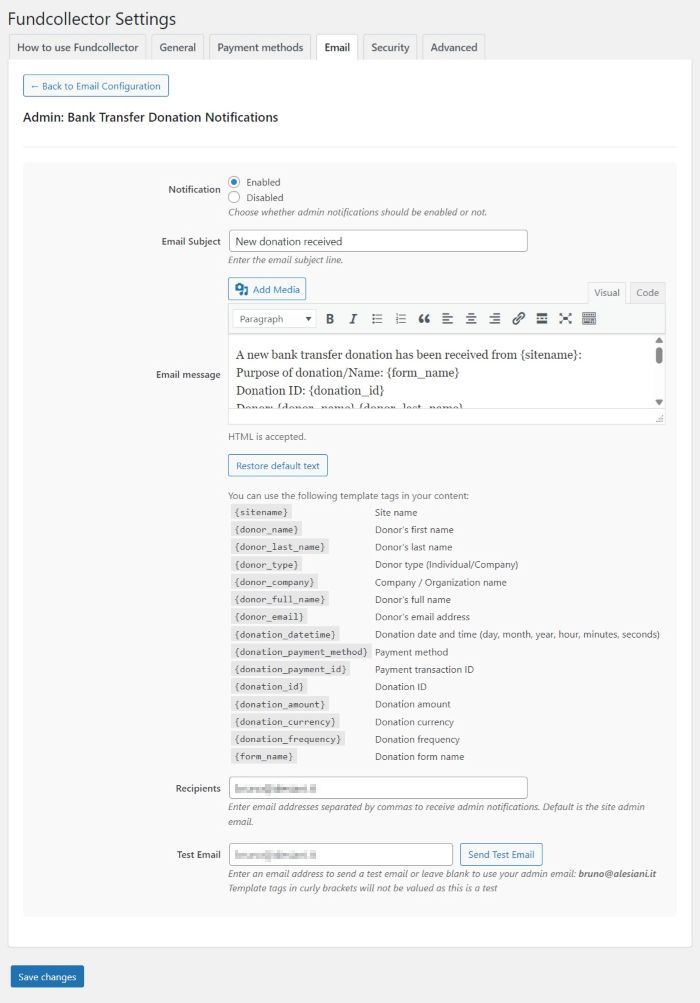
Admin: Bank Transfer Donation Notifications
Email Settings for Bank Transfer Admin Notification
This screen configures the email sent to site staff when someone submits a donation using bank transfer. Open it from FundCollector → Settings → Email, select the Bank Transfer sub-tab, then open Admin: Bank Transfer Donation Notifications. Use Back to Email Configuration to return to the email overview.
Notification Use Enabled or Disabled to turn these admin alerts on or off. When disabled, no admin notification is sent for new bank-transfer donations (other payment methods use their own admin templates).
Email Subject Sets the subject line. The default is a “new donation received” style subject (localized when the site language is not English).
Email message The body is edited with the WordPress editor (visual/HTML, quick tags, optional media). HTML is accepted. The default text announces that a new bank transfer donation was received, includes key details (form name, donation ID, donor name, email, payment method, amount with a note that the amount is to be verified on the bank account, date/time), and states that the donor has been given bank transfer instructions to complete payment.
Restore default text After confirmation, replaces the current message with the plugin default. Click Save changes on the settings page to keep the change.
Available template tags The reference lists placeholders such as {sitename}, {donor_name}, {donor_last_name}, {donor_full_name}, {donor_type}, {donor_company}, {donor_email}, {donation_datetime}, {donation_amount}, {donation_payment_method}, {donation_payment_id}, {donation_id}, {form_name}, and {site_url}. They are replaced with real data when the email is sent for an actual donation.
Recipients One or more addresses separated by commas. By default this is the WordPress site admin email. Use this to notify finance staff, a shared inbox, or multiple people.
Test Email Enter an address (or leave the field empty to use the admin email shown in the help text) and click Send Test Email. This sends a real message so you can verify SMTP/delivery. Curly-bracket template tags are not replaced in test mode—they stay as literal text because no live donation is attached.
Save the FundCollector settings after changing notification state, subject, body, or recipients.
6. Security Settings
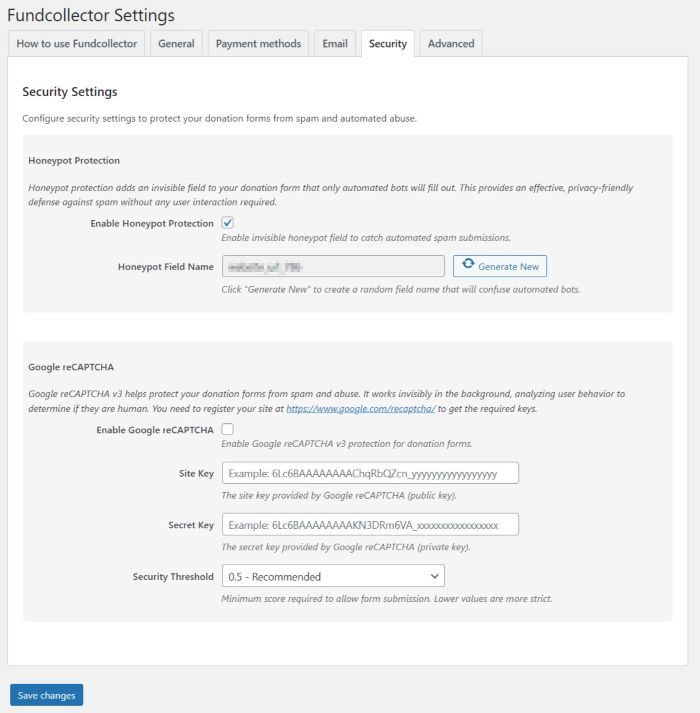
Security Settings
Open FundCollector → Settings in your WordPress admin and click the Security tab. This screen is where you reduce spam and automated abuse on your donation forms. You can use honeypot protection alone, Google reCAPTCHA v3 alone, or both together for a stronger setup.
Honeypot Protection
Honeypot protection adds a hidden field to the form that real visitors do not see or fill in; simple bots often fill every field and get caught. It does not ask donors to solve puzzles and is privacy-friendly.
Enable Honeypot Protection — Turn the invisible honeypot field on or off.
Honeypot Field Name — The name of that hidden field (shown read-only). Use Generate New to rotate a random name from time to time so predictable bots have a harder time adapting.
Google reCAPTCHA
FundCollector uses Google reCAPTCHA v3, which runs in the background and scores how likely the visitor is human—no checkbox challenge for most users. You must create a v3 site in the Google reCAPTCHA console and add the keys here.
Enable Google reCAPTCHA — Activates reCAPTCHA on donation forms.
Site Key — Public key from Google (safe to use in the browser).
Secret Key — Private key; keep it confidential.
Security Threshold — Minimum score (0.0–1.0) required to accept a submission. Lower means stricter:
0.3 – Very strict — Fewer bots get through; some real users might occasionally be blocked on strict sites.
0.5 – Recommended — Balanced default for many sites.
0.7 – Moderate and 0.9 – Permissive — More submissions allowed; use if you see false positives with stricter values.
Admin notice
If neither honeypot nor reCAPTCHA is enabled, the plugin can show a Security Warning stating that no anti-spam protection is active and that forms may receive automated spam. Enabling at least one method clears that concern.
Extra layer: Keep honeypot enabled and add reCAPTCHA v3 with the Recommended threshold, then adjust if donors report issues or spam persists.
After any change, scroll down and click Save Changes (same as the rest of FundCollector settings).
7. Advanced Settings
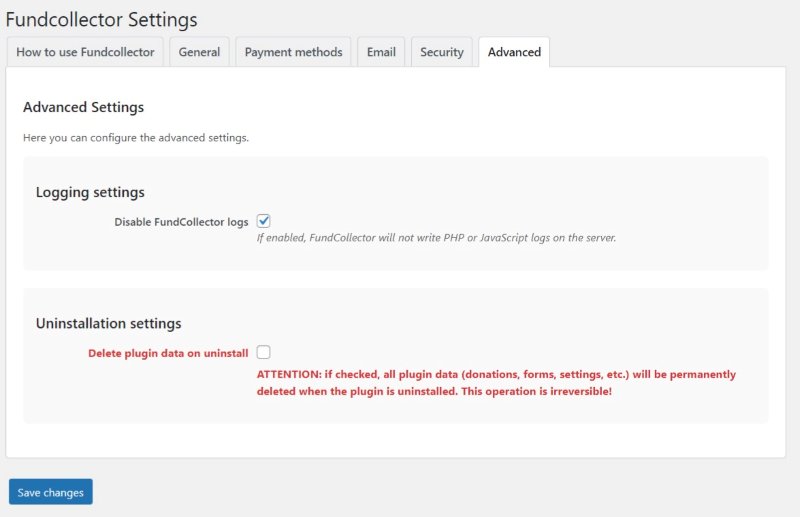
Advanced Settings
Go to FundCollector → Settings and open the Advanced tab. This area is for options that affect logging on the server and what happens when the plugin is removed. Use it when you need to reduce disk writes or when you explicitly want FundCollector to clean up all its data on uninstall.
Logging settings
FundCollector can write diagnostic logs (PHP and JavaScript) to help troubleshoot issues. In normal operation you usually leave logging enabled so support or developers can inspect problems if something goes wrong.
Disable FundCollector logs — When this is checked, FundCollector stops writing PHP and JavaScript logs on the server. Note: Disabling logs does not fix underlying errors; it only stops recording them. Enable this only if you have a clear reason (for example, strict hosting policies or you are sure you do not need file-based logs).
Uninstallation settings
This option controls whether FundCollector removes all of its own data when you uninstall the plugin from WordPress (not when you merely deactivate it).
Delete plugin data on uninstall: If checked, uninstalling the plugin will permanently delete plugin-related data such as donations, forms, settings, and related records. This operation is irreversible! Recommendation: Leave this unchecked unless you are deliberately wiping the site of FundCollector data (for example, before removing the plugin forever on a test install). For production sites, keep it off so an accidental uninstall does not erase your donation history.
After changing any option, click Save changes at the bottom of the settings screen (same as for other FundCollector tabs).
8. How to create a new donation form
This guide explains how to create and configure donation forms in WordPress with FundCollector.
Overview
FundCollector stores each donation layout as a form. Every form has:
A Form ID used in the shortcode.
Its own fields (what donors see and what is required).
Design options (width, colours, typography).
A shortcode such as [fundcollector_donation_form id=your_id] to embed the form on pages or posts.
You can use the built-in Default donation form to speed up the process, or create additional forms for different campaigns or pages.
Open the Forms screen
Log in to the WordPress admin (/wp-admin/).
In the left-hand menu, open FundCollector.
Click Forms.
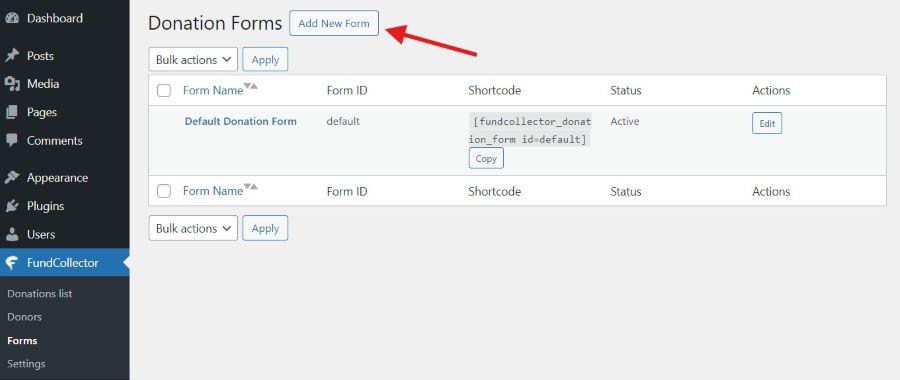
You should see the Donation Forms screen: page title Donation Forms and (when forms exist) a table of forms.
Add new form (Free version)
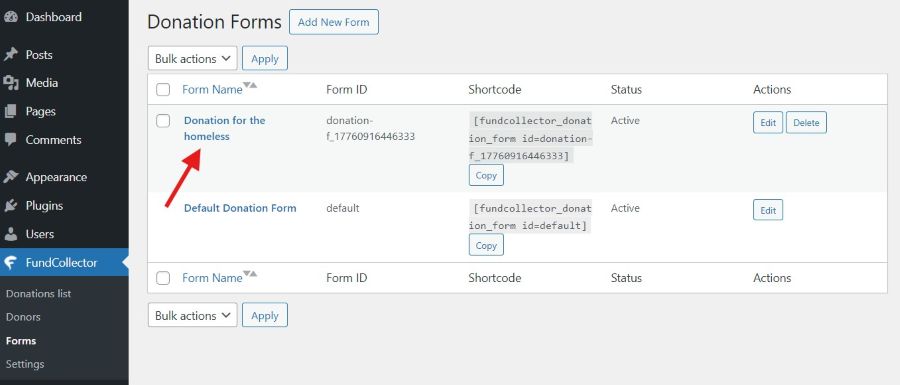
Donation Forms list (existing forms)
When at least one form exists, the list shows:
Form Name (sortable; click the column header to switch sort order — a tooltip explains the next sort).
Form ID — internal identifier used in the shortcode.
Shortcode — the exact embed code; a Copy button copies it to the clipboard.
Status — Active or Inactive.
Actions — Edit; Delete for custom forms (subject to the rules in Managing forms below).
Above the table:
Add New Form (next to the page title).
Bulk actions — select multiple forms, choose Delete, then Apply (the default form cannot be selected).
Create a new form
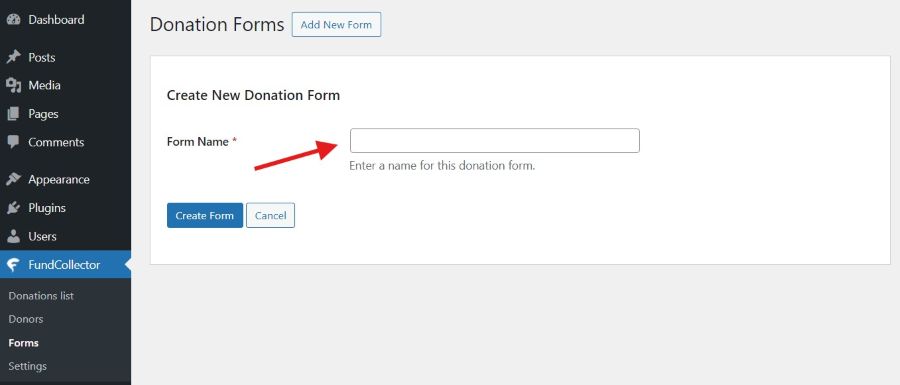
Click Add New Form (or Create Your First Form on the empty state).
The Create New Donation Form panel appears.
Enter a Form Name (required). This name mainly helps you recognize the form in the admin; you can set the public-facing title separately in the editor (Purpose of donation / Name).
Click Create Form to save, or Cancel to return to the list without creating.
After creation, WordPress opens the form editor for the new form.
Add new form name (Free version)
Form editor — header, shortcode, and navigation
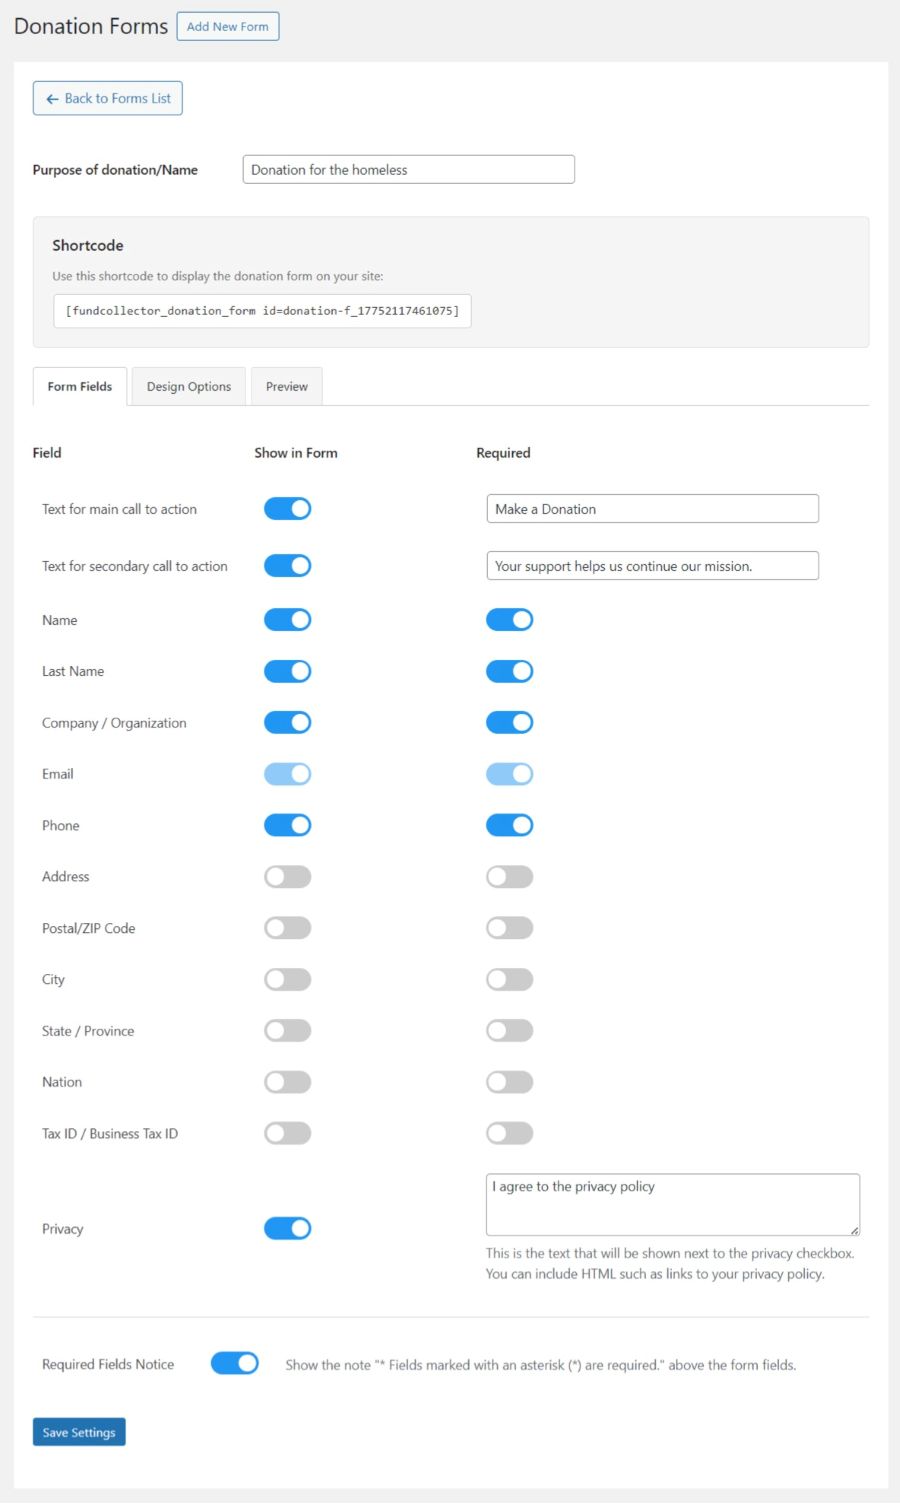
At the top of the editor:
Donation Forms title and Add New Form (same as list screen).
Back to Forms List — returns to the table.
Purpose of donation / Name — text field; this is the public-facing title or context for donors (align it with your campaign copy).
Shortcode — read-only box with the exact shortcode, e.g. [fundcollector_donation_form id=abc123].
Default form: the built-in form uses id=default. You can embed it with [fundcollector_donation_form id=default] or, for the default only, [fundcollector_donation_form] with no id attribute.
Donation Forms List
Tab: Form Fields
Three tabs appear: Form Fields, Design Options, Preview. Open Form Fields first.
Calls to action
Text for main call to action — toggle Show in Form; set the headline text (default idea: “Make a Donation”).
Text for secondary call to action — optional supporting line under the title.
Donor fields
A table lists fields such as Name, Last Name, Company / Organization, Email, Phone, Address, and address-related fields, Tax ID, and more.
For each row:
Show in Form — include or hide the field.
Required — donor must fill the field before submitting.
Email is always shown and required (you cannot turn it off).
Privacy
Privacy — toggle visibility; edit the privacy text in the textarea. You may use HTML (for example a link to your privacy policy page). This text appears next to the privacy consent checkbox on the front end.
Required fields notice
Below the main field table, Required Fields Notice toggles whether the form shows the standard note that asterisk-marked fields are required.
New Donation Form Settings
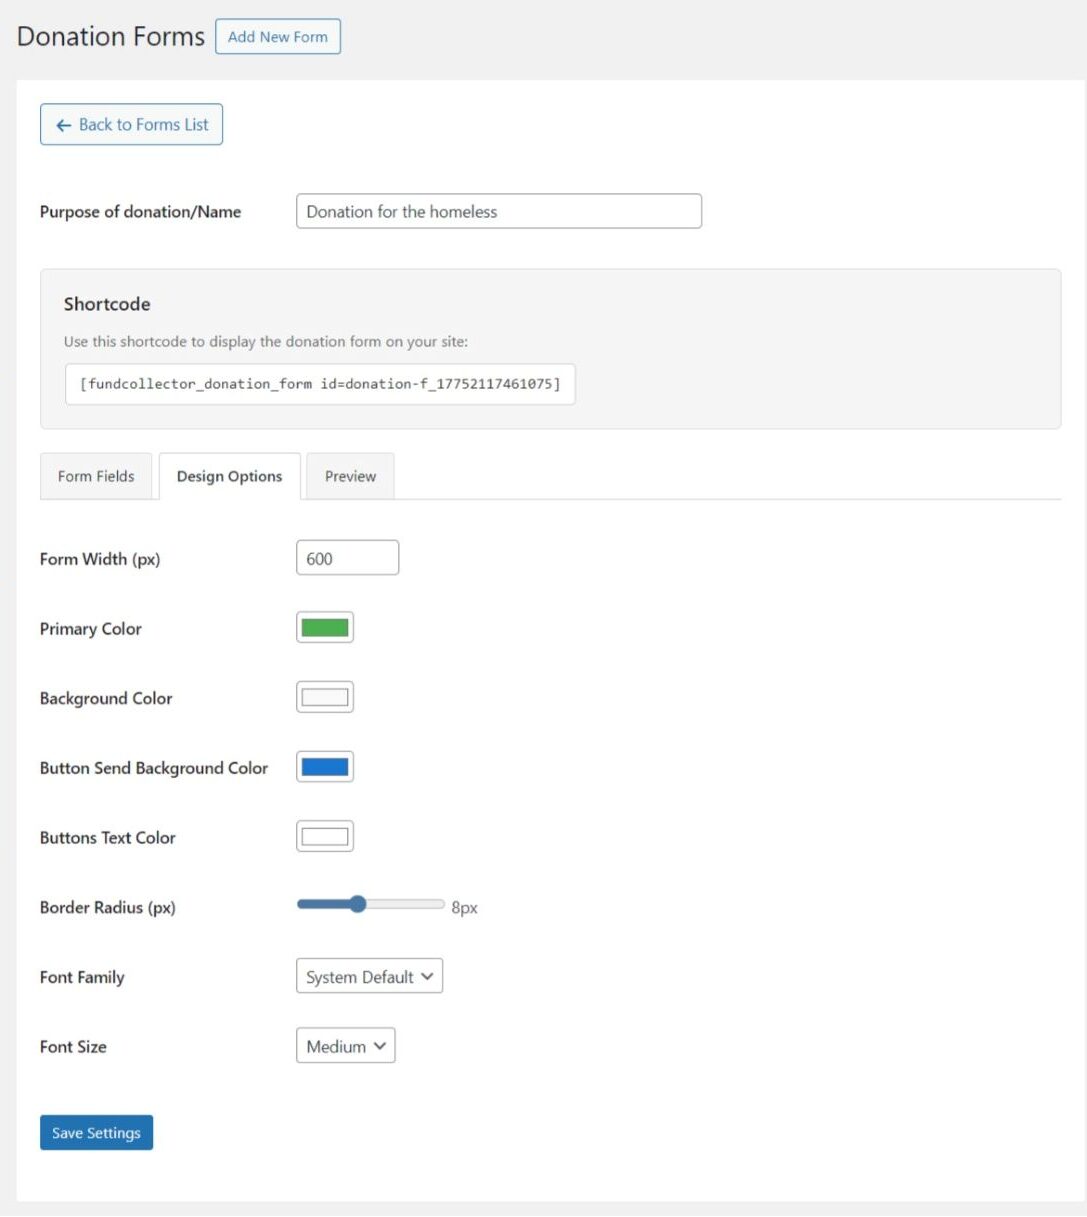
Tab: Design Options
Use Design Options to align the form with your theme:
Form Width (px) — between 300 and 1200.
Primary Color — accent for amounts and highlights.
Background Color — form panel background.
Button Send Background Color and Buttons Text Color — main donate button.
Border Radius (px) — slider with live value.
Font Family — e.g. System Default, Arial, Verdana, Helvetica, Roboto.
Font Size — Small / Medium / Large.
Design New Donation Form
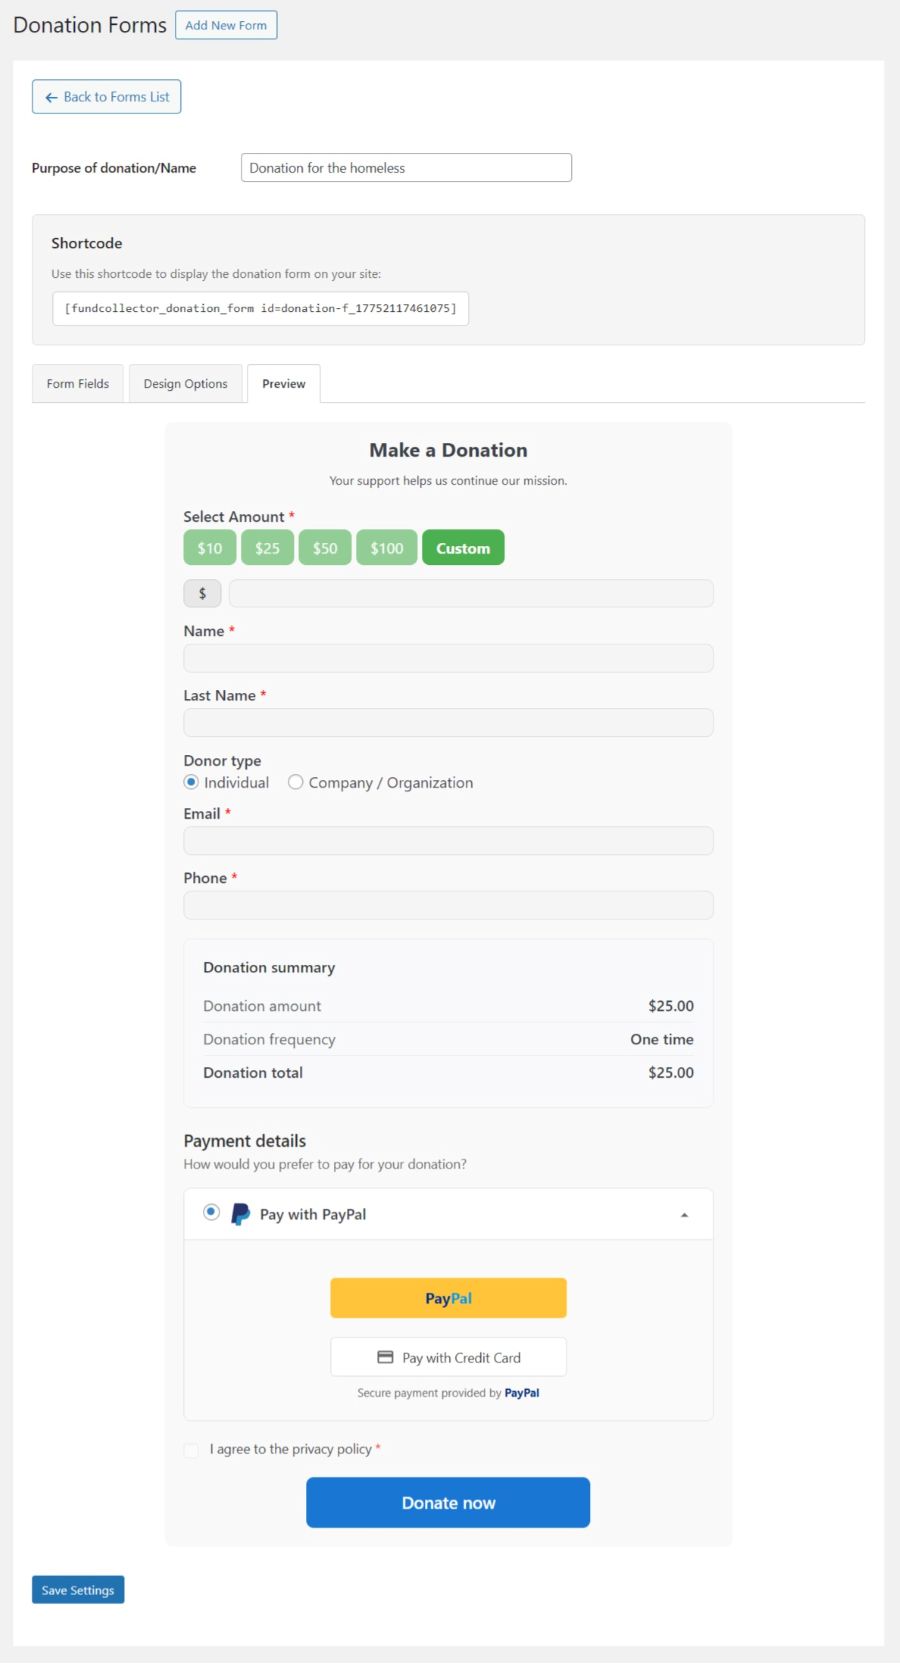
Tab: Preview
Preview renders an approximate version of the form inside the admin, including:
Title and secondary text.
Amount buttons and custom amount area.
Visible donor fields and donation summary.
Payment details reflecting enabled payment methods in plugin settings (PayPal and/or bank transfer).
Privacy checkbox (if enabled).
Donate now button (disabled in preview).
If no payment method is enabled, a warning appears instead — enable at least one method under FundCollector → Settings before expecting a full preview.
New Donation Form Preview
Save
Click Save Settings at the bottom of the editor. On success, a green admin notice confirms that form settings were saved.
Embed the form on the site
You can place the same form on many pages. Use the Donation Form block in the Gutenberg Block Editor (recommended), or paste the shortcode if you prefer the classic approach.
Block Editor (Gutenberg)
Open the page or post where you want the form (or create a new one).
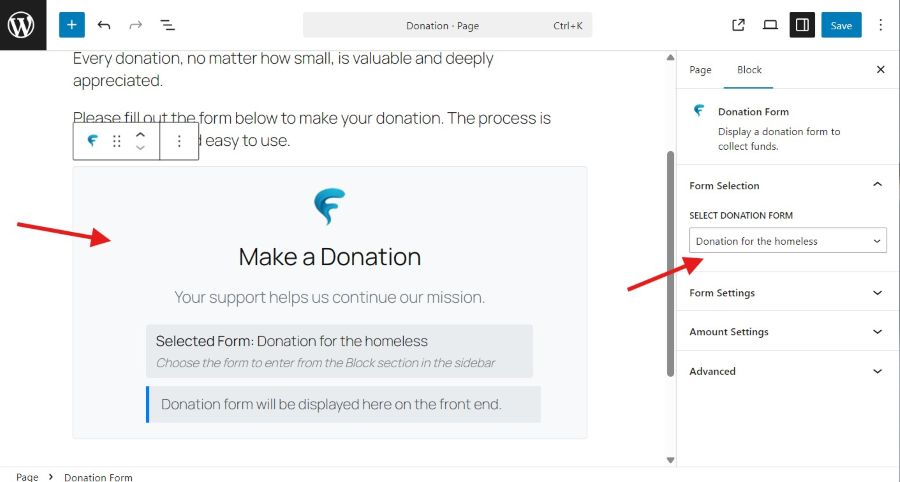
Add a block: click + and search for Donation Form, or open the Fundcollector block category and choose Donation Form.
Click the block in the editor canvas so it is selected.
In the right-hand sidebar, make sure you are on the Block panel (icon with two sliders), not the Page/Post document panel.
Open the Form Selection section (it is expanded by default). In Select Donation Form, pick the form you want from the dropdown. The list uses the same names as FundCollector → Forms.
If you choose an inactive form, the sidebar shows a warning that it will not appear on the front end—set the form to Active under Forms or pick another form.
Click Save or Update, then view the page on the front end to confirm the donation form loads.
The Form Settings section in the same sidebar (collapsed by default) lets you change text and amount options for this block only (for example title, description, suggested amounts). Which form is loaded—and its fields and colours—still comes from Form Selection and FundCollector → Forms; many sites only adjust Select Donation Form and leave Form Settings as they are.
Embedded form in page or post
Shortcode (alternative)
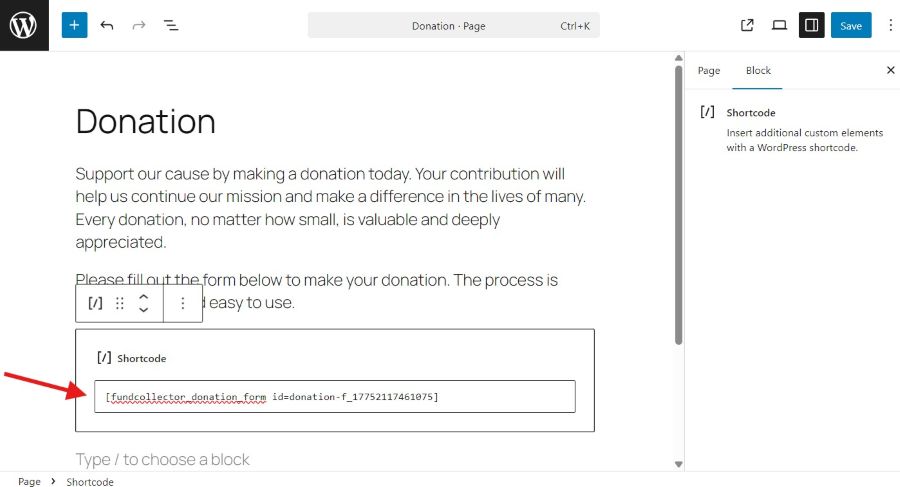
Copy the shortcode from FundCollector → Forms (Copy next to the shortcode) or from the form editor.
In the Block Editor (Gutenberg), add a Shortcode block (or use the Classic Editor / a shortcode-ready widget) and paste the shortcode, e.g. [fundcollector_donation_form id=your_form_id].
Front end
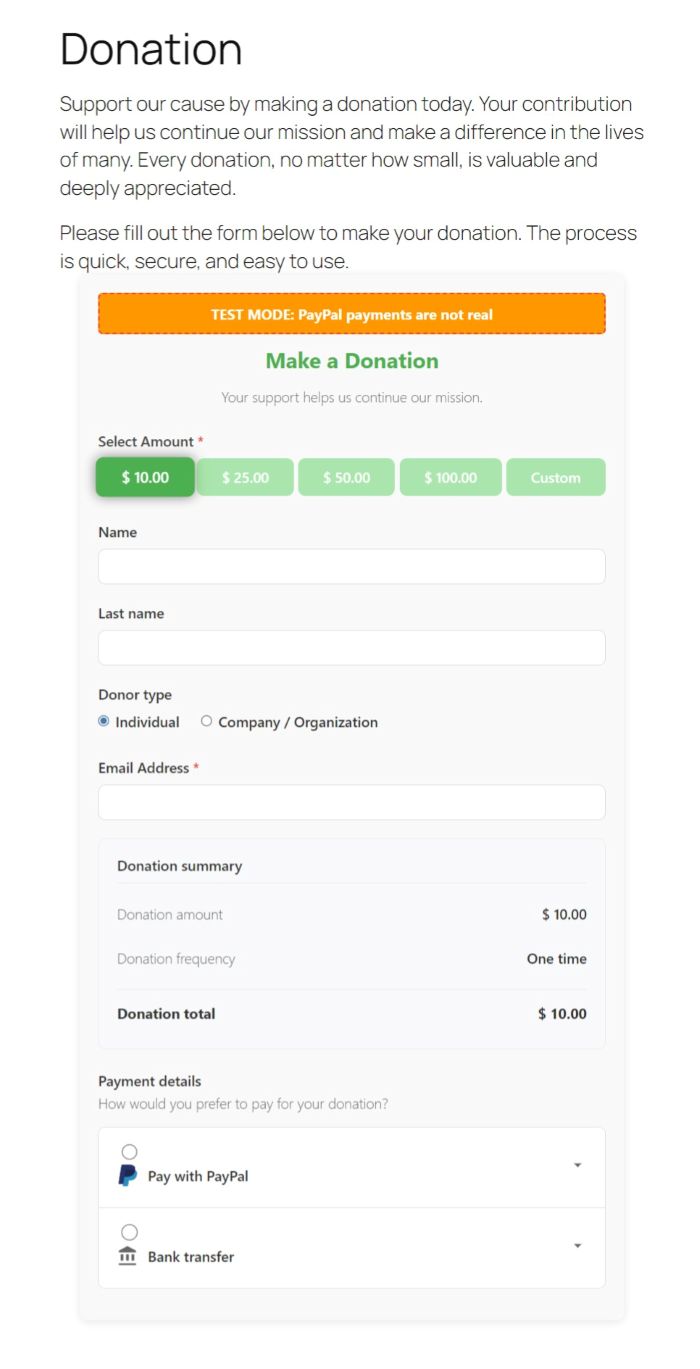
After saving the page or post, visitors see the real donation form on the public site.
Form in frontend
Related settings
Payment methods (PayPal and bank transfer) are configured under FundCollector → Settings, not on the form screen. The Preview tab reflects what is enabled globally.
Currency and other global options also affect how amounts and symbols appear.
9. Donations Management
Donations List
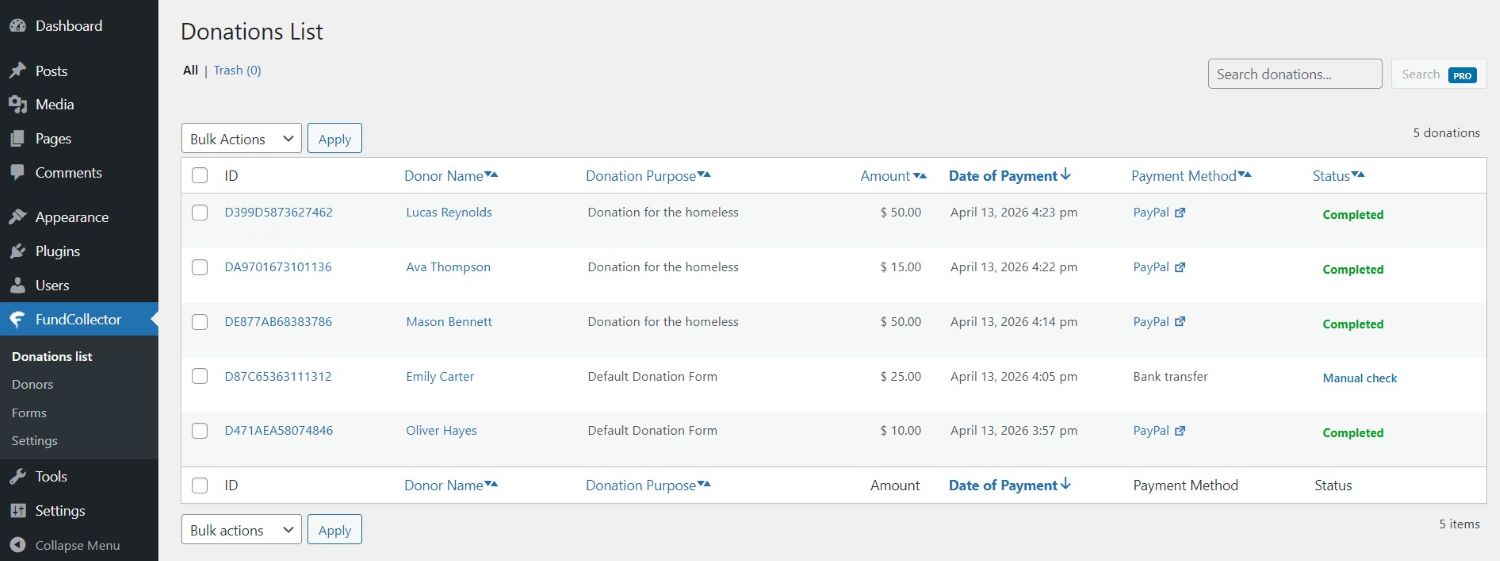
The Donations List is the main operational view for donations stored in the plugin database. Each row is one donation record. From here you can:
Review donor, amount, purpose, payment method, and status.
Open a Donation Details modal without leaving the page.
Trash or restore donations (soft delete: records stay in the database but are hidden from the default list).
Use bulk actions to trash or restore many rows at once.
Only users with the manage_options capability (typically Administrators) can access this screen.
Open the Donations List
Log in to the WordPress admin (/wp-admin/).
In the left-hand menu, click FundCollector (the plugin uses this menu as the top-level entry; the first submenu item is Donations list).
You land on FundCollector → Donations list (admin.php?page=fundcollector-donations-list).
Donations List
The donations table
Below is a description of the table columns:
Columns
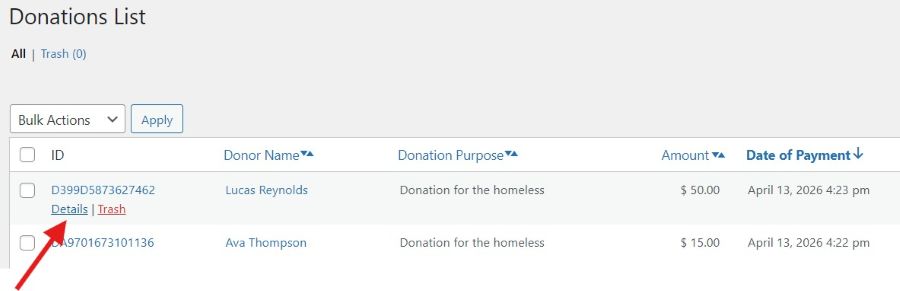
ID: The donation identification code donation ID (clickable). Under it: Details, Trash or Restore.
Donor Name: Full name. If the donation is linked to a donor record, the name links to FundCollector → Donors (donor detail). If empty, the UI shows Anonymous.
Donation Purpose: Form name / purpose of the donation text.
Amount: Formatted with your currency symbol and decimal / thousands settings from Settings → Currency & Location (accounting-style: symbol + formatted number).
Date of Payment: Shown in the site’s configured timezone/locale via the plugin’s date utilities.
Payment Method: e.g. Bank transfer or PayPal. For PayPal, when a gateway payment ID exists, the label is a link that opens the provider’s dashboard for that payment (sandbox vs live PayPal follows your PayPal test mode setting).
Status: Colour-coded payment status (e.g. Completed, Pending, Failed, Cancelled, Expired, Refunded, Declined). Bank transfer donations are labelled Manual check in the list because the transaction must be verified by a person in the bank account. Trashed rows can show a struck-through Trashed state when viewed in context.
Sorting
Click a sortable column header to change order. Active sort is indicated by bold header text and an arrow icon. Sorting resets to page 1 when you change column or direction.
Row actions
Details (modal)
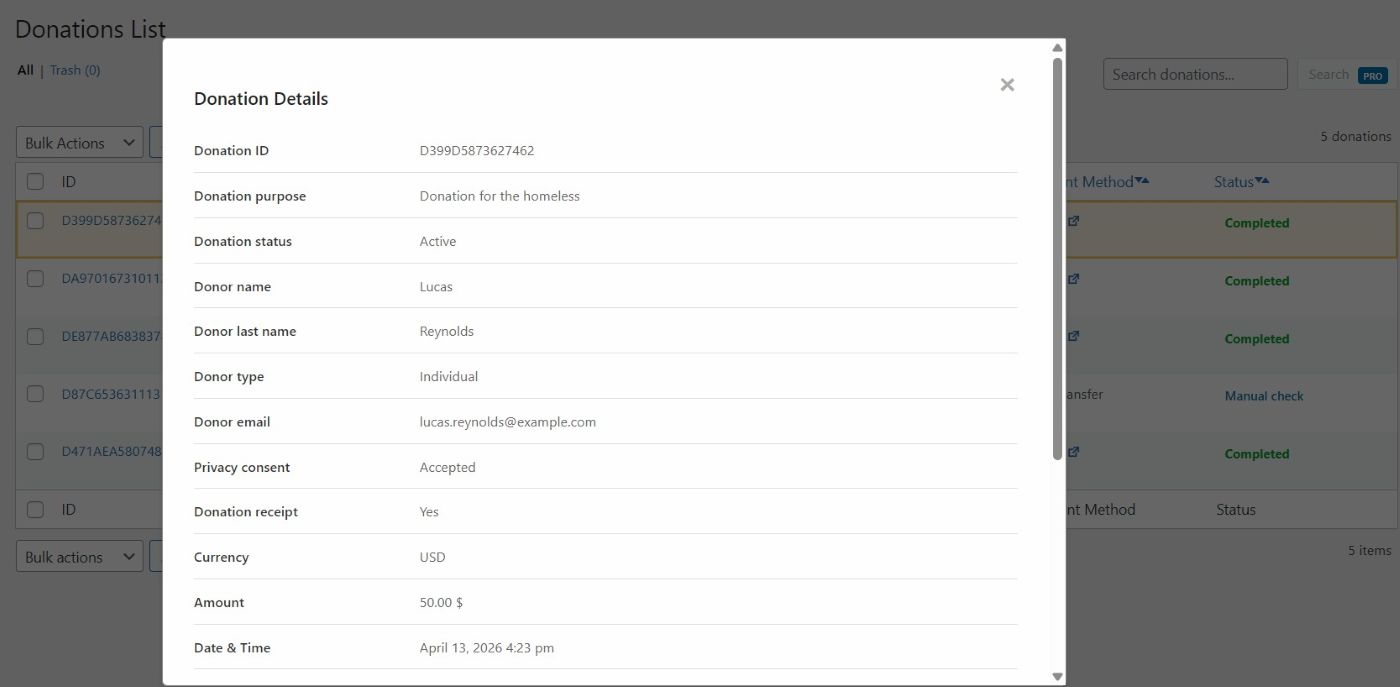
Click the donation ID or Details to open Donation Details in a modal. Content is loaded via AJAX. Close with ×, clicking the backdrop, or the Escape key.
The modal lists fields in a fixed order, with values formatted for readability. Typical sections include:
Donation ID, purpose, donation status (including trashed)
Payment method, PayPal transaction type (PayPal only), Payment ID, payment status
Payer name / email when supplied by the gateway
Empty values appear as --. In the admin, manage_options users see the full detail set for each donation.
Donations List DetailsDonations Details Popup
Trash
Clicking the Trash link marks the donation as “in the trash”; it is no longer visible in the list but has not been permanently deleted from the database—it has been moved to the Trash page, which can be accessed via the link at the top of the Donation List page. Donations in the trash can be restored using the Restore link located below each donation in the trash.
Which donations appear in the list?
The list is not limited to “completed only”. It includes donations whose payment status is among:
This helps you audit abandoned checkouts and gateway outcomes.
10. Donors Management
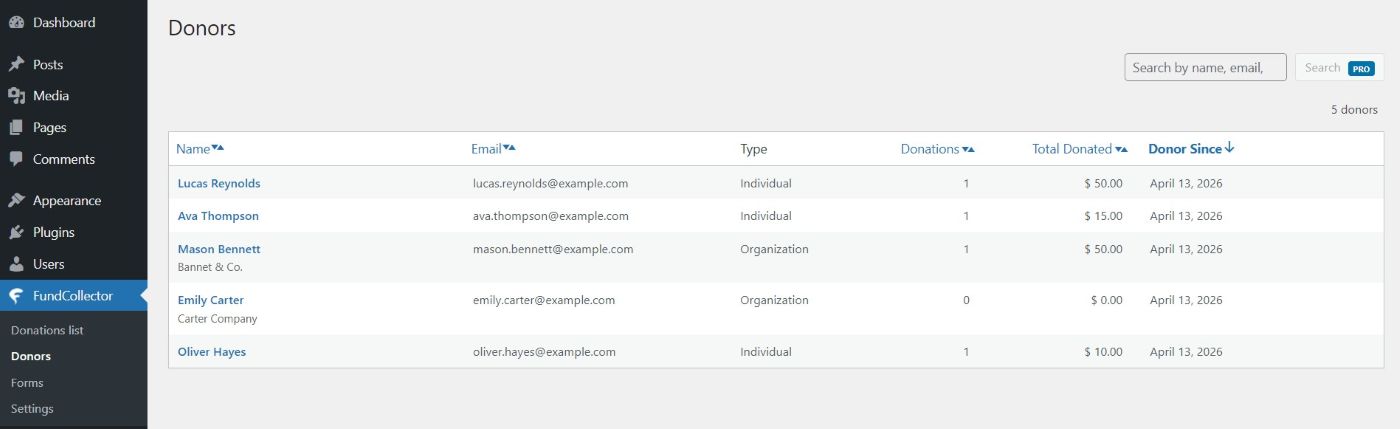
Now let’s describe the Donors screen in the WordPress admin for FundCollector. It is a people-centric view: each row is one donor profile built from donations, so you can see who supports your campaigns, how often they give, and how much (where the plugin can measure it).
Overview
On Donors you can:
Browse everyone the plugin recognizes as a donor, with paging when the list is long.
Sort several columns to bring the most relevant donors to the top.
Open a donor’s detail page to see contact-style information and their recent donations.
You need access to FundCollector in the dashboard (normally Administrators) to open this screen.
Open the Donors page
Log in to your site’s WordPress admin.
In the left menu, open FundCollector.
Click Donors.
You will land on FundCollector → Donors (admin.php?page=fundcollector-donors).
Donors List
Sorting
Several column titles work as sort links. Click a title to change the order; click again to flip direction. The active column is shown more prominently and a small arrow icon indicates the direction.
You can sort by:
Name — alphabetical order (A→Z or Z→A).
Email — alphabetical order by address.
Donations — by the number of donations recorded for that donor (low to high or high to low).
Total donated — by the sum of amounts the plugin uses for that donor (low to high or high to low). Currency symbol and number formatting follow your Settings → Currency & location choices.
Donor since — by when the donor record was first created (newest first or oldest first).
Changing sort usually sends you back to page 1 of the list.
Type (Individual vs Organization) is shown for each row but is not a sortable heading.
What each row shows
Think of each row as one donor. The pieces of information are:
Name — the donor’s name and surname as stored by the plugin. The name is a link: click it to open that donor’s detail page. If a company name exists, it may appear on a second line under the person’s name. If no name was saved, the list may show a friendly “no name” placeholder.
Email — the email address on file.
Type — either Individual or Organization, depending on how the donor was recorded.
Donations — how many donation records are tied to this donor (a simple count).
Total donated — the running total the plugin associates with this donor, formatted with your currency settings.
Donor since — the date (and related time display rules) when this donor profile was created. If that date is missing, the cell may show a dash.
If nobody matches the current filters or search, you see a clear empty message.
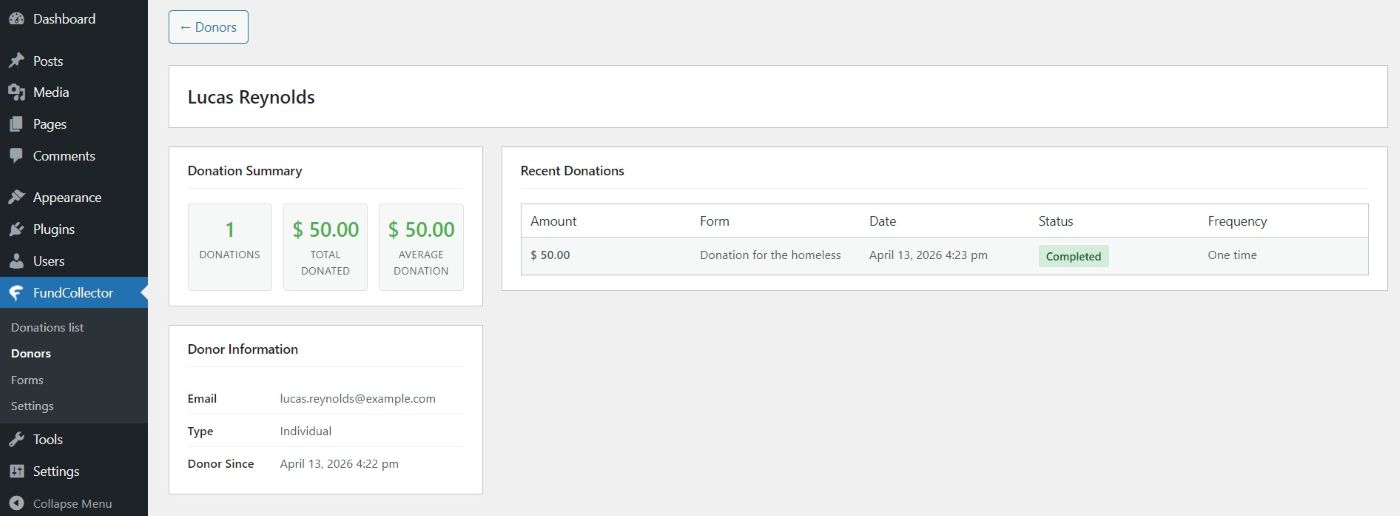
Donor detail page
When you click a donor’s name, you leave the list and open a detail view for that person or organization.
At the top, a back style link returns you to the Donors list.
The donor’s name appears as the main heading.
Donor details page
Donation summary (left side)
A compact Donation summary area highlights:
Donations — again, the count of donations.
Total donated — the same kind of total as on the list, with your currency formatting.
Average donation — the total divided by the count (or zero when there are no donations).
If this donor has bank transfer donations, an extra figure may show how many of those there are. In that case a short note explains that bank transfer amounts are not included in the totals above, so the numbers stay honest when some gifts are still manual or outside automatic totals.
Donor information (left side)
Donor information lists what the plugin knows, such as:
Email
Type (Individual or Organization)
Organization name (only when it exists)
Phone (only when saved)
Address (only when any address parts exist — street, postal code, city, region, country are combined into one readable line)
Tax ID (only when saved)
Donor since — creation time of the donor record, with more detail than the list if your settings show date and time together.
Fields that were never filled in simply do not appear as extra rows.
Recent donations (right side)
The Recent donations block lists this donor’s gifts in a table-like layout. For each donation you typically see:
Amount — with the correct currency symbol when a per-donation currency exists.
Form — the purpose or form name tied to the donation, or a dash when nothing is set.
Date — date and time in the site’s usual WordPress date/time format.
Status — a readable payment status (the same family of labels you know from the donations list, including special wording for bank transfer when relevant).
If there are no donations at all for this donor, a short message says so.
11. Next Steps
Congratulations! Your donation system is now configured and ready to accept donations.
Recommended Next Steps
1. Testing Phase
Make a test donation via PayPal Sandbox mode
Verify all emails are received correctly
Test bank transfer flow
Try forms on mobile devices
Check donations appear in the admin panel correctly
Test with different browsers
2. Before Going Live
Switch PayPal to Live mode and enter live API keys
Make a small real donation to verify end-to-end flow
Configure SMTP for reliable email delivery
Set up Google reCAPTCHA for your production domain
Review all email templates for accuracy
3. Launch & Promote
Add donation form to key pages
Create dedicated donation landing page
Announce to your community
Share on social media
Include in email newsletter
Add to website navigation menu
4. Ongoing Management
Check donations daily
Verify bank transfers weekly
Respond to donor questions promptly
Keep plugin updated
Common Troubleshooting
PayPal Issues:
Donations not appearing: Verify your PayPal webhook is configured correctly. Check the PayPal Developer Dashboard for webhook delivery logs.
Payment fails: Verify currency compatibility with your PayPal account
Test mode not working: Confirm you are using Sandbox credentials
Email Issues:
Emails not arriving: Configure SMTP settings
Emails in spam: Use SMTP with proper SPF/DKIM records
Form Issues:
Form not displaying: Check shortcode/block configuration