

Payment methods
How to Set Up PayPal Donations on WordPress (Step by Step)
PayPal is the most widely recognized payment method for online donations. Most donors already have an account or trust the PayPal checkout experience. Setting it up on WordPress involves a few steps beyond simply entering an email address: you need the right account type, API credentials, sandbox testing and a donation plugin that handles the workflow correctly. The configuration steps below use FundCollector, a WordPress donation plugin, as the example. This guide walks through each step.
PayPal Personal vs PayPal Business: which one to use
To receive donations through a WordPress plugin, you need a PayPal Business account. A Personal account does not give you access to the API credentials required for plugin integrations, and it may have receiving limits that Personal accounts cannot lift easily.
A PayPal Business account is free to open. If you already have a Personal account associated with your email address, you can upgrade it to Business in the PayPal account settings. You do not need a registered company to open a Business account. Nonprofits, associations and individuals can all use one.
After upgrading or creating the Business account, verify it by linking a bank account. Unverified accounts have lower transaction limits and may delay donation withdrawals.
Getting your PayPal API credentials
WordPress donation plugins that integrate with PayPal properly use the PayPal REST API rather than the older NVP/SOAP API. The credentials you need are a Client ID and a Secret, which you obtain from the PayPal Developer dashboard.
To get them:
- Log in at developer.paypal.com with your Business account.
- Go to Apps & Credentials.
- You will see two sections: Sandbox (for testing) and Live (for real payments). Each has its own set of credentials.
- Create or select an app in each section to see the Client ID and Secret.
- Copy both values. You will paste them into your WordPress plugin settings.
Keep your Live Secret confidential. Do not paste it into public documents or commit it to version control. It gives access to your PayPal account.
Configuring PayPal in your WordPress donation plugin
With FundCollector, PayPal configuration is in the plugin’s Settings panel inside WordPress Admin. You enter the Sandbox Client ID and Secret for testing, and the Live Client ID and Secret for production. A toggle switches between modes so you can test without processing real payments.
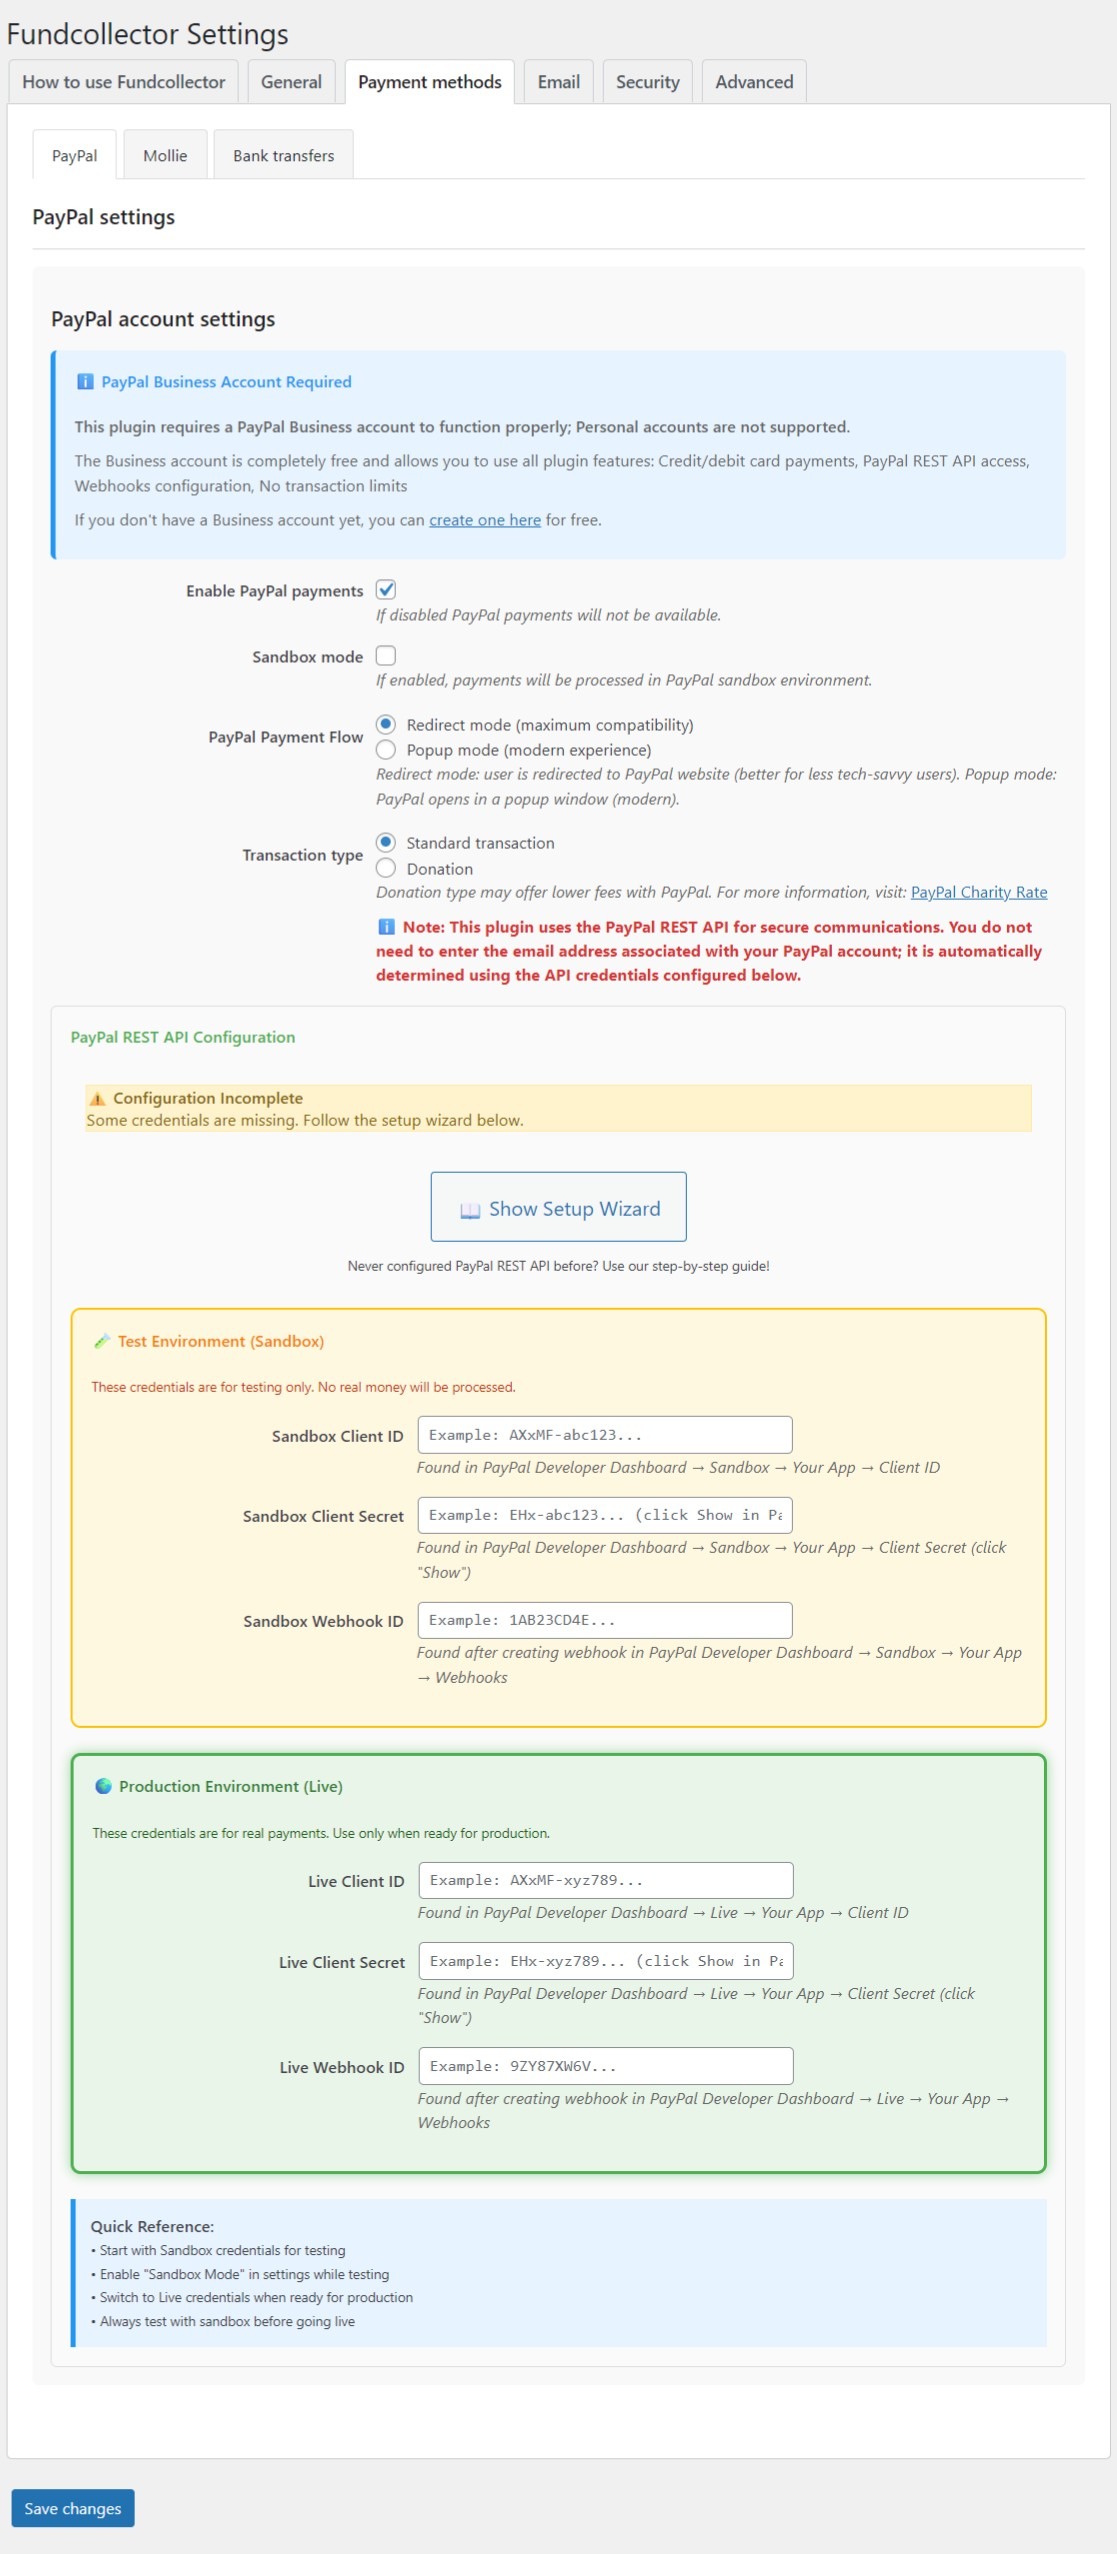
After saving the credentials, the donation form automatically shows PayPal as a payment option. Donors click the PayPal button, complete the payment on the PayPal checkout page and are returned to your site for the confirmation screen.
If you are using a different donation plugin, the configuration location varies, but the principle is the same: find the PayPal settings, enter the credentials for both sandbox and live environments, and save.
Testing with PayPal Sandbox
PayPal Sandbox is a simulated environment where you can test the full payment flow without using real money. Testing before going live is not optional – it is how you confirm that donation amounts are transmitted correctly, confirmation emails are sent, and donor records are created in your WordPress dashboard.
To test with Sandbox:
- Enable Sandbox mode in your plugin settings.
- Go to developer.paypal.com and find the Sandbox test accounts (under Accounts in the left menu). PayPal creates two by default: a Business account (the receiver) and a Personal account (the buyer).
- Open your donation form and submit a test donation. When the PayPal checkout opens, log in with the Sandbox Personal account credentials.
- Complete the payment and verify that you are returned to your site with a confirmation message.
- Check your WordPress donation dashboard to confirm the record was created with the correct amount, donor name and status.
Run at least two or three test donations, including one with a custom amount and one with a preset amount, to cover the common cases.
Going live and checking the first real donation
Once sandbox testing passes, switch the plugin to Live mode by entering your Live Client ID and Secret. Do one final check before announcing the donation page publicly: make a small real donation yourself (even one unit of your currency) to confirm the live credentials work and the real PayPal checkout loads correctly.
After the first real donation, verify:
- The donation record appears in your WordPress dashboard with the correct status.
- The donor received a confirmation email from your site.
- The transaction appears in your PayPal Business account under Recent Activity.
If any of these three are missing, there is a configuration issue to resolve before directing donors to the page.